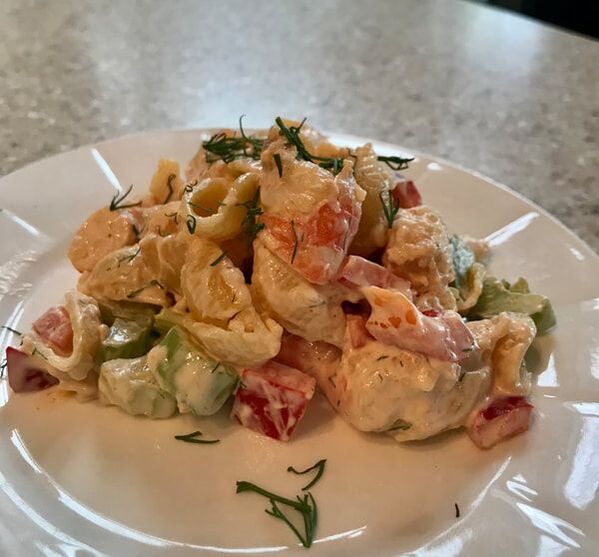
 Shrimp Pasta Salad is so light and delicious with a creaminess and freshness that will keep you coming back for more.
Food that is simple, quick, and delicious is number one on my summertime playlist. I'm one of those people that loves to be outside when the weather is warm. Granted, heat in the 90s and above may require some indoor activities and that's when I create my simple dishes. I use ingredients that I love to cook and create with; after all, that's the point...wouldn't you agree? If you're going to enjoy food, then enjoy food. Cook for yourself. Realistically... There are probably more in your household than you alone, and considering their likes and dislikes is ideal. That's why is important to find the freshest and most tasty ingredients. I'm sure many of you enjoy eating seafood pasta salads. Oftentimes, I'll go to the local deli and order a single serving of the good stuff. However, this 'good stuff' may cost almost as much as it would cost to make eight servings. That said, with the rising cost of food and crazy gas prices, I decided, out of necessity and a good 'ole craving, to make my own. The idea came to me out of my love for shrimp and cocktail sauce. Is there nothing better on a hot, summer day than dipping ice-cold shrimp in a spicy cocktail sauce? I say not. Here's the recipe. Hope you enjoy it. I loved it so much that I licked the bowl clean and turned around and made it again. Ingredients: One pound of large shrimp (If you don't want the smell in your house, have the fish market boil it for you at very little cost and in minutes. If not, buy the shrimp boil and boil at home). Small pasta shells (I use gluten-free and found a delicious brand Ancient Harvest) One cup of mayonnaise plus 2 Tablespoons Two T. Dijon mustard 2 T. Worcestershire sauce Dash of hot sauce Squeeze of lemon Whole red pepper Three stalks of celery 1/4 cup of fresh dill Directions: Boil and peel shrimp. If large, cut and slice in half or thirds, depending on how large. You still want it chunky. Set aside. Boil the pasta according to the directions on the box. Place in a colander and run cool water over all the shells. Add to the shrimp. Mix together the mayo, mustard, Worcestershire sauce, hot sauce, lemon, and dill. Add the sliced red pepper and celery. Add the shrimp and pasta. Stir. Chill. Serve with a few dill leaves sprinkled on top. FRESH!!
0 Comments
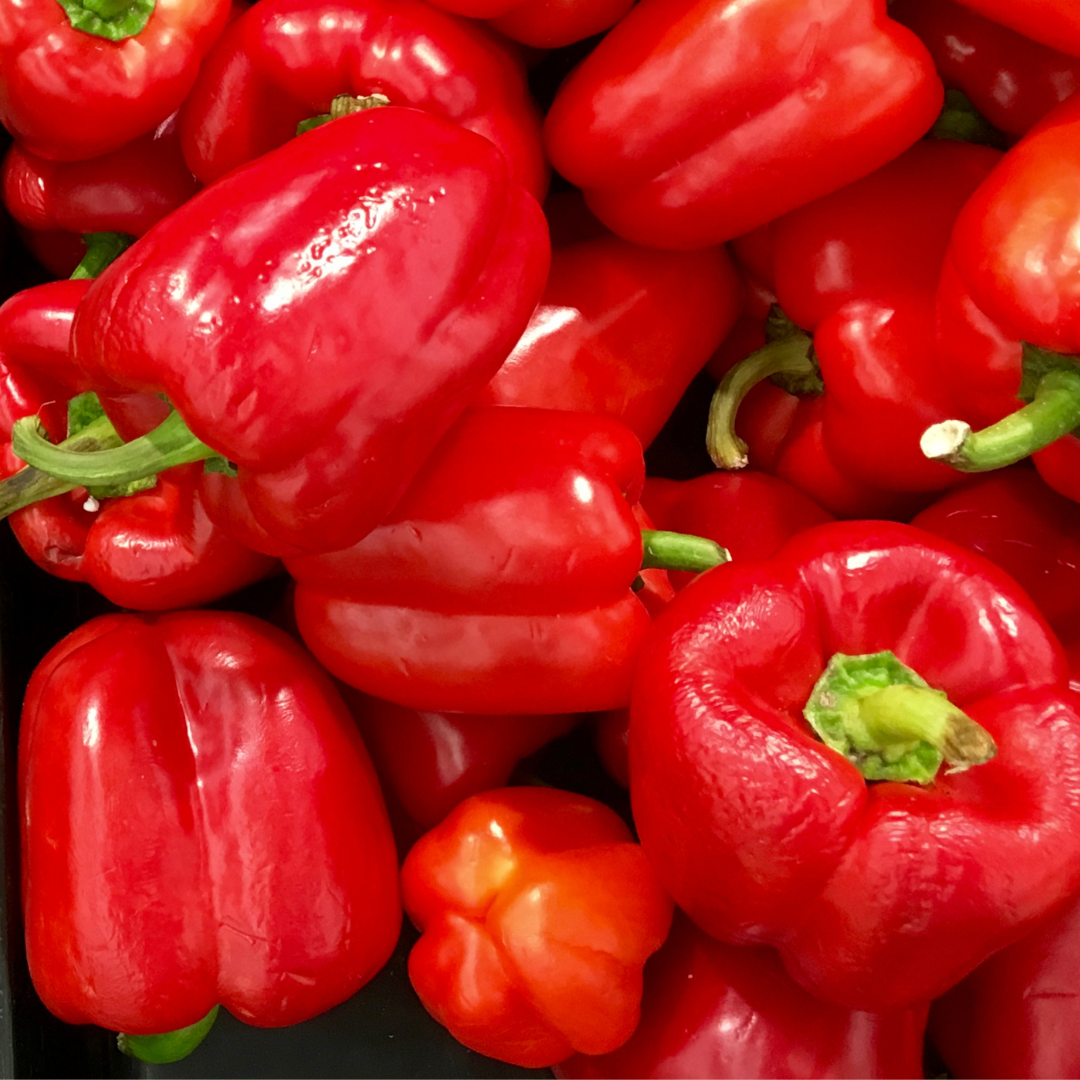
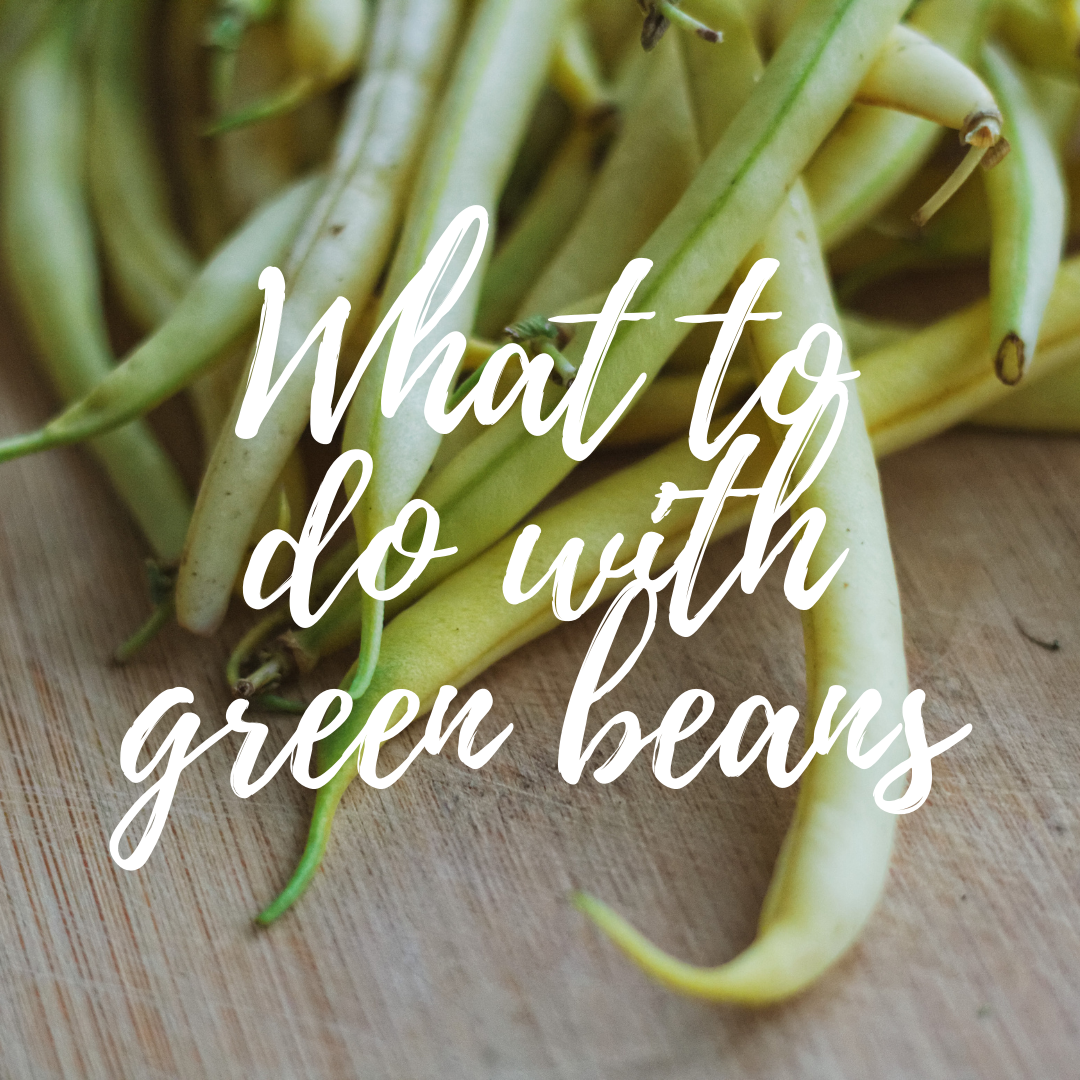 Fresh, organic, canned, frozen green beans...a favorite anytime of year. After taking note of a social media post about 'what to do with green beans', I started recording all of the various green bean recipes FB friends were suggesting for Thanksgiving. Surprisingly, most weren't weighted down with heavy sauces, creams, and soups but were made with few ingredients and for the most part, healthy. That's a 180 degree turn from the 70's when casseroles were all the rage. It was during this era, a Campbell's Soup Company employee, Dorcas Reilly, created the green bean casserole. She decided 'the bean' was boring and needed a flavor boost. So, she dumped a can of cream of mushroom soup in with 'the bean' and viola, a new holiday favorite was conceived. In case you're unfamiliar with the recipe...here it is: One large can of string beans (drained and rinsed) then poured into a square or rectangular glass dish. Add four to five pats of butter and heat through in a 350 degree oven until the butter melts. Add a can of cream of mushroom soup and spread over the beans. Top with the French's fried onions and bake until golden brown. Make sure you look for the bubbly soup 'doing its thing' along the side of the pan. Did you know that green beans didn't make the cut for the traditional Thanksgiving meal until the 19th century? I can't imagine not having the green, go-to vegetable on the holiday table. In fact, the first recorded Thanksgiving, more likely than not, had turkey, along with other fowl, pumpkin (not pie), potatoes, nuts, herbs, and grains. How did the first Thanksgiving gathering come about? Governor William Bradford organized the feast in 1621 commemorating the Pilgrim's first successful corn harvest. He invited members of the colonies and Native American allies. Since those early days, we've come full circle with vegetables. We're getting back to our traditional roots by eating whole foods like the early American settlers. Check out the recipes recorded in the comments of the social media post mentioned earlier. Mexican Green Beans: Cut raw bacon into one inch squares. Cook in a frying pan on high heat for 3 - 4 minutes or desired crispness. Add a can of drained jalapeno/carrot mix (jalapenos in escabeche - located in the Mexican food section) and cook for two minutes. Add a can of drained and rinsed green beans and cook until the beans are heated through. 'Take it up a notch' Green Bean Casserole: Start with wild mushrooms sautéed in olive oil. Once browned, add one tbsp. of butter and flour. Stir in a cup or so of black garlic infused cream (substitute with roasted garlic and a few drops of balsamic vinegar), then pour over trimmed - blanched French green beans. Season to taste with salt and pepper. Mix in French's fried onions and bake at 350 degrees for 20 minutes. Top with a few more fried onions the final few minutes until golden brown.
Chinese Green Beans: Deep fried green beans smothered in black bean sauce.
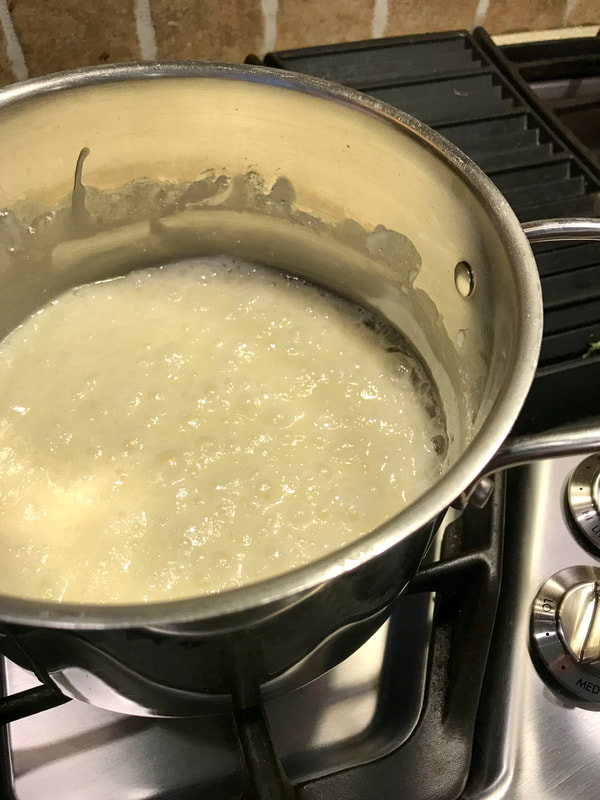
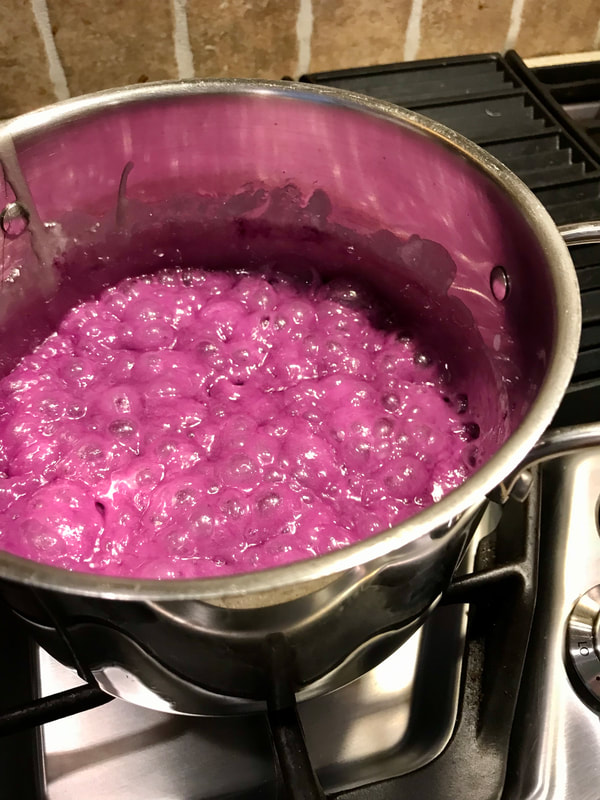
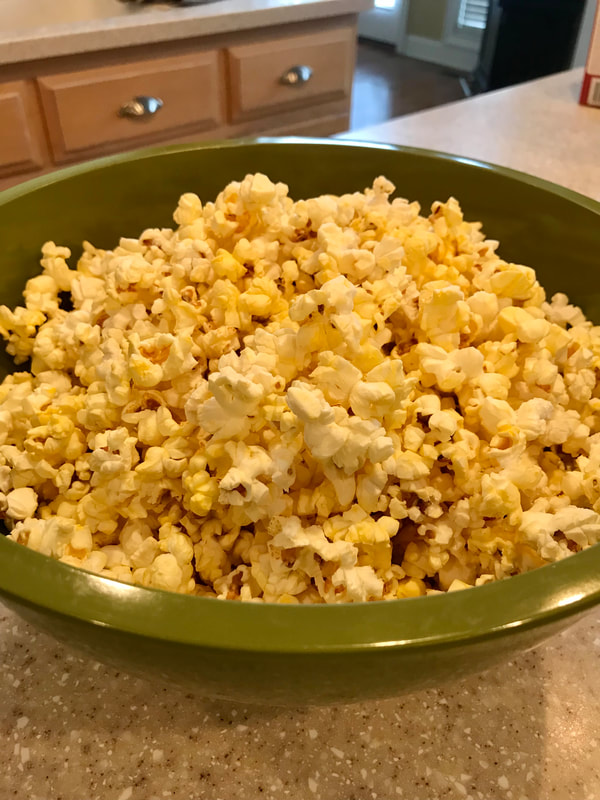
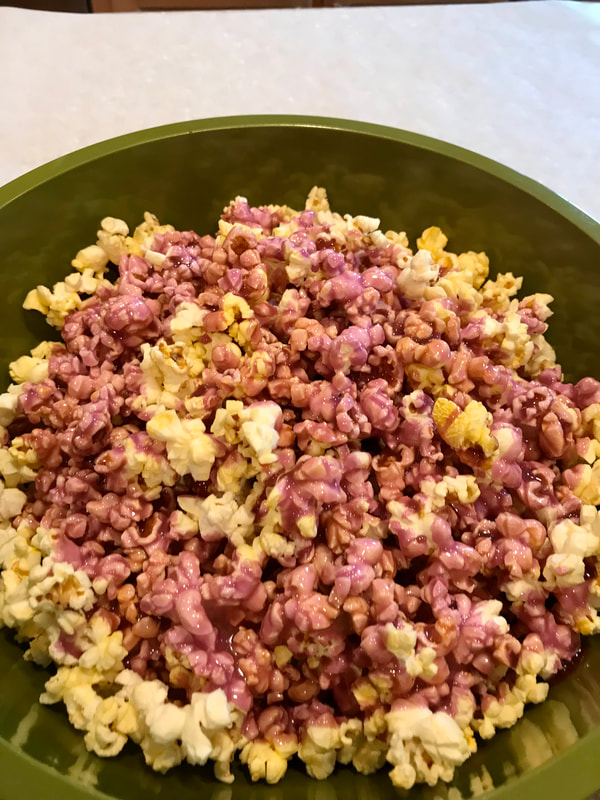
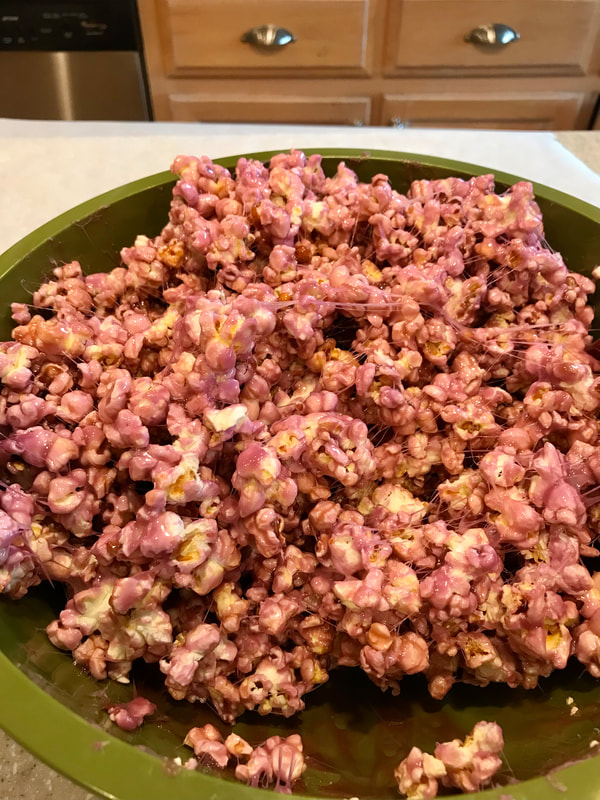
Organic Green Beans: Steam and top with sliced almonds and bread crumbs. Junior League Green Beans: Fresh green beans covered in a ginger and orange sauce. Go Go Go Green Beans: Spicy with extra mushrooms Chi Dynasty Green Beans: Sauté fresh green beans in olive oil with lots of garlic. Stir Fry Green Beans: Blanche then stir fry in olive oil, butter, minced garlic, sea salt, black cracked pepper and roasted, slivered almonds. The BEST Green Beans: Fresh green beans, very lightly coated in cream of mushroom soup and seasoned with garlic powder and red pepper flakes. Bake at 350 degrees until warm and bubbly. No fried onions. 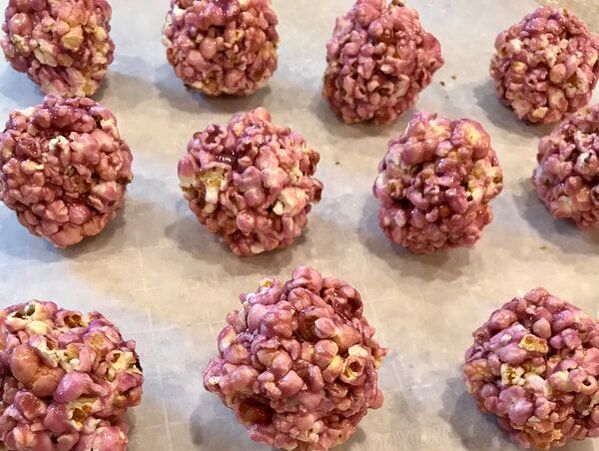 Popcorn balls for a combination birthday-Halloween party It's a very interesting day when you're trying to combine a holiday with a birthday. You want it to be special. You want it to be true to the day. You want it to be the perfect combination of both special days. My princess (granddaughter) wants a pink party and it's Halloween. One of the treats to serve at the pink party is pink popcorn balls. Since Halloween is one day away, I'm making this post short and sweet, literally. It took little time and effort to create this fun snack that works for the pink birthday party and Halloween.
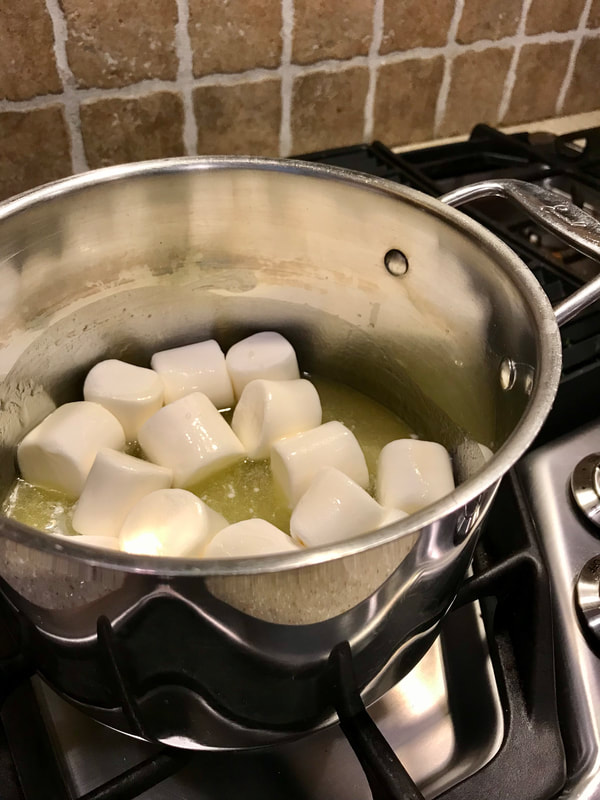
Ingredients: Two bags of microwave popcorn (butter or without) Two Tablespoons water Half a bag (16 - 20 large marshmallows) Two cups confectioners sugar Food coloring Spray oil (for your hands)
Directions: Pop the microwave popcorn as directed. Place in a large bowl. In a medium sauce pan, add two Tsp. water and 1/4 cup butter (1/2 stick). Once melted add the marshmallows and the sugar. Over medium heat, begin stirring. It will take approximately 10 - 15 minutes to bring the mixture to a boil. Once the sauce is at a rolling boil, add a few squirts of food coloring. Continue boiling for another couple of minutes. Take off the stovetop and pour over the popcorn. Quickly, begin to mix the popcorn and caramel/marshmallow mixture to coat the corn. Once mixed, it's time to form the balls. If it's still too hot to form with your hands, wait until it's cooled. Spray your hands with a vegetable oil/olive oil spray. Begin forming the balls. You may have 12 large popcorn balls or 16 -17 smaller popcorn balls. Time to eat! 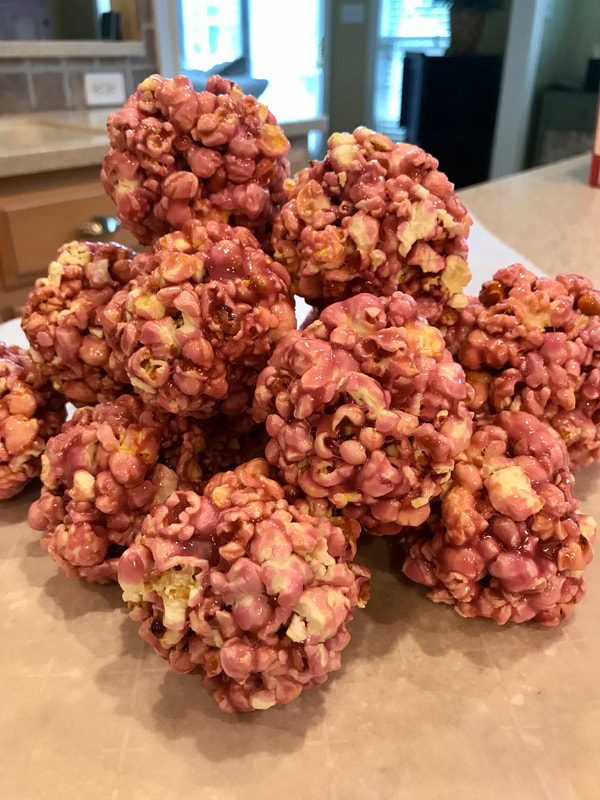 Trick-or-Treat...or is it a birthday party? Enjoy the combination of the two with this sweet holiday treat.
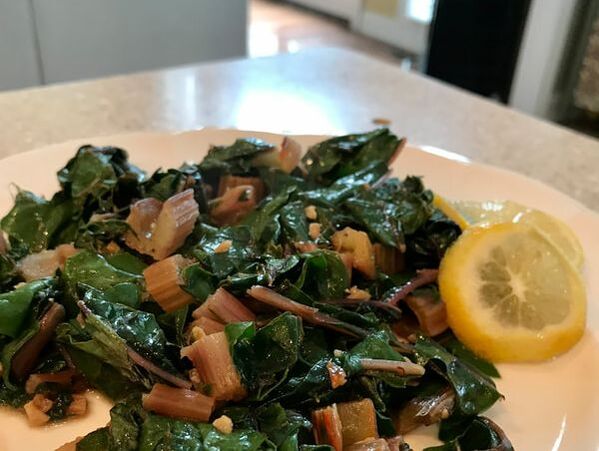
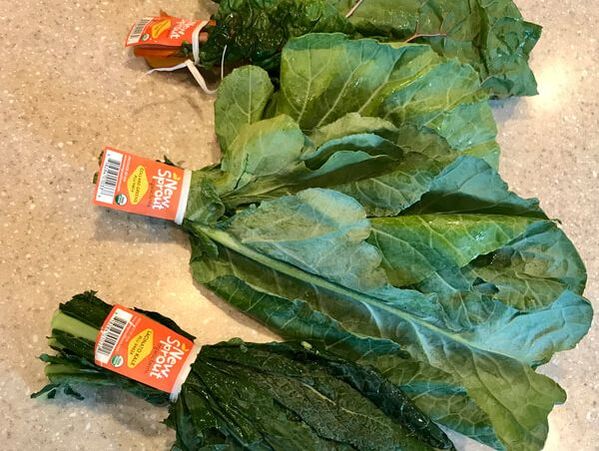
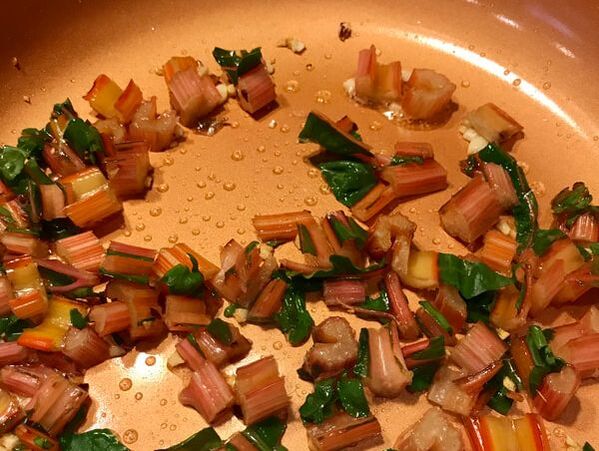
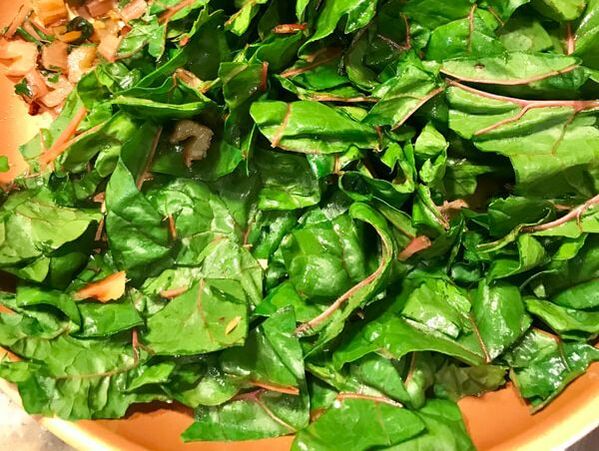
Whole foods are medicine to our bodies that heal, protect, and boost our immune system. One of those ' powerhouses' (term used by WebMD) whole foods is the leafy green vegetable Swiss chard. My last shopping trip to the grocery was a quest for interesting, colorful vegetables. While searching for veggies that 'popped', I ran across rainbow chard, the leafy green that got its name from its multi-colored stem. My first impression was 'I gotta try it.' There's no doubt first impressions matter, not only in job hunting or physical attraction but also in food choices. Think about it, our first encounter with food is based on how it looks...our first impression. After the initial encounter, we make a decision to either take the next step or walk away. If we decide to continue on, a type of 'food seduction' takes place and we test the pheromones, I mean the aroma of the food. If it smells good, we take a bite. Only one of the five senses is left out of the equation...hearing. Of course, if your dinner companion is a lip-smacking open-mouthed eater, you may not ask him/her out on a second date. What are the health benefits of rainbow chard? There are seventeen nutrients found in our leafy green friend: potassium, fiber, protein, calcium, iron, thiamin, riboflavin, niacin, folate, zinc, and vitamins A, B6, B12, C, D, E, and K. I've tried many leafy greens except for chard. I'm so happy I gave it a whirl. It's delicious and I'm using my 'go-to' recipe for sautéing leafy vegetables.
Ingredients:
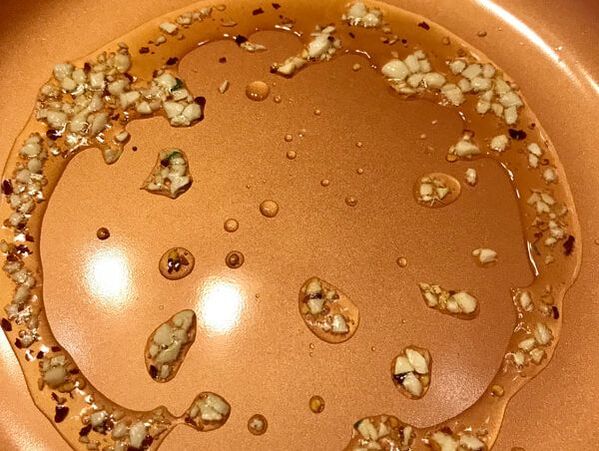
Large bunch rainbow chard (or any swiss chard) 2/3 T. EVOO 2 garlic cloves (chopped and minced) 1/4 Tsp. red pepper flakes Lemon Zest Fresh squeeze of lemon juice Salt and pepper to taste Directions: Wash your leaves and pull away from the stems. Chop the stems into 1/2-inch slices. Chop the leaf into two-inch slices. Add an S-shaped amount of EVOO to a sauté pan. Turn to medium/high. Add garlic and red pepper flakes. Sauté until the smell of garlic hits you in the face (a minute or two). Add the stems until slightly softened. Turn the heat to medium. Then, add the leaves. Turn the heat to medium/low. As they begin to wilt, salt and pepper to taste. Add some lemon zest and a generous squeeze of lemon. After a couple of minutes, take the chard off the heat, add a few more red pepper flakes to top off the dish, and serve. (One bunch serves 2-3).
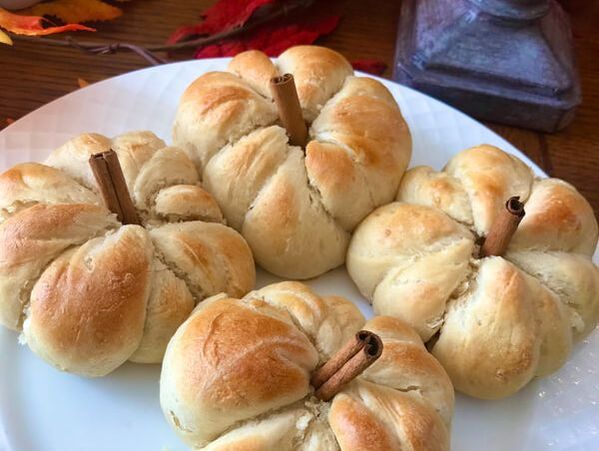
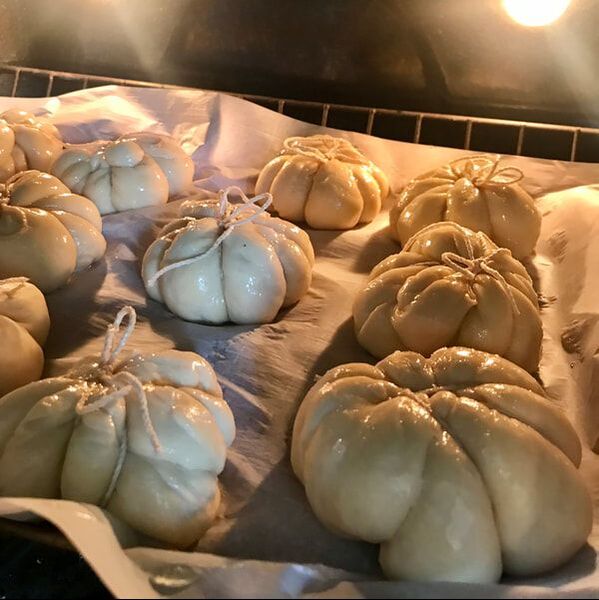
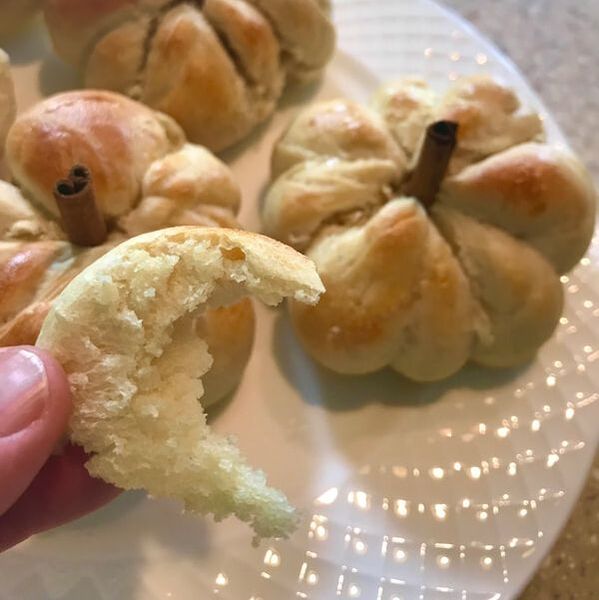
Last year, the holiday season was overshadowed by all things Covid leaving many of us longing for gatherings with family and friends. This year, with the aid of vaccines and a clearer understanding of how the virus spreads, we're able to reach out and touch our loved ones once again and appreciate the little things in life. One of those little things is pumpkin-shaped yeast rolls. It's good to try new recipes. These dinner rolls will create a little whimsy and magic at the dinner table. Even more exciting is the extra effort behind this little project is incredibly easy. The only drawback is a little time waiting for the dough to proof. No big deal. If you're ready to try it, I've got the recipe complete with tips and a video.
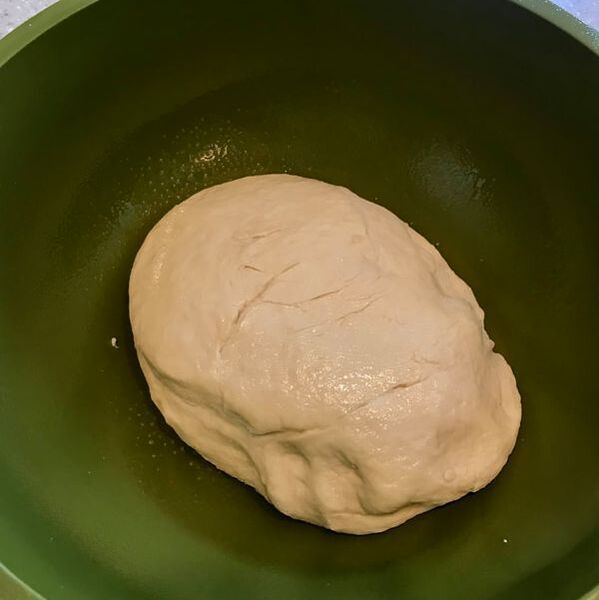
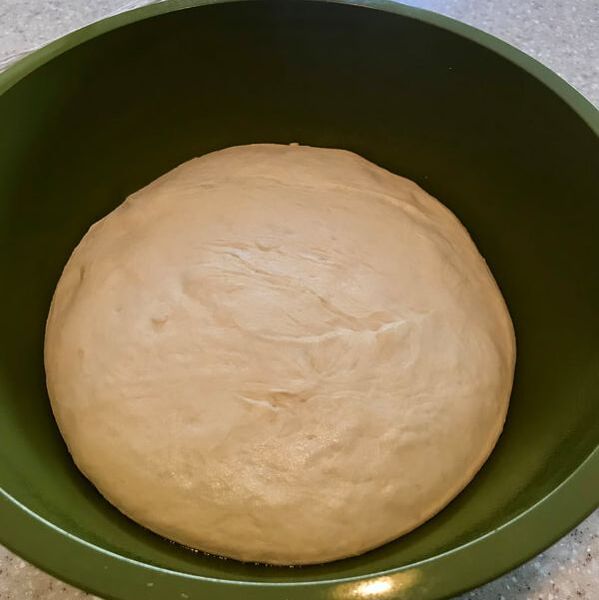
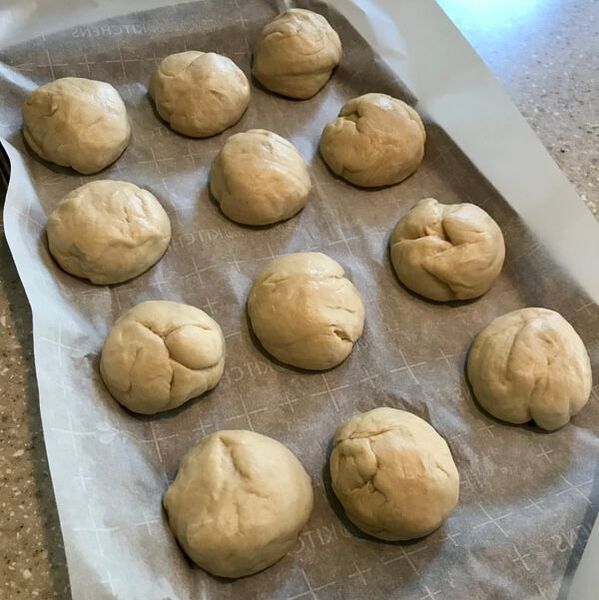
Direction and Ingredients needed for Pumpkin-shaped yeast rolls. Two packages of yeast Two cups warm water One Tbs. of sugar Mix and let sit for 10 minutes Add to the following: ½ cup sugar Two tsp. salt ¼ cup of extra light EVOO 1 egg (beaten) and at room temperature Five to six cups of all-purpose flour Four cinnamon sticks cut in thirds. If making smaller dinner rolls, you'll need eight cinnamon sticks. A one minute video on how to wrap the dough balls with kitchen twine to create pumpkin-shaped yeast rolls. After the yeast has dissolved, add to other ingredients. Start with four cups of flour. On medium speed, mix until smooth. Side note: I used a Cuisinart Prep 11 Plus Food Process with a dough setting. I've had this machine for close to 20 years and have never used it for bread. There's always a first time. At this point, add another cup of flour and mix. The idea is to have a stiff dough. If you need to add more flour, do so at this time. Once the dough is a good consistency, begin to knead it on a surface that’s been floured. Knead the dough for approximately six to seven minutes. The dough should be pliable, and flexible. Next, add the dough to a large bowl that’s been greased. Place the dough ball in the bowl and flip it one time so the entire dough has some grease on it. Cover the dough and place in a warm place. It may take an hour or less to prove. Check it after 30 minutes. After the dough has doubled in size, punch down the dough. Begin dividing the dough into 12 round balls. If you want smaller dinner rolls, cut them into 18 - 24 rolls. After forming the dough balls, set on a baking sheet lined with parchment paper. Cover and let it rest for 30 minutes. Now, it’s time to wrap twine around each ball. Cut 12 – 32 inch strings from the kitchen twine (adjustment to the length of the twine is needed if making smaller dinner rolls). Each ball will be wrapped like a present and rotated until the ball is cut into eight pieces, like a pie. Be sure and pull the string tight enough to make small indentions in the ball. Next, brush each pumpkin with egg whites for browning with a little shine. Bake in the oven at 350 degrees for 20 minutes. The pumpkin rolls should brown. After taking the rolls out of the oven, cut the strings off each roll. After the string is off, add the cinnamon sticks to each pumpkin roll.
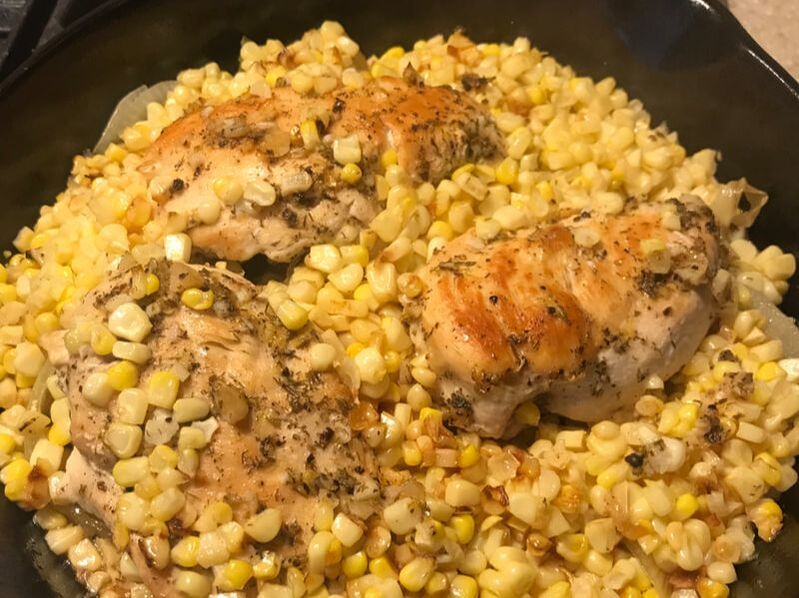
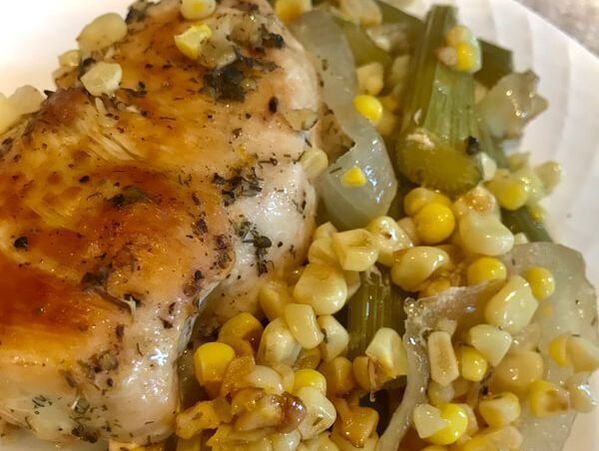
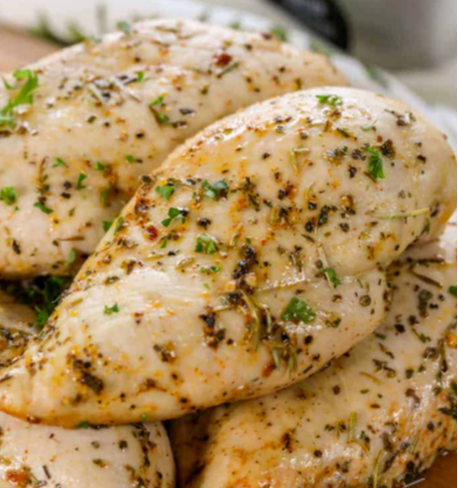
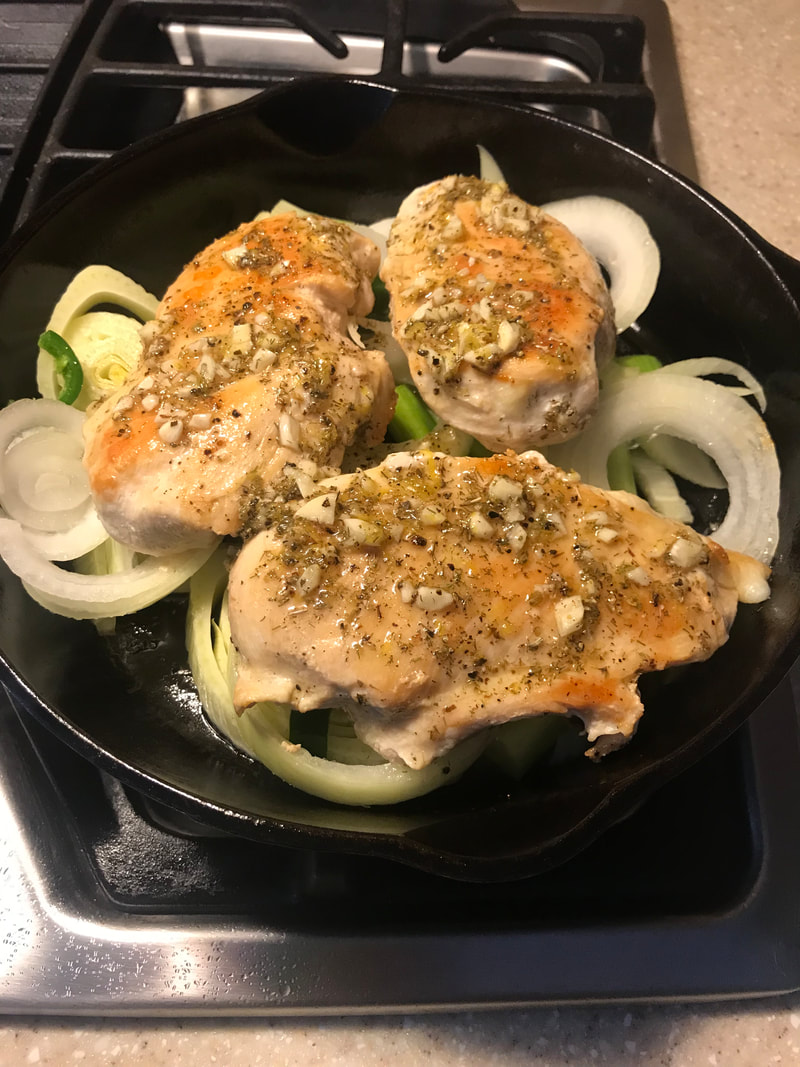 Iron skillet chicken with fennel, onion, jalapeno and an herb-based sauce drizzled across the top of the chicken. Fresh roasted corn will be added to the skillet after a quick sauté. It was a rainy Friday and not much to do other than eat. After opening the freezer and seeing the three chicken breasts alongside three hamburger patties; I chose chicken. Most of the ingredients were available in my pantry and refrigerator except the fennel. If you've tried roasted fennel, it's a sweet treat with a bit of a licorice flavor. It's not overpowering and more flavorful than celery. There's a particular marinade that I make that's a go-to for many of my grilled meats. I decided to add a few more dried herbs to the special marinade to pour directly over the chicken before roasting it in the oven. Most of the ingredients are readily available in cupboards and refrigerators. If you're missing one or two items, you may always improvise. Let's get to it! Ingredients: 3 chicken breasts 3 T. olive oil A pat of butter A medium onion A fennel bulb 3 ears of fresh corn on the cobb A large jalapeno (seeded and membranes removed) 2 T. lemon juice Tsp. lemon zest Tsp. of oregano 1/2 tsp. of dillweed 1/4 tsp. salt 1/4 tsp. pepper 3 cloves of garlic (chopped and crushed)
Directions:
Lightly salt and pepper the chicken breasts and sear in the iron skillet with a tablespoon of olive oil. Go ahead and sear both sides. Remove the chicken from the pan and set aside. Make the herb olive oil with the remaining oil (two tablespoons), salt, pepper, 2 T. lemon juice, lemon zest, oregano, dillweed, and garlic. Whisk together. Slice the fennel and onion and chop the jalapeno. Place in the iron skillet. Add the seared chicken breasts. Drizzle the herb olive oil over the top of the chicken. Shuck the corn and cut off the cob. Heat a pat of butter in a small skillet. Add the corn, salt, and pepper to taste, and sauté for a couple of minutes. Once sautéed, add the corn to the skillet with the chicken. Cover the skillet with aluminum foil and place in a 400-degree onion for 30 to 40 minutes. Halfway through the roast, spoon some of the liquid over the chicken. Once the chicken reaches 165 degrees, take the skillet out of the oven to sit for 10 minutes. Serve.
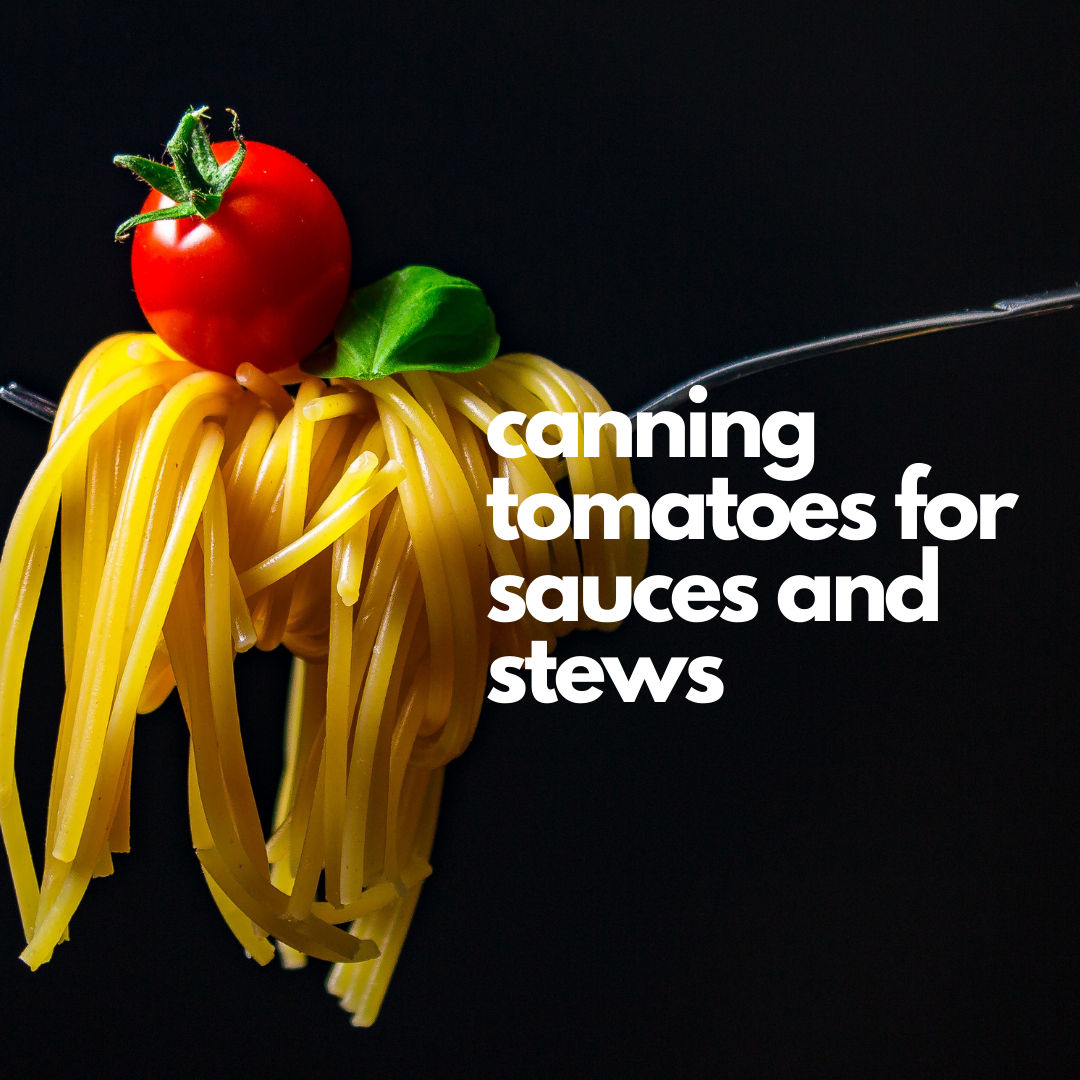
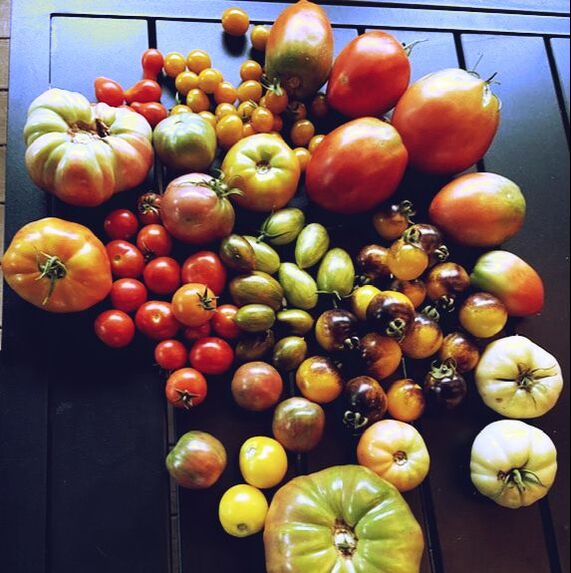
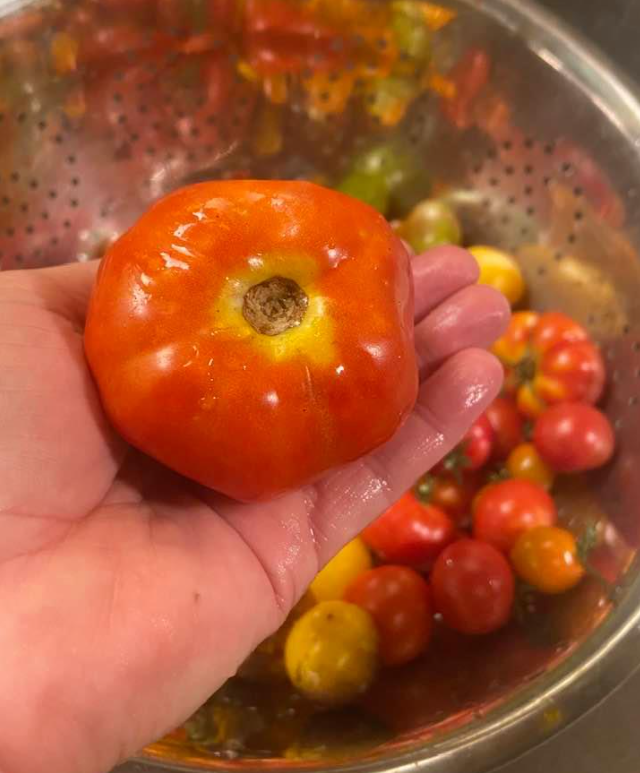
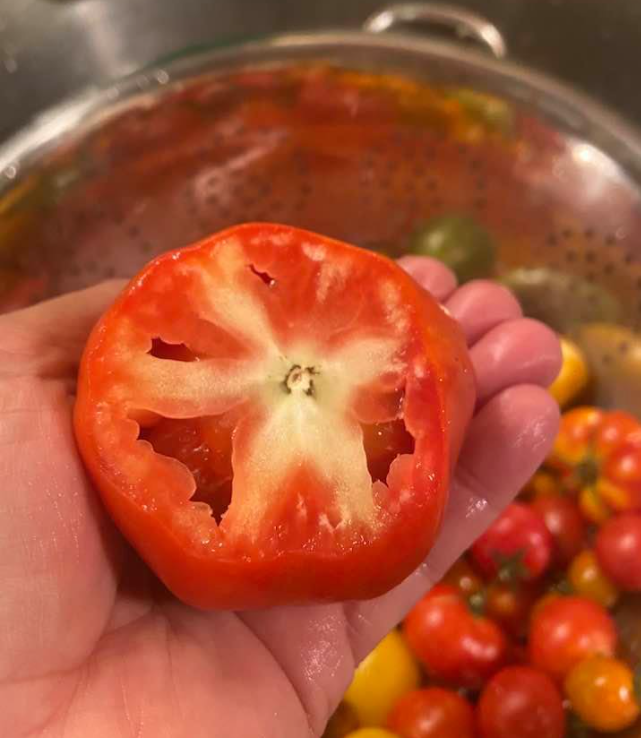
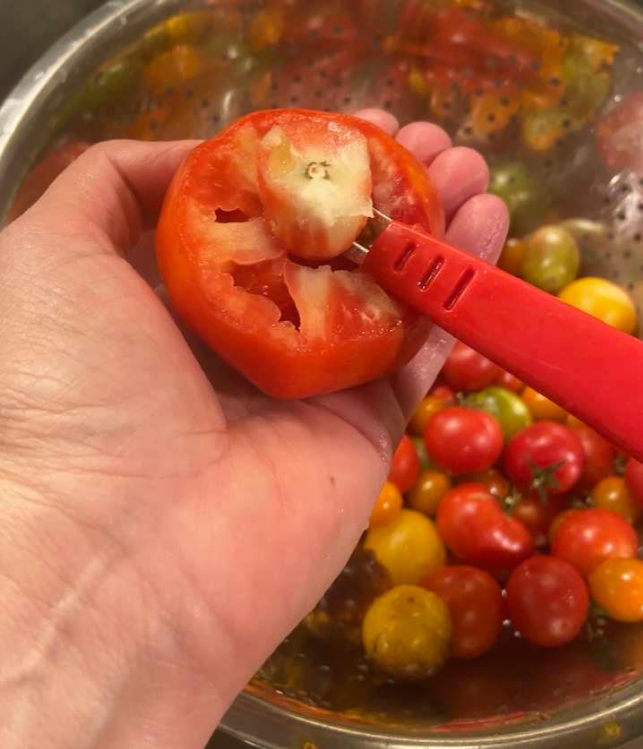
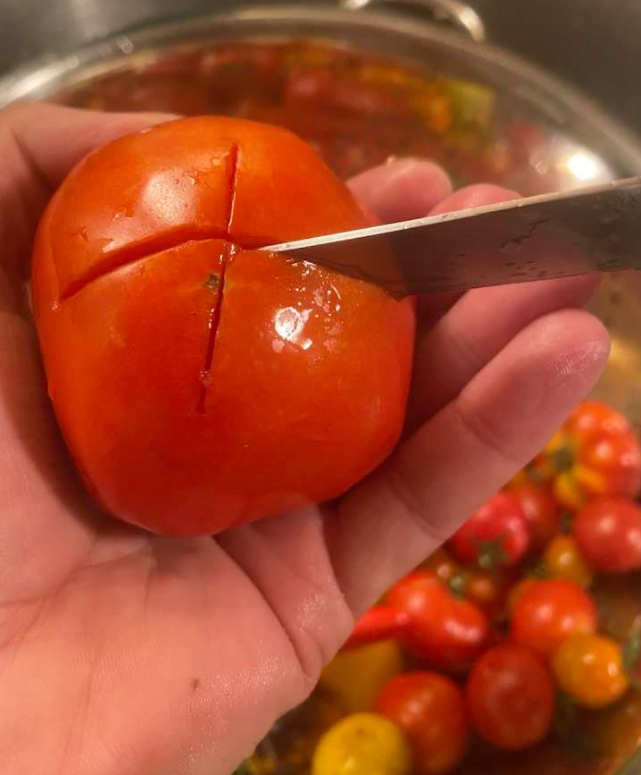
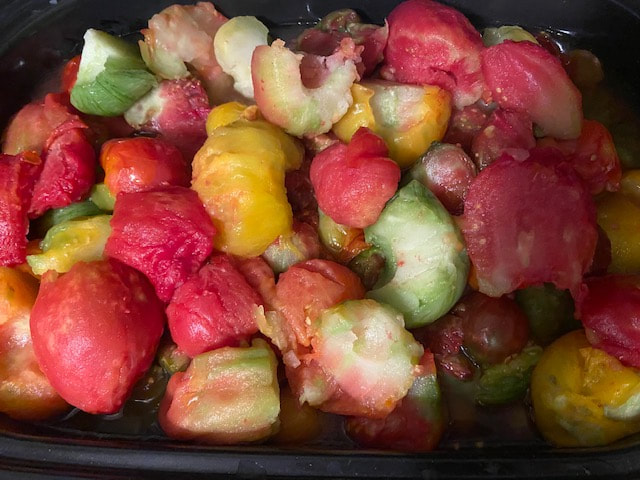
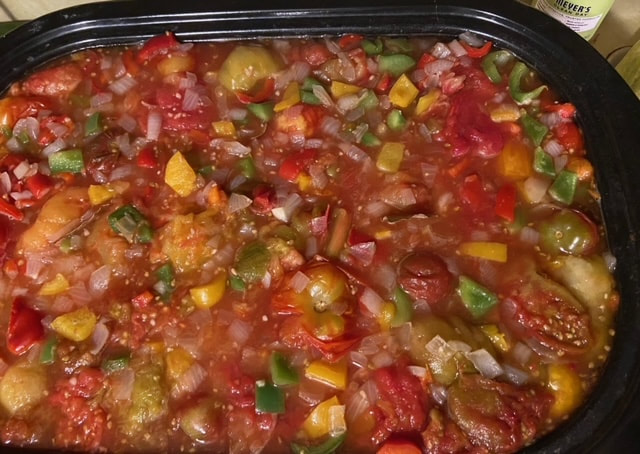
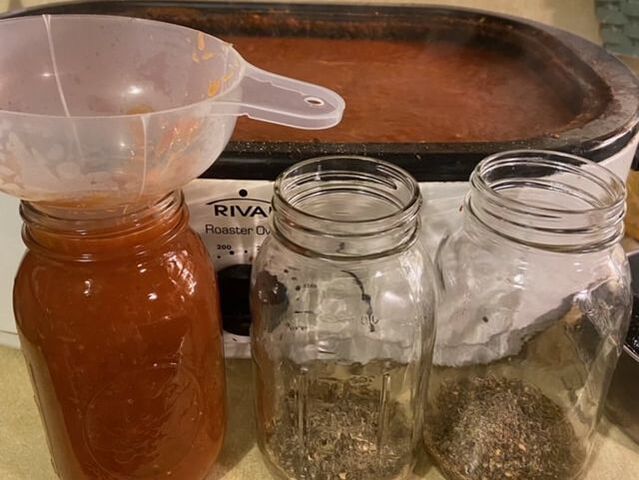
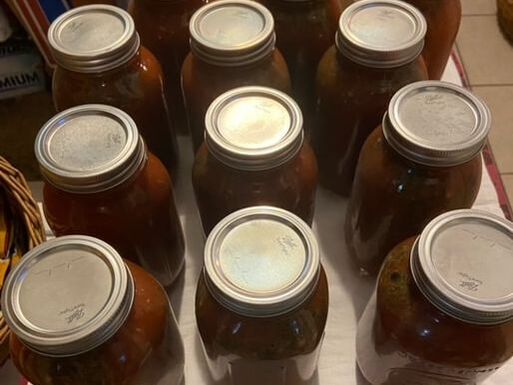
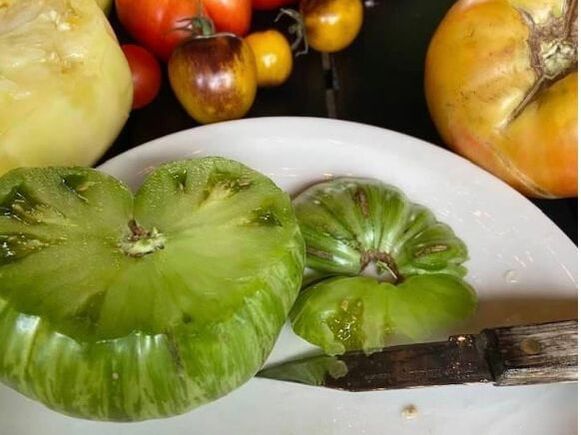
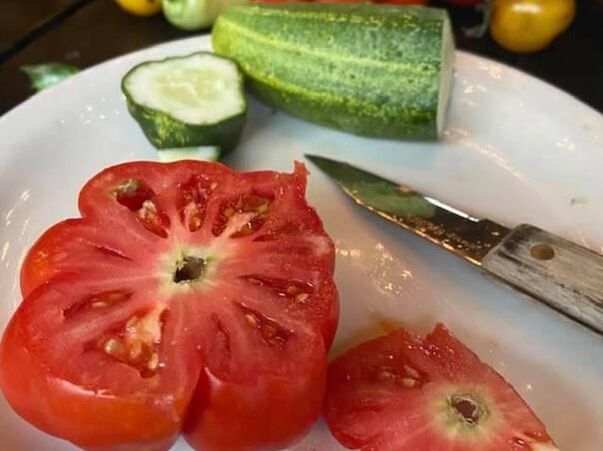
Photos and recipes by Holly Roberts Walker Late summer is the best time of year for plum-like tomatoes that are ready for canning; and in many cases, the tomato plants will keep producing until the first frost. In western Kentucky, the 2021 tomato growing season has produced flavorful red, yellow, green, orange, pink, and purple fruits. Now is the time to prepare winter pantries with delicious stewed tomatoes, tomato sauces, and salsa. A good friend and gardening expert, Holly Roberts Walker, shares two tomato canning recipes to delight the taste buds. If you're interested in a sweet and savory tomato sauce or batch of stewed tomatoes, two recipes will follow for the readers of WKY Community Living. To prepare tomatoes for roasting, one must core, score, freeze/thaw, and take the skin off. Scoring the tomato makes it easier to remove the skin. Ingredients: 25 lbs. of assorted tomatoes, peeled and cored 6 bell peppers, roughly chopped (combination green and red) 4-6 medium yellow onions, roughly chopped Worcestershire Sauce, to taste (up to ½ cup) Liquid Aminos, to taste (up to ¼ cup) can substitute soy sauce 8-10 cloves garlic, minced 4-6 bay leaves 1-2 teaspoon olive oil ⅔ cup brown sugar (packed) 4-6 6 oz. cans tomato paste Seasoning Blend (see below) 1 -2 T. salt *Lemon Juice*
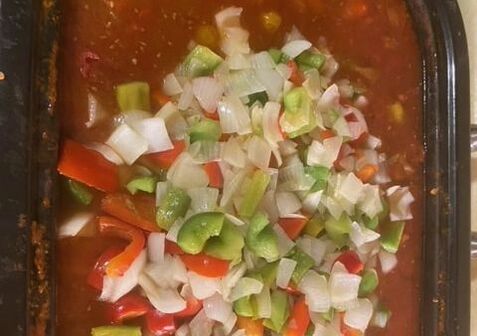
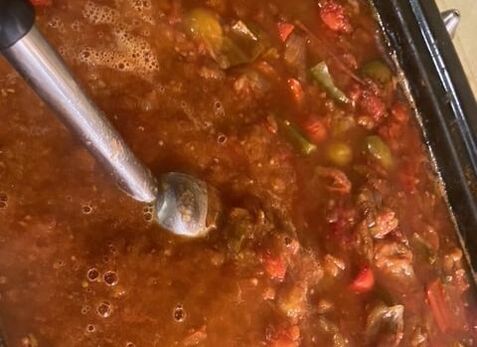
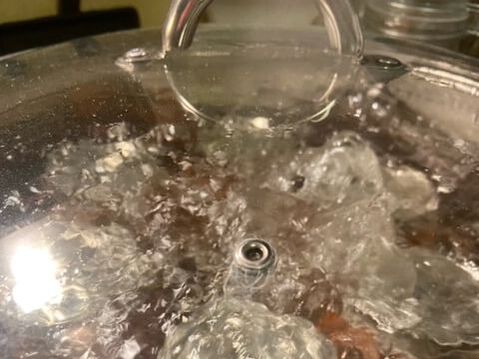
Stewed Tomatoes Combine: tomatoes, bay leaves, Liquid Aminos, Worcestershire sauce, 1 -2 T. salt In a 22-quart roaster pan set to 250 degrees. Roast/stew for 3-5 hours. To each Quart jar add 2 Tablespoons of lemon juice. For a Pint jar add 1 Tablespoon of lemon juice. Can immediately while the liquid is hot using the water bath method for 40 minutes leaving ½” headspace. OR Tomato Sauce Base Combine: Onions, Peppers, & Garlic In a Dutch oven, place olive oil and set over medium heat. Sauté mixture until onions are cooked through. Add the mixture to the roasted tomatoes and cook for five additional hours at 200 degrees.
Add: tomato paste (start with 4 cans) Check the consistency and add the brown sugar. Using an emulsion blender, puree the batch thoroughly.
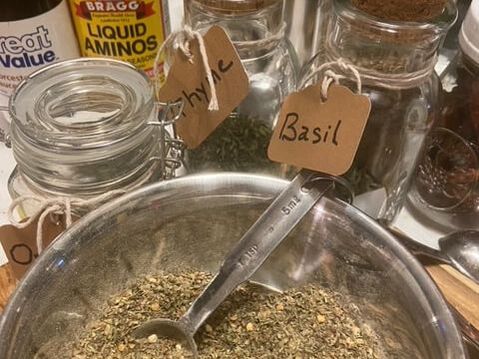
Italian Seasoning Blend (in a bowl) Combine: 4 Tablespoons dried oregano 4 Tablespoons dried basil 2 Tablespoons garlic powder 4 Teaspoon dried thyme 4 Teaspoon dried red pepper To each Quart jar add 4 ½ teaspoons of blend and 2 T. Lemon Juice Pint jar add 2 ¼ teaspoons of blend and a T. Lemon Juice
Fill jars with hot tomatoes leaving a ½” headspace.
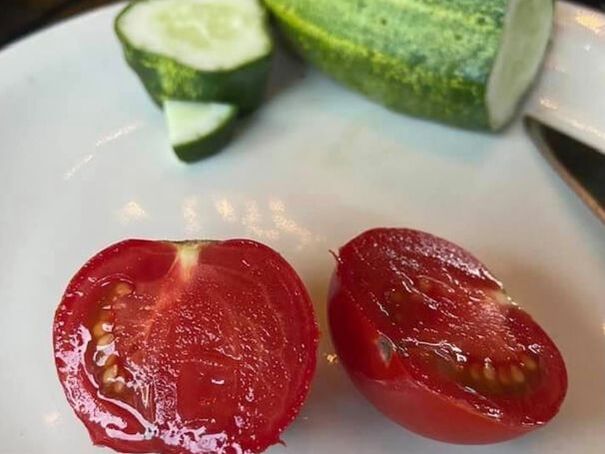
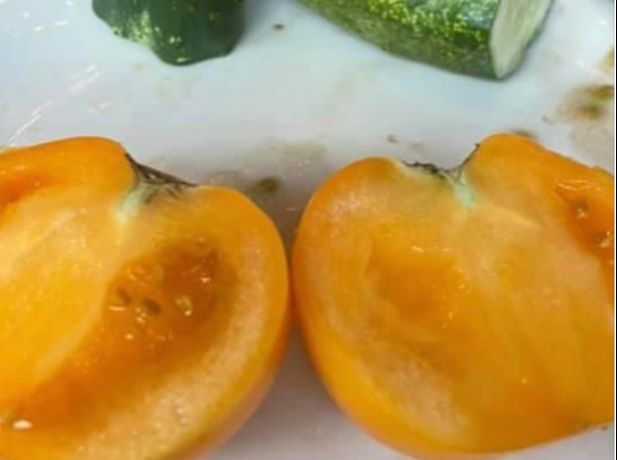
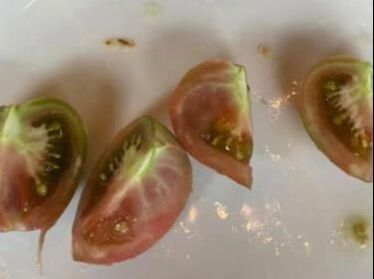
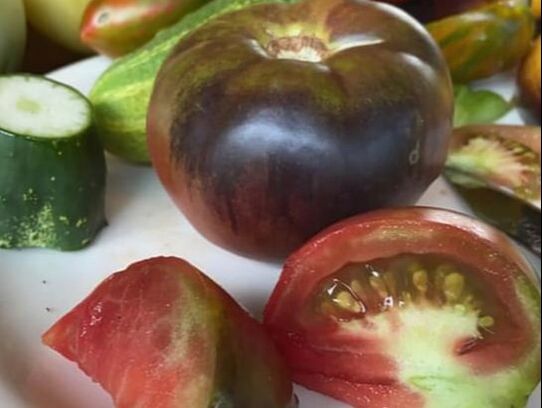
Wipe rims and seal. Water bath for 40 minutes. To Use: Shake jar to blend before opening. 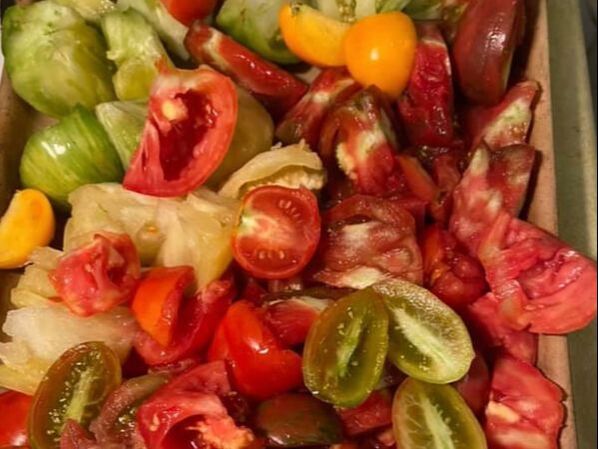 Varieties of tomatoes are ready for roasting. All photos by Holly Roberts Walker on Facebook. "You like potato and I like potahto. You like tomato and I like tomahto. Potato, potahto, tomato, tomahto! Let's call the whole thing off!" From the movie, 'Singin' in the Rain' starring Fred Astaire, Gene Kelly, and Ginger Rogers, came the famous lyrics to the song 'Let's call the whole thing off.' Whether pronouncing the fruit as tomato or tomahto, nobody would ever suggest 'calling off' nature's sweetest summertime harvest. Holly Roberts Walker and her husband Eric have a fantastic backyard garden called 'Urban Gardenology' nestled in the sleepy, little town of Paducah, KY. In the garden there are 184 tomato plants with 23 new varieties planted this year; that's a whole lot of sweetness being cultivated from this backyard blessing. Holly's famous tomato taster, Eric, shares his talents with those interested in choosing tomato seeds for next year's garden from the overwhelming selection of products on the internet. In addition to testing, Holly has supplied the readers of WKY Community Living with her famous salsa recipe and 'best picks' seed companies.
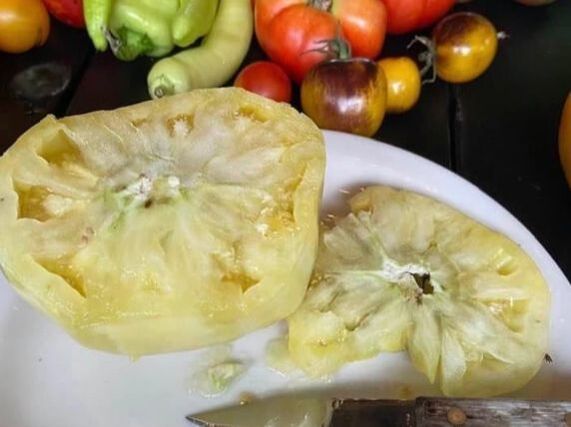
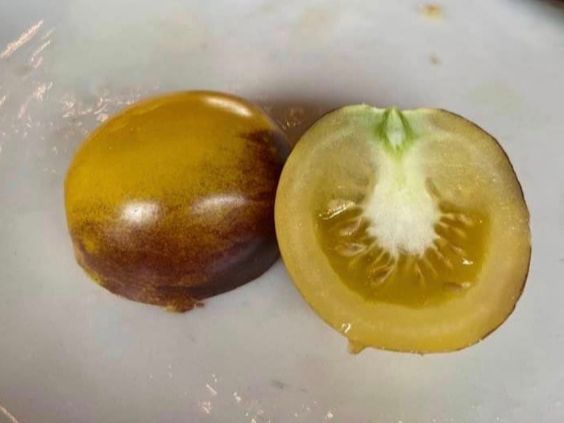
The Marglobe tomato is a determinate (meaning they are bred to stop growing usually around 3 - 4' tall). These heirloom tomatoes were created a century ago and are designed to be crack and disease resistant. This variety is a favorite among home gardeners and one of the best on the market. "It's thick-skinned and an amazing slicer...a 10!," said Eric. The White Tomesol is a pale yellow-white fruit with a blush of pink. It's an heirloom tomato that is fragrant and bursting with flavor. It's an 80 day tomato that is indeterminate (meaning they could grow between 6 - 20' tall and produce fruit until the first hard frost). It's sweet and good to eat! The Mountain Gold is an 80 day determinate that yield 8 to 12 ounce golden yellow tomatoes. It's disease resistant and grows well in the south. The tomato was released in 1991 by a horticulturalist in North Carolina. "It's very flavorful and clean tasting. A bit heavy on the pulp," said Eric.
The Green Zebra is chartreuse in color with deep lime-green stripes and determining when it's ready for pickin' can be tricky. For starters, feel the tomato for firmness with some give, look to see if the lime-green stripes have turned yellow, and watch for the yellow stripes to begin to show a blush color. "It's light, refreshing, with an apple consistency," said Eric. The Black from Tula is a beautiful tomato and a good slicer. It's been described as 'mealy' with soft flesh. Eric said it wasn't as flavorful as some of the other varieties. Brad's Atomic Grape are indeterminate elongated multi-colored cherries that grow in clusters. The interior is green with a blushed red when extra ripe. The heirloom tomato is rugged with high productivity. Eric said that it's crunchy, firm-skinned, and middle of the road in terms of flavor.
The Evil Olive average 75 days to maturity and is one of the most gorgeous heirloom tomatoes. It's a very productive, non-determinate, cherry tomato that's good for salsa, snacking, and salads. "It's meaty, (not mealy), sweet-sour, perfect for hamburger slicers," said Eric.
The Violet Jasper is a pretty violet-purple fruit and is known for its jewel-like glow. They average around one to three ounces and are high producers. Eric said it's a 'big flavor' for a cocktail-size tomato. It will be on Holly's 2022 grow list! The Bosque Blue Bumblebee is a bright yellow with dark-blue marbling. They develop dark-blue coloring as they continue to grow. The more the sun shines, the deeper the color. It's tart in flavor. Of course, this is only a small sample of the selection of heirloom tomatoes from Urban Gardenology. As far as seed companies go, Holly said, " I have between 80 and 100 seed companies I use to search and find specific seeds I want." Her top 10 companies are Baker Creek, M I Gardener, Botanical Interests, Trade Winds Fruit, Urban Farmer, Johnny’s Seeds, Fruition Seeds, Seed Exchange, Renaissance Farm, and Annie’s Heirloom. Holly went on to say, "It also depends on what seeds I am searching for at the time. Some companies are wild plant-based, some are Heirloom fruits and veggies, some are focused on developing new species, and some deal in large bulk (for farms). I have specific herb-based companies...it really depends!" Holly's Salsa Recipe: 7 lbs. tomatoes (cored and quartered) 10 total jalapeños and nadapenos (slice in half and roast. For mild sauce use 3 jalapeños and 7 nadapenos. For a hotter sauce, use half and half). Two onions quartered 1-2 cloves garlic 1-2 bunches cilantro Fresh lemon/lime juice (either will work) Roast tomatoes, onions, garlic cloves, and jalapenos/nadapenos for 45 minutes to 1 1/2 hours at 300°. Char/blacken to desired amount. Ninja all roasted items. Add leaves of cilantro and juice of one lemon or lime. Mix thoroughly. Yields three pint-size canning jars. Use immediately.
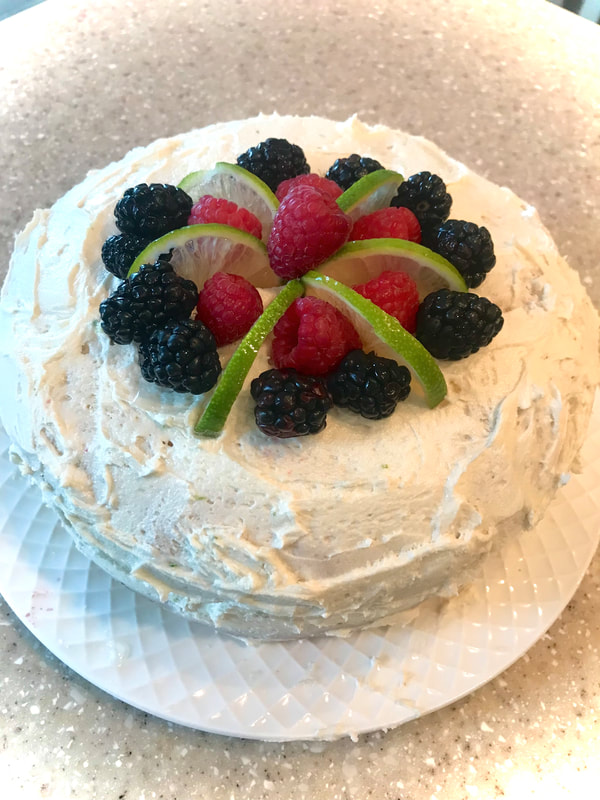
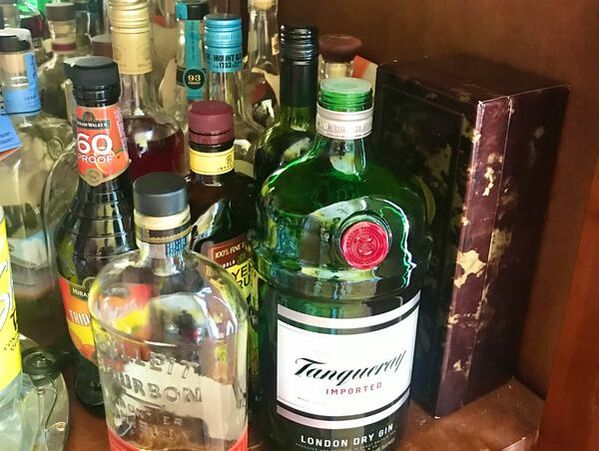
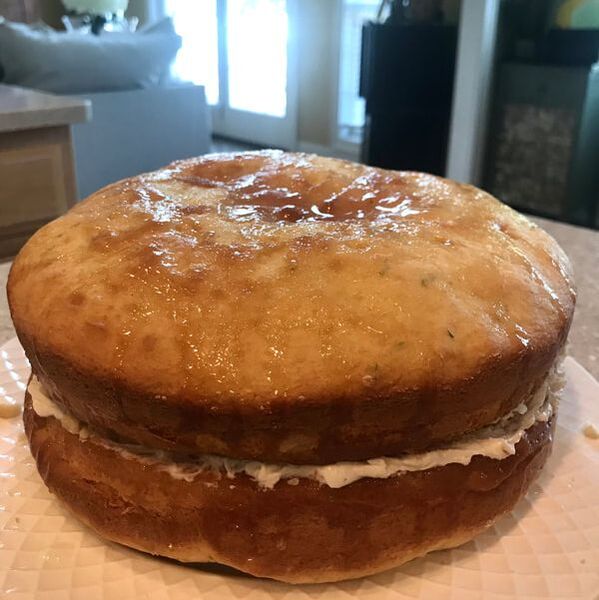
You've heard the old saying, "If you can't beat them, join them." As the desire to imbibe still ensues me, I've decided to get creative with the liquor cabinet. I used to really enjoy a good cocktail; a nice salty dog, mojito, or bourbon on the rocks. So, it struck me, I'll turn the occasional evening cocktail into a seductive, after-dinner dessert. This next dessert was inspired by summertime parties, outings, and late nights on the deck. The gin & tonic is crisp, refreshing, and hits all the right notes. Here's what you'll need to make this sweet, memorable cake.
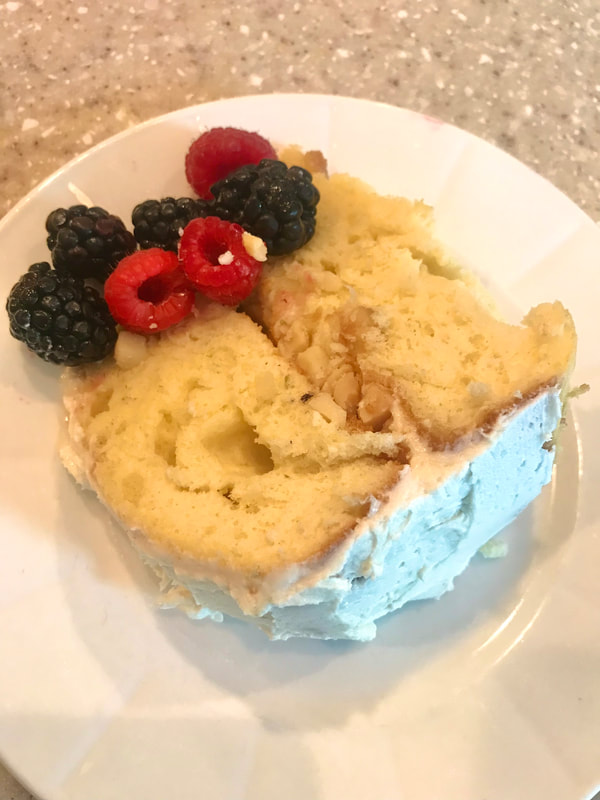
Cake Ingredients: Box of white cake mix 3.4 ounce box of white chocolate instant pudding Four eggs Juice of two limes 1/2 cup vegetable oil 3/4 cup gin 1/4 cup of water Cup of macadamia nuts (crushed) Assortment of berries (blackberries, raspberries, blueberries, strawberries) Gin & Tonic Glaze: 1/2 cup gin 1/2 cup tonic Cup of sugar Stick of butter Buttercream Icing: Three cups powdered sugar 1/3 cup butter (softened) 1 1/2 tsp. vanilla 3 - 4 T. heavy cream Dash of gin and 1/2 teaspoon of lime zest
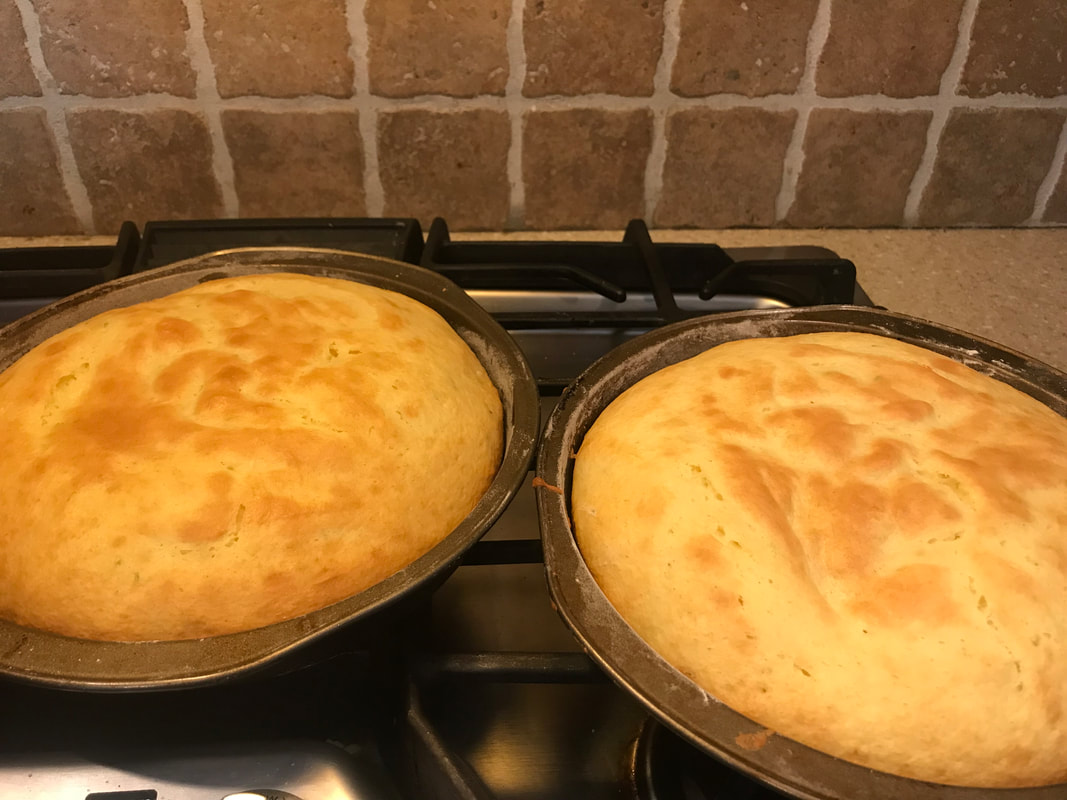
How to make the cake batter: Mix the white cake mix and the pudding together. Whisk the eggs in a separate bowl then add to the dry ingredients along with the lime juice, vegetable oil, gin, and water. Mix until just smooth. Be careful not to overmix. Tip: Overmixing can result in a gummy texture. If this should happen, slowly add sifted flour a tablespoon at a time. You can also stick the batter in the refrigerator for a few minutes. The oven should be preheated to 350 degrees. You'll need two equal size nonstick pans for a double-layer cake. Grease and flour both pans. Pour equal amounts of batter into each pan. Place in the oven for 20 minutes or until an inserted toothpick comes out clean. Set aside to cool for 10 minutes. The gin and tonic glaze will come next.
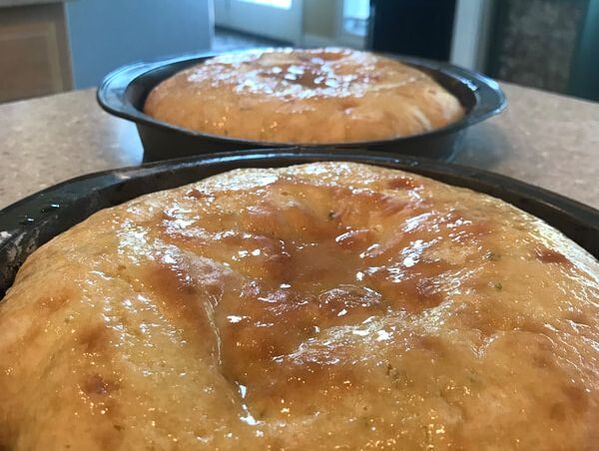
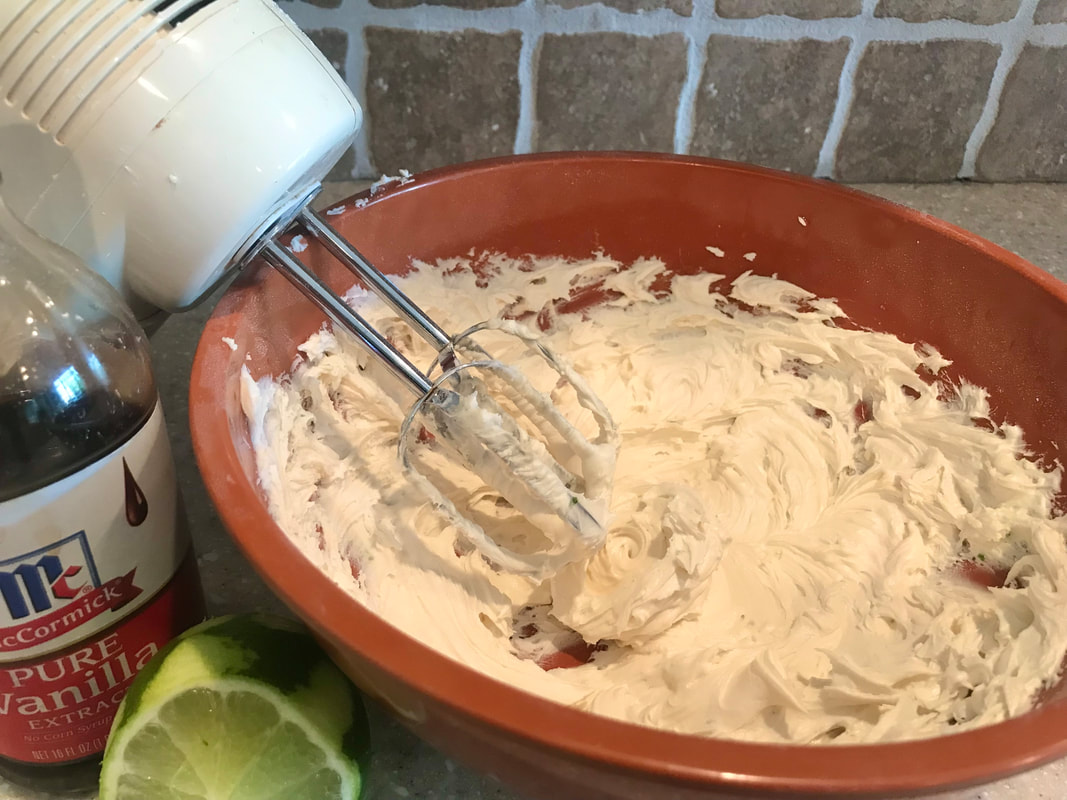
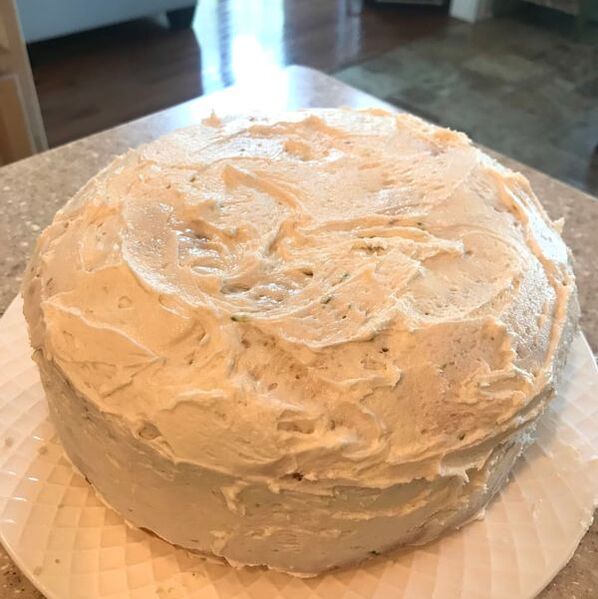
How to make the glaze: Add the butter, gin, tonic, and sugar to a saucepan over medium heat until the sugar dissolves (approximately five minutes). Stir continuously. Once the glaze is made, you'll want to add it to the cakes. Take each cake out of the tin. Add 1/4 of the glaze to the bottom of each pan and reinsert the cakes. Punch holes in the tops of the cakes with a toothpick and add the remaining glaze to each cake distributing equally until the glaze is gone. If you have 30 minutes, let the cakes sit to soak up the gin and tonic glaze. How to make the buttercream frosting: Using a mixer, combine the powdered sugar and the butter. After combining, add the vanilla and the heavy cream. Once the buttercream is mixed, add the gin and lime zest and mix. Assembling the cake: It's a two-layer cake. After the first layer is placed on the cake plate, add a layer of buttercream frosting and crushed macadamia nuts. Add the second layer to the cake and frost the entire cake. Decorate with berries, slices of lime, some crushed nuts, and a little lime zest. Serve with a stiff drink or a flavorful cup of coffee. 
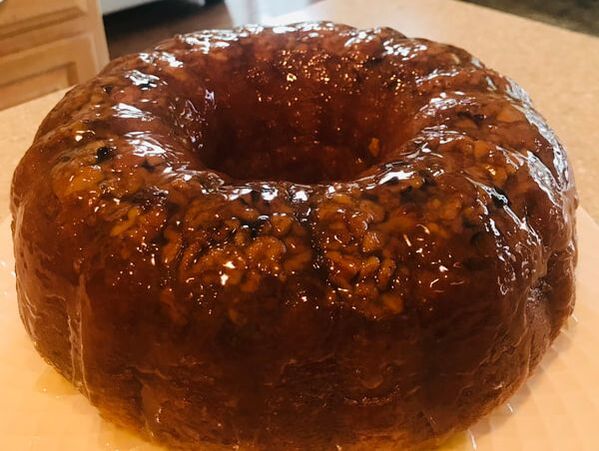
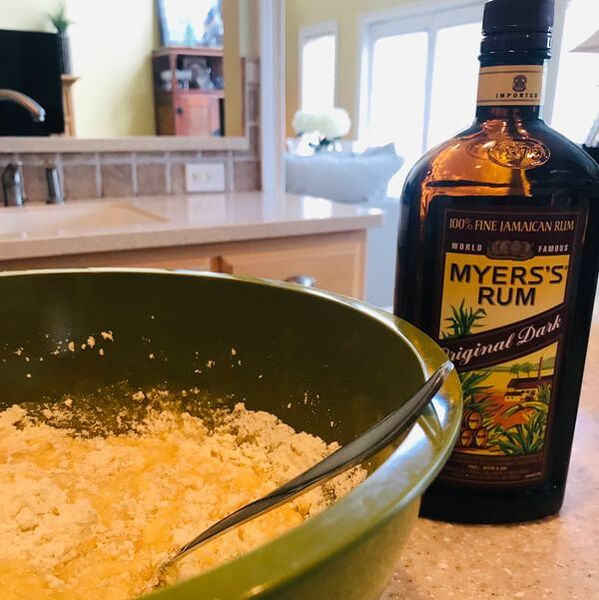
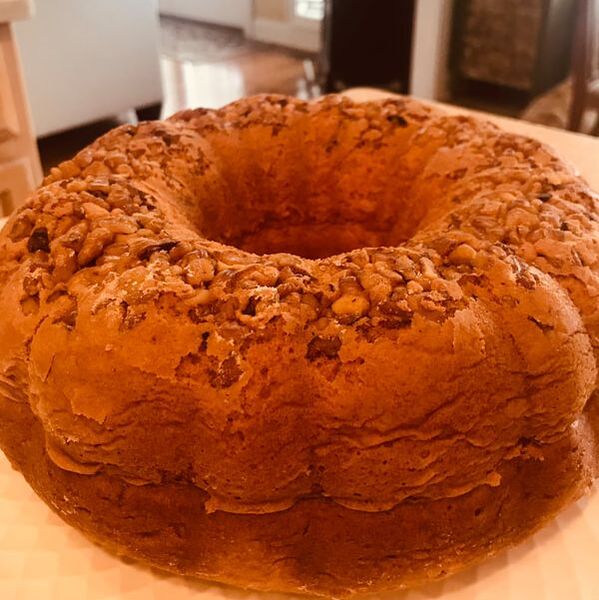
The Buttery Rum Orange Liqueur recipe was created from the availability of different liquors and liqueurs in our liquor cabinet. Making cocktails and after-dinner drinks isn't standard around the Latta household these days. The question is...what to do with all the fabulous booze in the cabinet. I thought, why not cook with it. There are many wonderful recipes to be created from our stash of goodies. The first of those recipes is the heavily infused boozy cake. Let's begin with the ingredients for the cake: Cup of chopped walnuts Package of yellow cake mix Package of vanilla pudding mix (3.4 ounces) Four eggs 1/4 cup water 1/4 cup of a freshly squeezed orange A teaspoon of orange zest 1/2 cup vegetable oil 1/2 cup dark rum (I like Myers's) 3/4 cup of unsweetened coconut Ingredients for the glaze: A stick and a half of unsalted butter 1/4 cup of water 2/3 cup of sugar 1/4 cup of dark rum 1/4 cup of orange liqueur (Grand Marnier, triple sec, whatever you have in the cabinet)
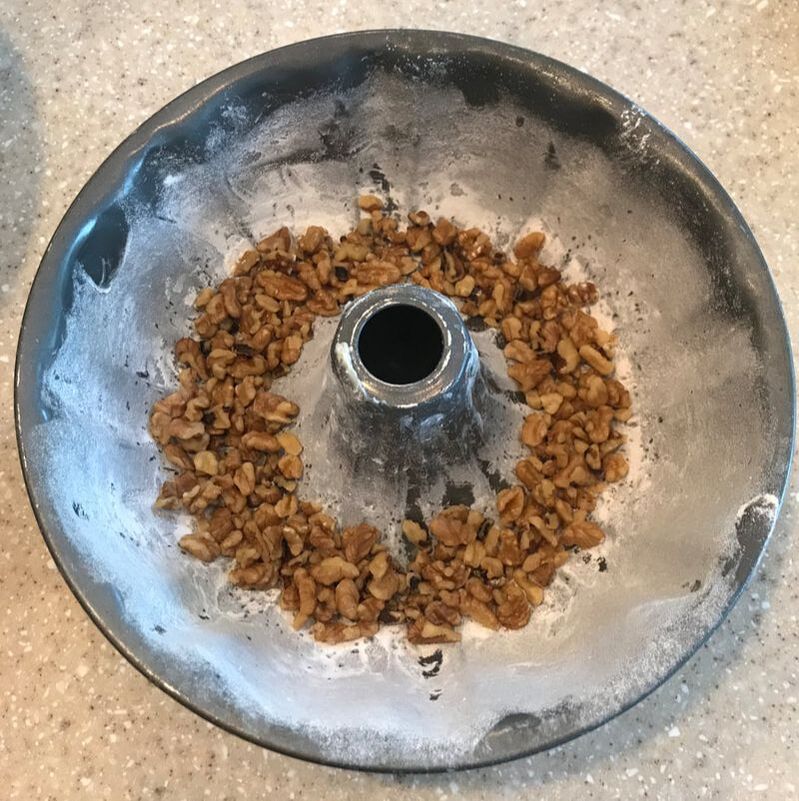
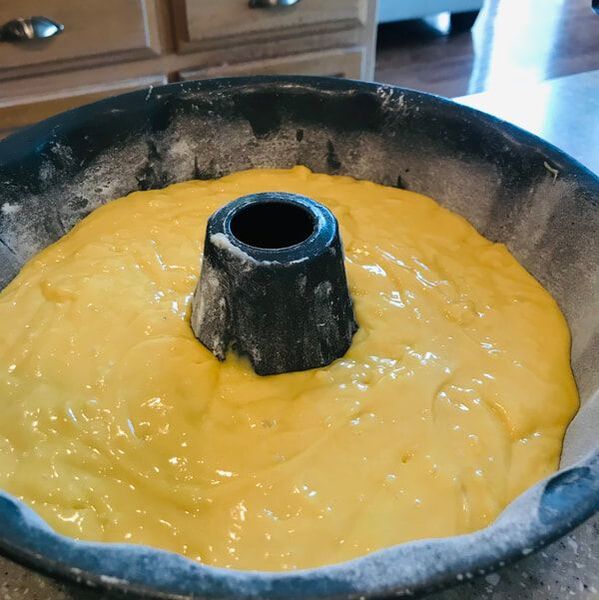
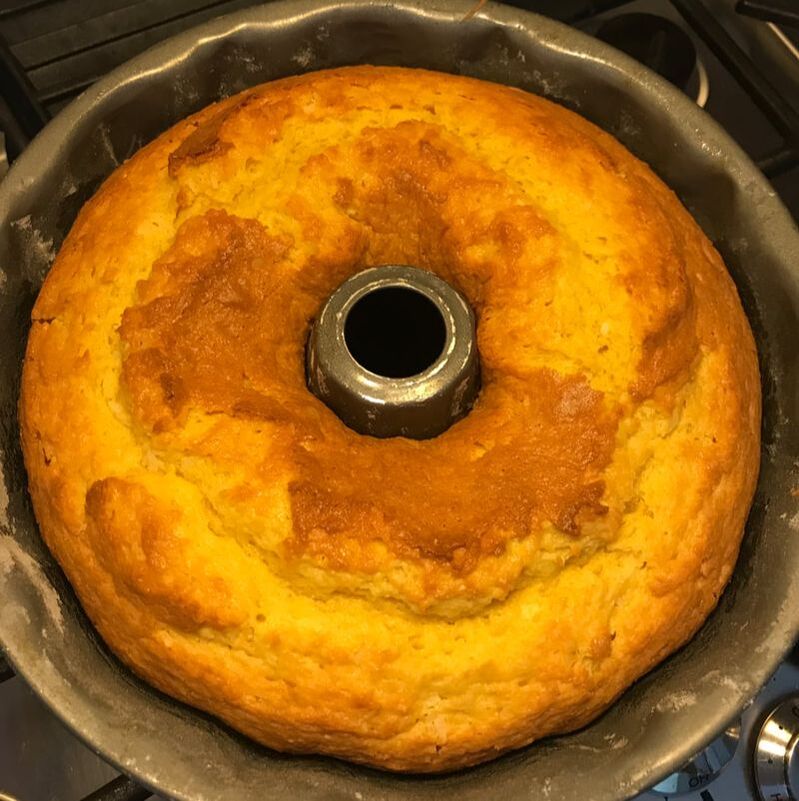
First, preheat the oven to 350 degrees. Grease the Bundt pan with butter and flour. Then, add the cup of chopped walnuts to the bottom of the pan. In a large bowl, add the yellow cake mix and the vanilla pudding mix. Mix together. In a separate bowl, whisk the eggs. Add the whisked eggs to the large bowl along with the 1/4 cup water, 1/4 cup squeezed orange, oil, 1/2 cup rum, and orange zest. Mix all ingredients to a smooth batter. Sprinkle in the coconut and stir. Add the cake mixture to the greased Bundt pan. Place in the oven for approximately 45 minutes. Insert a toothpick and if it comes out clean, the cake is baked. Let the cake cool for 15 minutes and take it out of the pan. Set aside.
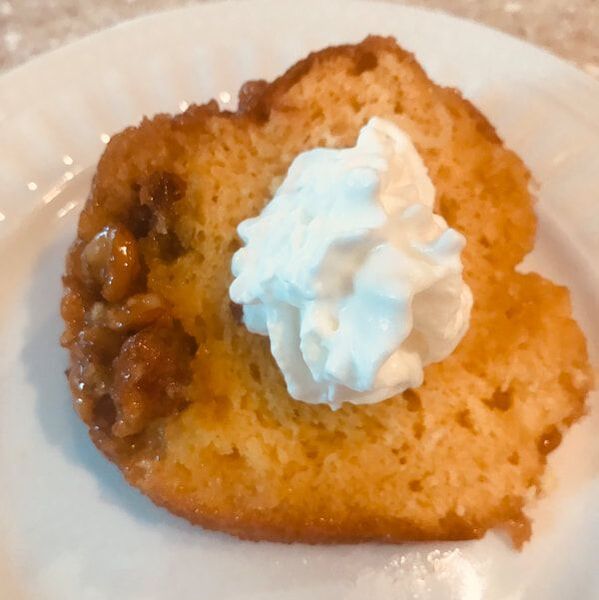
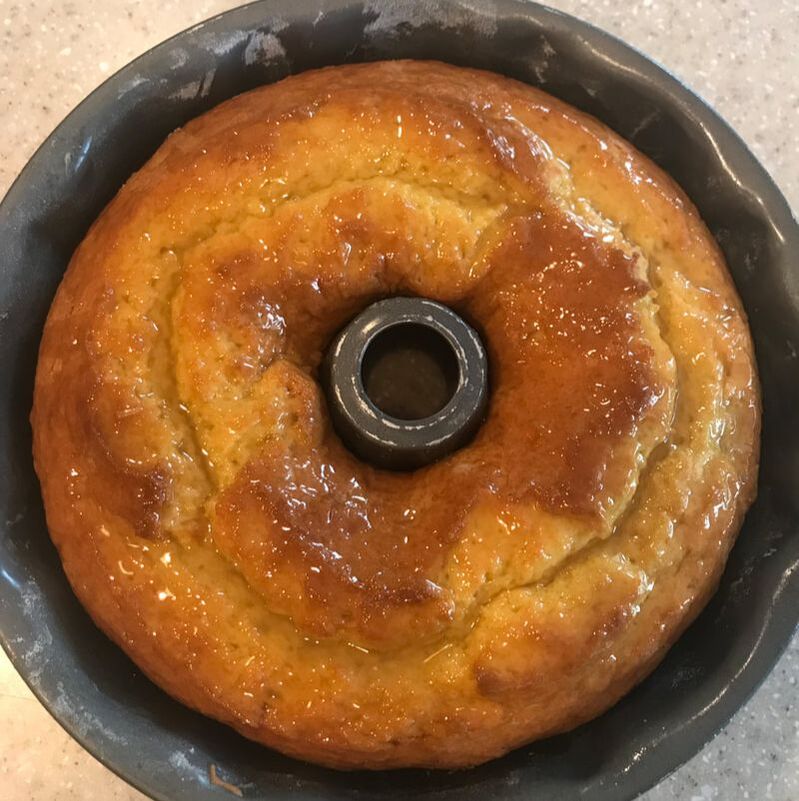
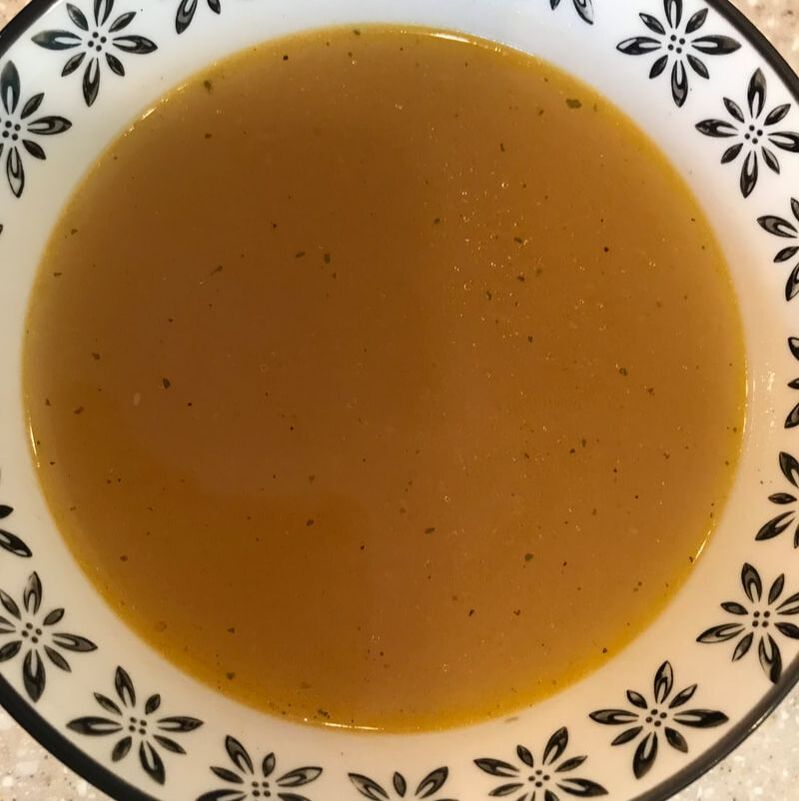
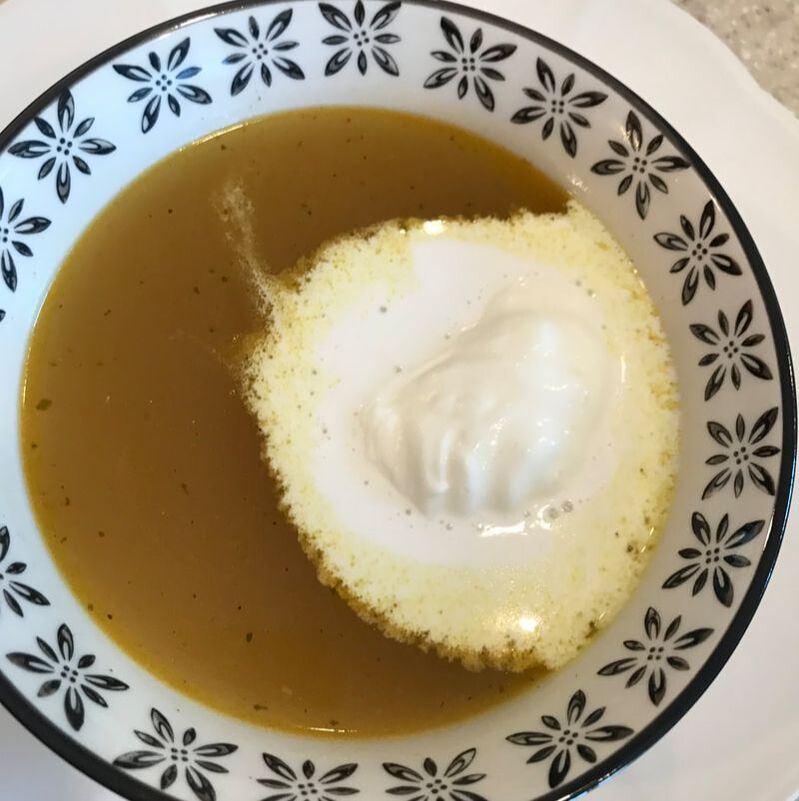
For the glaze, mix together in a saucepan over medium heat the butter, 1/4 cup water, and 2/3 cup sugar. Once it comes to a boil, stir until the sugar melts (approximately 4 - 5 minutes). Stir continuously. After the mixture comes off the heat, add the rum and orange liqueur. Once the glaze is ready. add half of the mixture back into the empty Bundt pan. Place the cake back into the pan as originally baked. Pour the remaining glaze on top of the cake (which of course is the bottom of the cake). Let it sit for a couple of hours if you have the time, so the cake soaks up all the glaze. When ready to serve, flip the cake out of the pan. FYI: If you don't have time to wait for the cake to soak up all the glaze, brush it on until all the glaze is gone. Using fresh whipped cream on top of each slice of cake makes it extra special. Also, if you want to add a sprig of mint to the whipped cream for presentation, it's a dessert meant for fine dining. 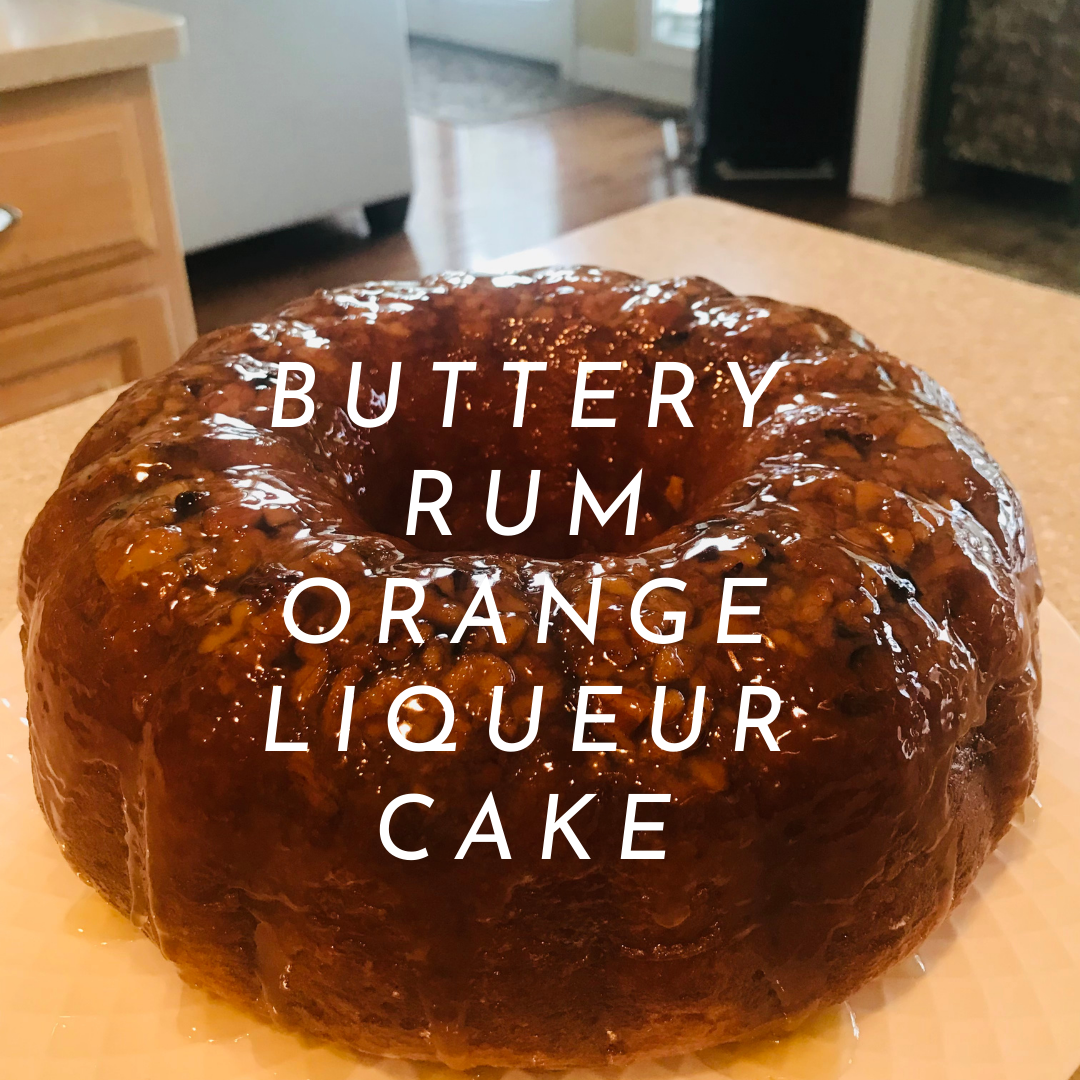  Bellevue Broth from the catering families of Philadelphia
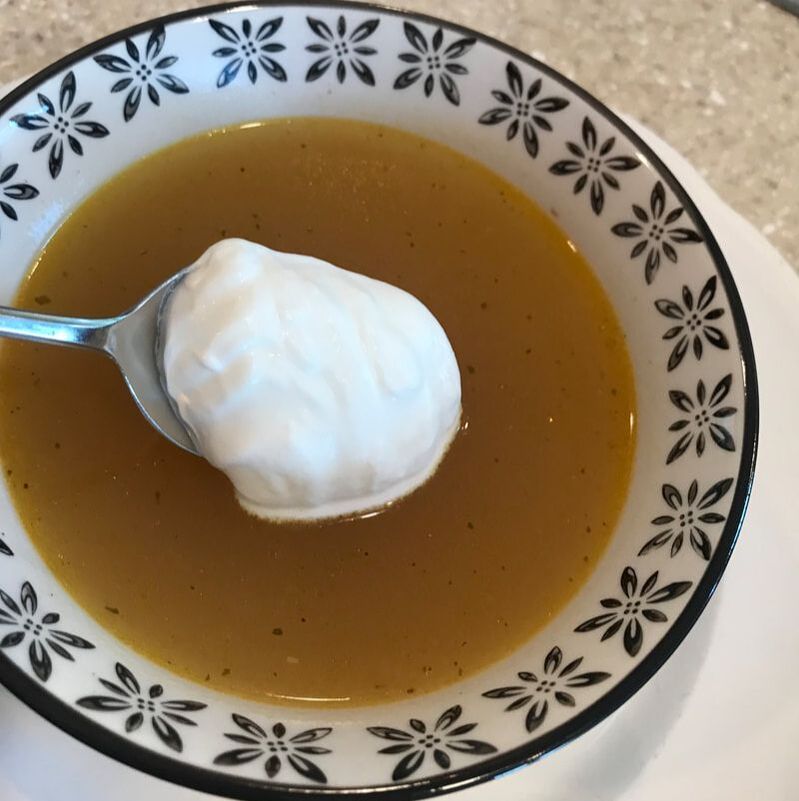
If you haven't watched the Netflix series High on the Hog it's time to sit down and binge. The food elevates the senses and the backstories reach deep into the soul. The entire four-part series will leave you wanting more. High on the Hog features stories about African American cuisine and how these dishes came to be. For me, part of the joy of cooking is trying something new. Much of my knowledge of cooking has deep Southern roots. My grandma was an excellent cook, and many of her dishes have been passed down to my mom, aunts, cousins, and me. That said, I try to put my own spin on many of the generational recipes. It's more fun and hopefully, healthier. Bellevue broth is an absolute delight to the palate. I had my husband give it a try and he said it's so good, it tastes like the first course from a five-star restaurant. I have to agree. I don't have the complete recipe from the show. I listened carefully and have my way of preparing the shellfish stock and a quick and easy way to nip the chicken stock in the bud. 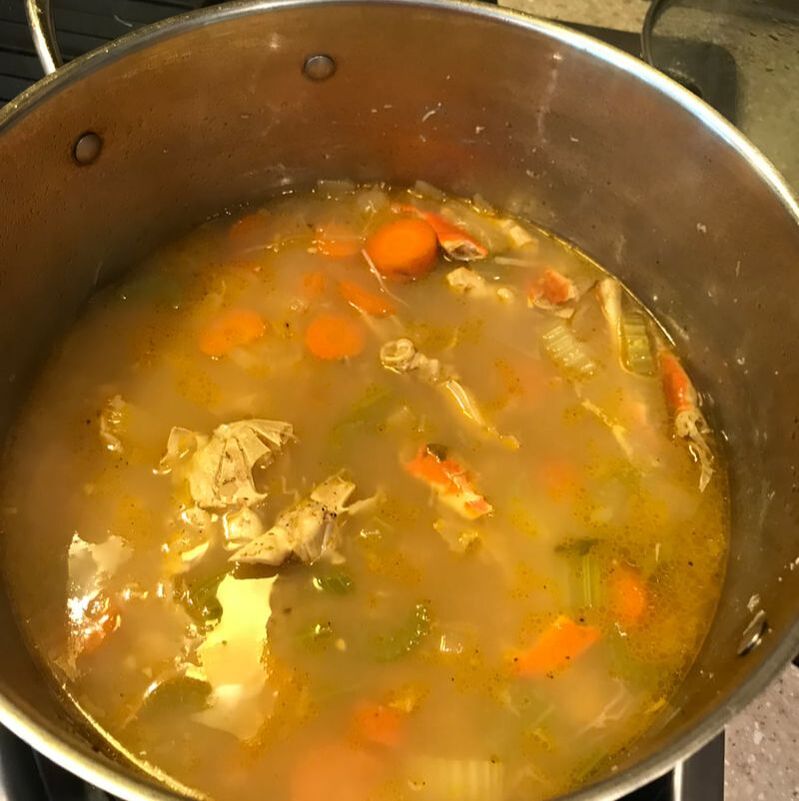 My recipe for the shellfish stock Bellevue Broth is part of shellfish stock and chicken stock. To begin with, I didn't make the chicken stock. I bought the Knorr chicken bouillon cubes and followed the directions. I did make the shellfish stock from scratch using my recipe.
Shellfish stock: Leftover shells from cooked shrimp, crab, King crab legs, etc. Since I knew I was going to make this broth, I took home my leftover King crab leg shells from a local restaurant, placed them in a baggy, and stuck them in the freezer. Once I decided to make the broth, I took the shells out of the freezer, beat them with a rolling pin, and they were ready to go. Ingredients: 1/2 pound shells (or pound if you want to double the recipe). 1/2 yellow onion Carrot Celery 2 cloves of garlic 2 T. olive oil Salt/pepper to taste 2 bay leaves Lemon squeeze Five cups water In a large stockpot, add your olive oil, shells, carrot, celery, and onion. Sauté for 15 minutes or until turning brown. Add the garlic for a two-minute sauté. Add your squeeze of lemon to get the brown bits off the pan. Pour in the water. Add the bay leaves. Bring to a boil. Let simmer for 45 minutes to an hour. Strain the broth using a cheesecloth and throw away the veggies and shells. Knorr Chicken Bouillon: I made three cups by following the directions Whipping Cream: Buy heavy whipping cream, whip it. Add a pinch of salt while whipping. The assembly of Bellevue Broth. It's a one-to-two ratio. One part shellfish stock to two parts chicken broth. Mix these together. Add a dollop of whipped cream just before serving and top with a bit of parsley. Incredibly delicious. Quick and Easy (be sure to bring home your shellfish shells from the local restaurant...or make your own). You'll believe you've died and gone to heaven. If you enjoy learning about different cultures and how food originated, you'll love the Netflix series, "High on the Hog."
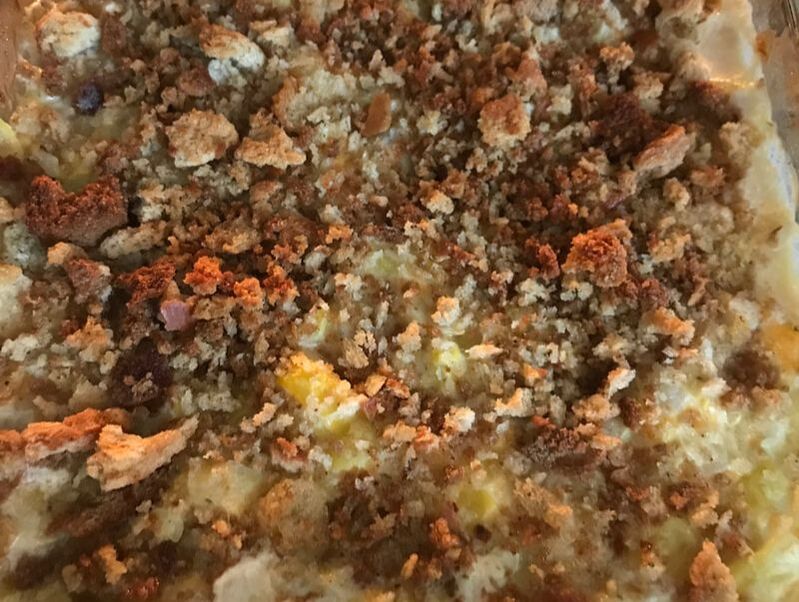
By Liz Latta It's a joy to cook in the summertime with all of the fresh vegetables. I've seen pictures of gardens growing all over Facebook. The Latta garden is producing and we're very excited.
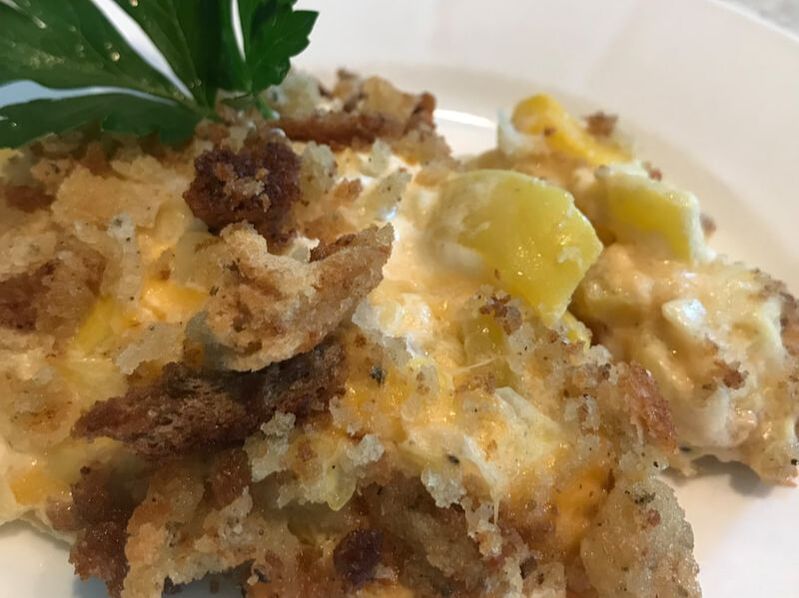
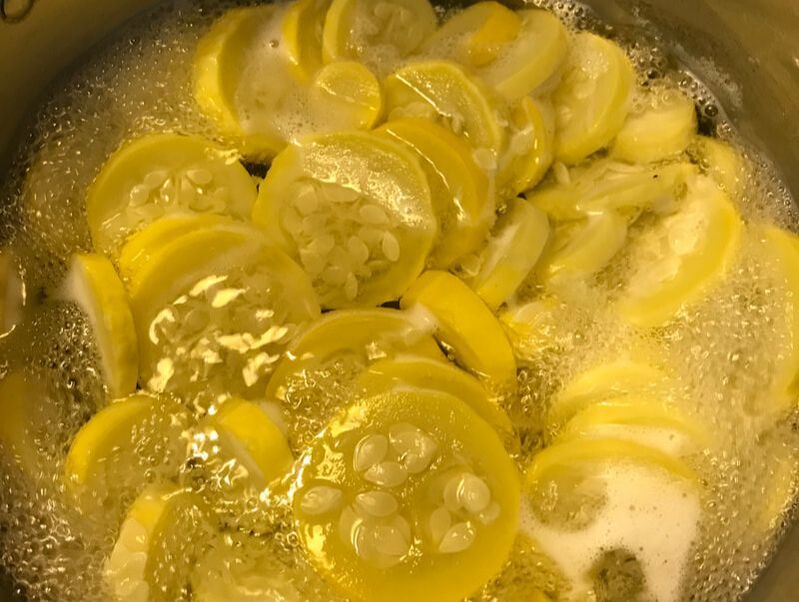
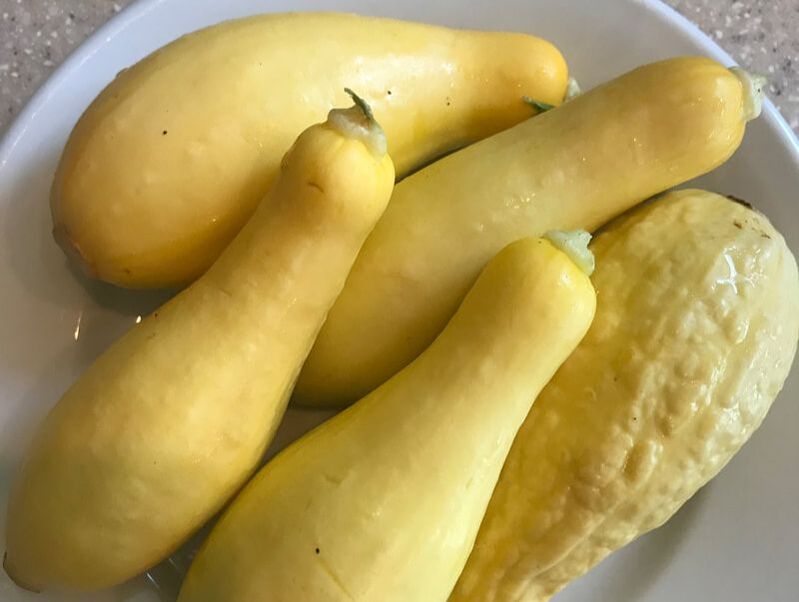
I've got to give my mom a shout-out; it's her garden too. She has the perfect spot and graciously agreed to share the space. First, it was the green leaf lettuce, spinach, kale, and romaine. Now, it's the squash's turn. Pepperidge Farm Cheesy Garden Squash Casserole Five average size squash 1/3 onion (chopped) Four pats of unsalted butter 1/3 bag sharp cheddar cheese 1/4 cup grated parmesan 1/4 cup cream cheese 1/4 cup sour cream 2/3 cup Pepperidge Farm Stuffing Salt/Pepper to taste Slice the squash. Cover with water. Boil until soft (approximately 15-20 minutes). Add 1/4 teaspoon of salt after the water comes to a boil. Drain the squash in a colander. In the pot used to boil the squash, add two pats of butter to sauté the onions (the buttery onions will be added to the squash). Salt to taste to bring out the sweetness of the onion. Combine the squash and the sauté onions in a square or round glass bowl. Salt and pepper to taste. Add the cheeses (reserve a bit of the parmesan for topping) and the sour cream. Mix together. In the same pot, add two pats of unsalted butter and melt. Add the stuffing and sprinkle the remaining parmesan cheese. Mix together. Pour on top of the squash and cheese mixture. Bake covered at 350 degrees for 20-25 minutes. Halfway through the baking time, take the aluminum foil off. Watch for the bubbles on the side of the casserole. Take out and let sit for five minutes and serve. 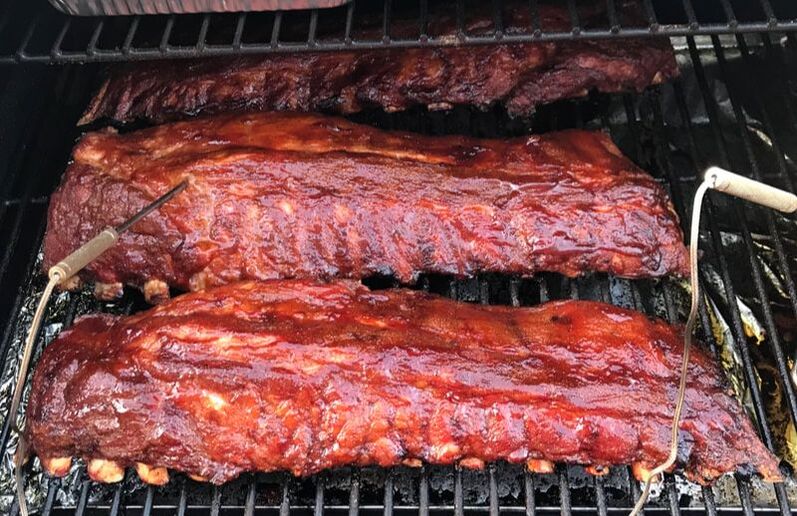 Pork ribs on the pellet grill over a sunny weekend in April. If you're from the South, there's nothing better than BBQ. Growing up, my favorite food was BBQ ribs. Weekend grilling with my dad as master chef, my mom as sous chef (makin' the sides), and me and my brothers waiting for the best meal ever...it's one of my favorite memories. Sam's is a great place to buy a rack or two of ribs. These beauties required little preparation before placing them onto the pellet grill. Our party of eight ate until we were full and had few 'to spare'. My husband was a master smoker and he did a fabulous job. Here are the directions on how to smoke the perfect ribs on the pellet grill. Pork ribs: Feeds 8 - 10 Two racks of pork ribs Wood Pellets: Hickory Spritzer of equal parts apple juice and apple cider 1/4 cup Dijon mustard 1/2 cup apple juice T. Worcestershire sauce 1/2 cup honey 1/2 cup dark brown sugar 1/4 cup apple juice Heavy-duty aluminum foil  The full meal on the pellet and charcoal grills consisting of ribs, a whole chicken, corn on the cobb, and roasted potatoes. Preheat the pellet grill to 180 degrees for 15 minutes. While the grill is preheating, remove any of the silver membranes from the bone side of the ribs. A butter knife will do. Combine the Dijon mustard, 1/2 cup apple juice, and T. Worcestershire together and brush onto the ribs. When the grill is ready, place directly on the grates, meat side up. Smoke for three hours. Tip: Take your spritzer of apple juice and cider and spritz the ribs once an hour to add moisture.
After the three-hour smoke, remove the ribs from the grill. Turn the temperature up to 225 degrees. Wrap the ribs in heavy-duty aluminum foil. Tear a couple of pieces per rack so you can keep moisture in more tightly. Before placing on the grill, add the honey, dark brown sugar, and remaining apple juice to the ribs. Continue to smoke for another two hours. After the two-hour smoke, remove ribs from the aluminum foil and place, once again, directly on the grate for another 30 minutes to an hour. During the final smoking, process is when you add your favorite BBQ sauce. Once the ribs reach an internal temperature of 165 degrees, take off the pellet grill and let them rest. Serve and enjoy! Three delicious sandwich recipes made famous at the Masters Tournament at Augusta National Golf Club4/11/2021
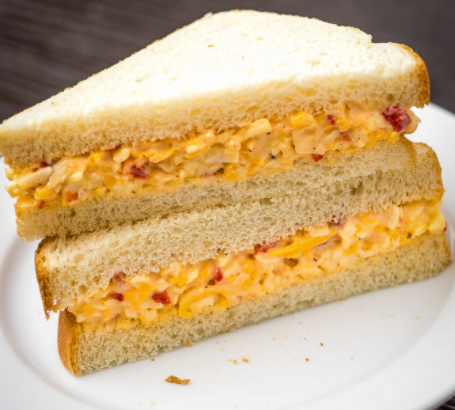
The Masters Tournament at Augusta National Golf Club is known for its famous sandwiches. The first is the pimento cheese. The Pimento Cheese Sandwich Eight ounces of cheddar cheese (preferably freshly grated) 1/2 cup cream cheese (softened) 1/2 cup of pimento or red pepper (finely diced and squeezed) 3 T. favorite mayonnaise (or substitute avocado) 1/2 tsp. red pepper flakes Kosher salt/pepper to taste Mix all ingredients and spread onto your favorite bread. Serves four.
Another Augusta classic is the egg salad sandwich. It's a traditional egg salad with fresh dill. Classic Egg Salad Sandwich Eight eggs boiled (for the perfect boil, place eggs in a pot covered in water. Bring to a boil. Turn the burner off. Let sit for exactly 14 minutes. Cool down with water. Peel). 1/2 cup mayo (again, you may substitute avocado) 2 celery stalks (finely chopped) 1/4 cup sweet onion (finely chopped) 2 tsp. fresh dill (finely chopped) 1 tsp. mustard A hint of ground pepper Dash of smoked paprika After the eggs are boiled and cool, separate the yolk from the white. Mix the yolk, mayonnaise, mustard, pepper, and paprika. Add the whites, onion, celery, and dill. Once tossed together, spoon onto your favorite bread and serve. Makes four sandwiches.
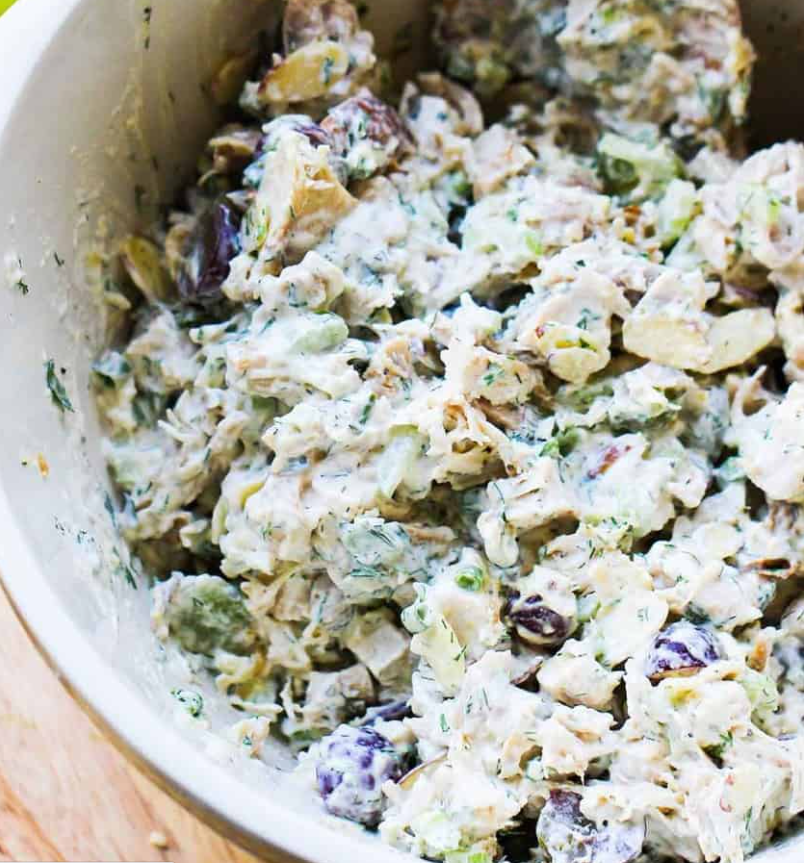
The last of three sandwiches for the Masters Tournament roundup is the chicken salad sandwich. This is California chicken salad which is sweeter than the traditional chicken salad. It's more sweet and savory.
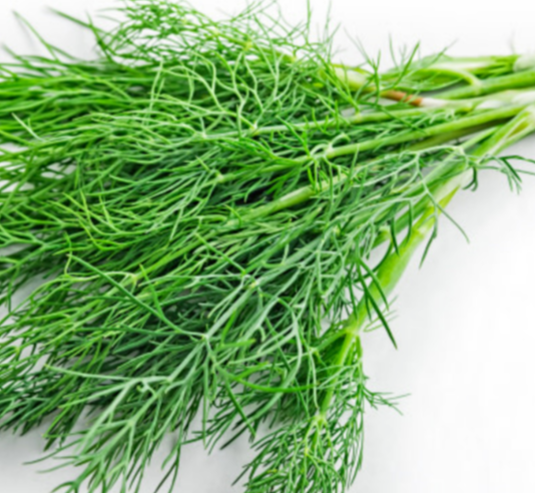
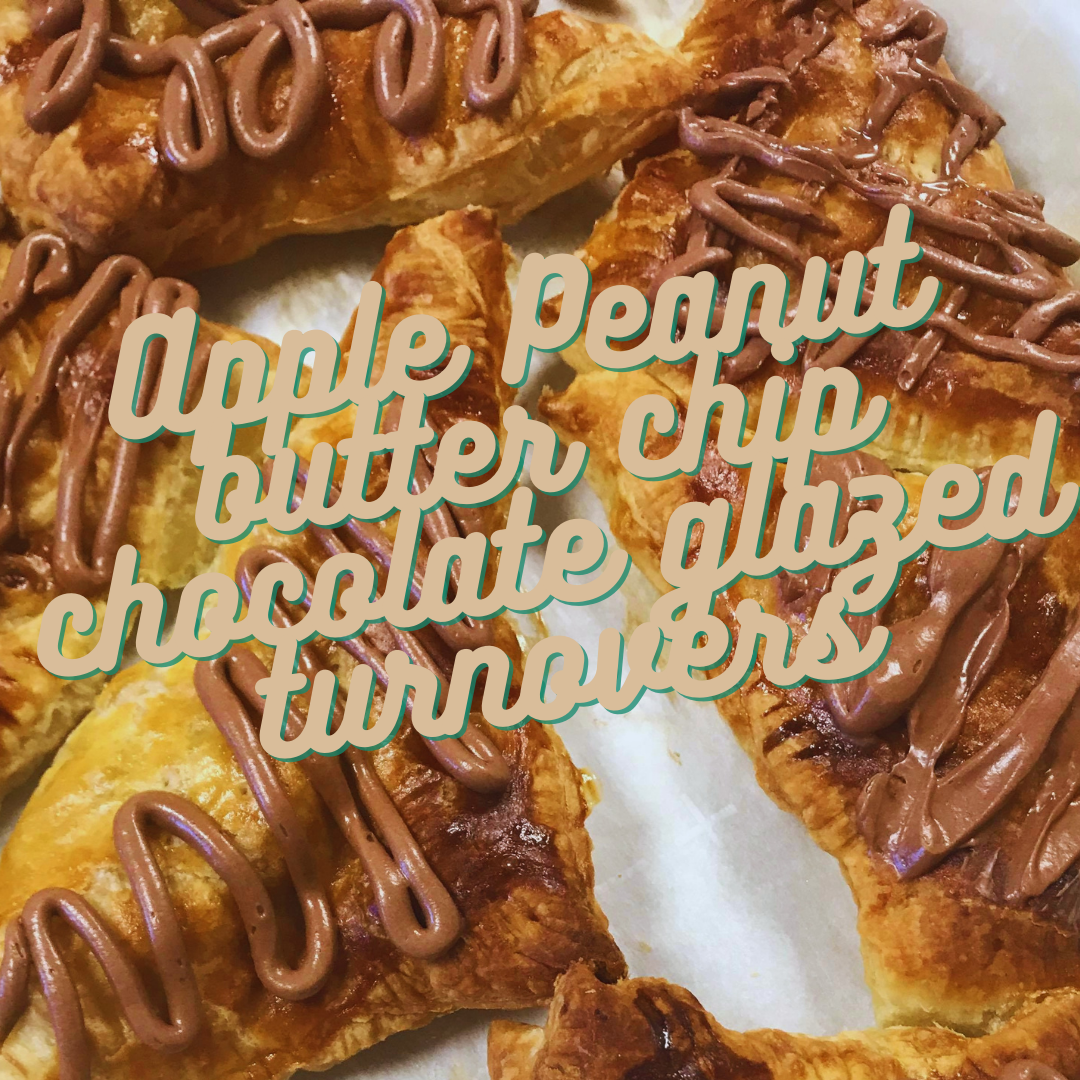
Chicken Salad Sandwich Three large chicken breasts (roasted at 350 degrees for 45 to 50 minutes. The internal temperature should reach 165 degrees. Season with olive oil, Kosher salt, and pepper). Cup of red seedless grapes (chopped in half or thirds) Cup of pecans or walnuts (your preference) 2 celery stalks (finely chopped) 2 green onions (finely chopped) 1 tsp. chopped dill Cup of mayonnaise 1/2 juiced lemon 1/2 tsp. Dijon mustard Kosher salt and pepper to taste After the chicken has roasted and cooled, cut into small pieces. Add the grapes, nuts, celery, onion, and dill. Mix the mayonnaise, lemon, mustard, and salt/pepper. Combine the two. Scoop onto your favorite bread and serve. Makes six to eight sandwiches. Apple peanut butter chip chocolate glazed turnovers are a Sunday surprise from a riverboat chef4/10/2021
While traveling down the river by Point Pleasant, West Virginia, at the confluence of the Kanawha and Ohio, chef Jeff created his delicious apple tarts with a surprise element for this particular crew. As a riverboat chef on the Hines Furlong Line, Sundays are special and made for comfort food. If you've heard of Point Pleasant, the town became famous by sightings of a moth man that appeared in the area in 1966. Witnesses said the red-eyed creature had wings with pointed tips and long legs. In 1975, the creature inspired a book, The Mothman Prophecies" which was later made into a movie starring Richard Gere. After half a century, the moth man is still part of the folklore and is celebrated at the annual moth man festival. Of course, this story has nothing to do with the recipe. It was Jeff's wife Dawn that inspired the surprise hidden inside the apple tart. He said she always eats her apples with peanut butter or Nutella. What a wonderful treat for the crew inspired by his lovely wife as he floats down the Ohio River on a sunny afternoon.
Apple Tarts
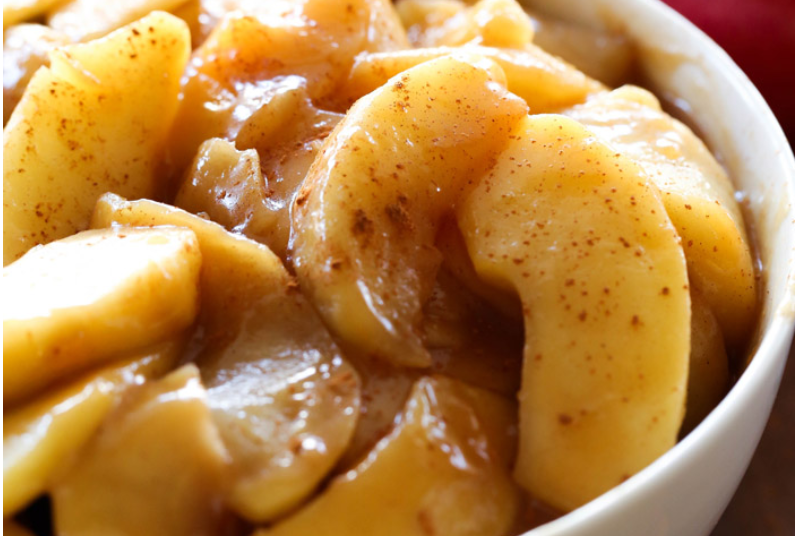
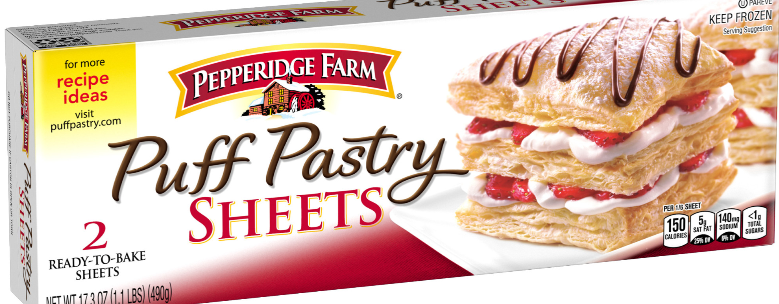
4-6 large Granny Smith apples (cored, peeled and sliced) 1 box of puff pastry (thawed) Cup of powdered sugar 1/4 cocoa powder Apple pie seasoning (to taste) Heavy cream or 1/2 & 1/2 Peanut butter chips Tbs. butter 2 eggs (beaten with a splash of cold water) Vanilla extract Parchment paper Directions: For the apples, start a skillet over medium heat, add butter, then apples & toss to coat. Sprinkle with apple pie spice & add a pinch of salt (salt brings out flavor in sweets too). When tender, set aside to cool (almost to or at least room temperature). Prepare puff pastry by laying out each sheet then work the folds out to make two smooth sheets using a little bit of flour to prevent sticking. Cut each sheet into four even squares giving you eight total squares. Spoon apples into the center of each square (dividing equally) & add half a dozen chips to each. Use a pastry brush to lightly brush two sides of the pastry & fold the corners to make a triangle. Pick up & gently pinch edges to seal. Use a fork to crimp edges but a fluted pastry wheel would work as well. Lay on a sheet pan & cut a slit or use a fork to pierce the top to let steam escape. When done, brush the eight tarts with the remaining egg wash. Bake at 375° for 12 -15 mins until golden brown. For glaze...in a bowl mix powdered sugar and 1 tsp. of vanilla. Slowly, add dairy (whisking constantly) to make a semi-thick glaze. With a sifter add cocoa powder & stir to incorporate. Note: if you like more cocoa, add a tsp. or two to taste (you may also omit & have a plain vanilla glaze if you choose). After the tarts have cooled for 15-20 minutes, put glaze into your favorite zip-top bag & cut a tiny piece out of the corner to make a pastry bag (if you don’t have a pastry bag) pipe as you wish to decorate & finish with powdered sugar. Note: "The peanut butter chips are meant to be a surprise...more of a lagniappe-like, Wow, I wasn’t expecting that. Enjoy! "
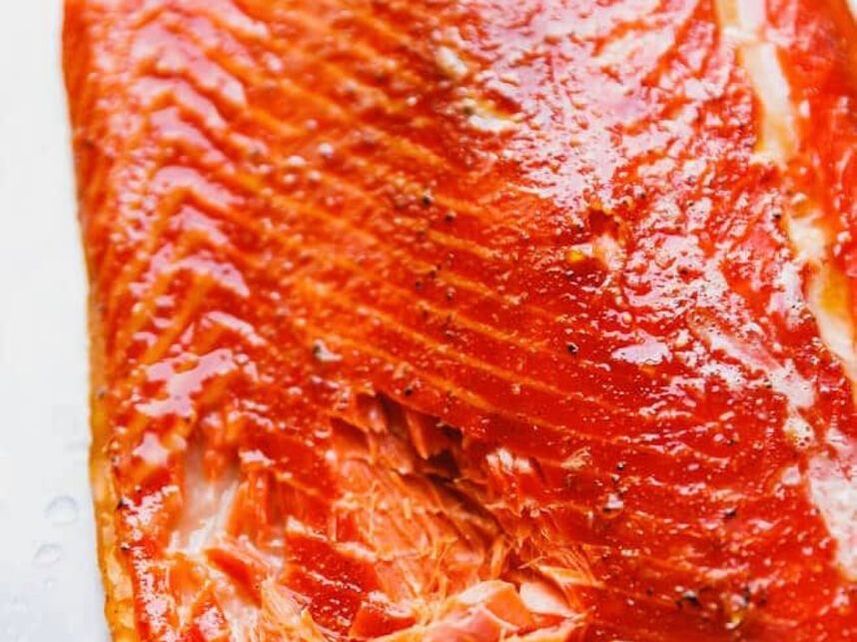
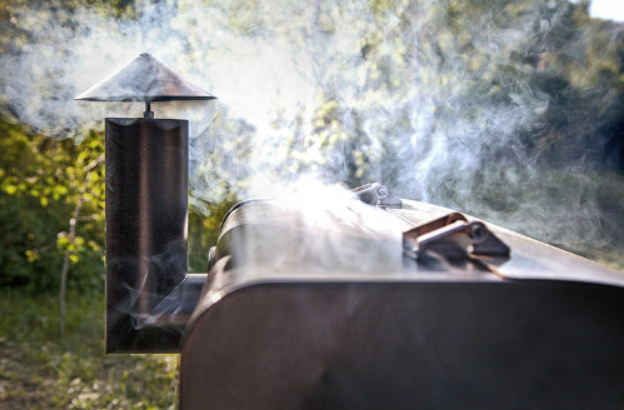
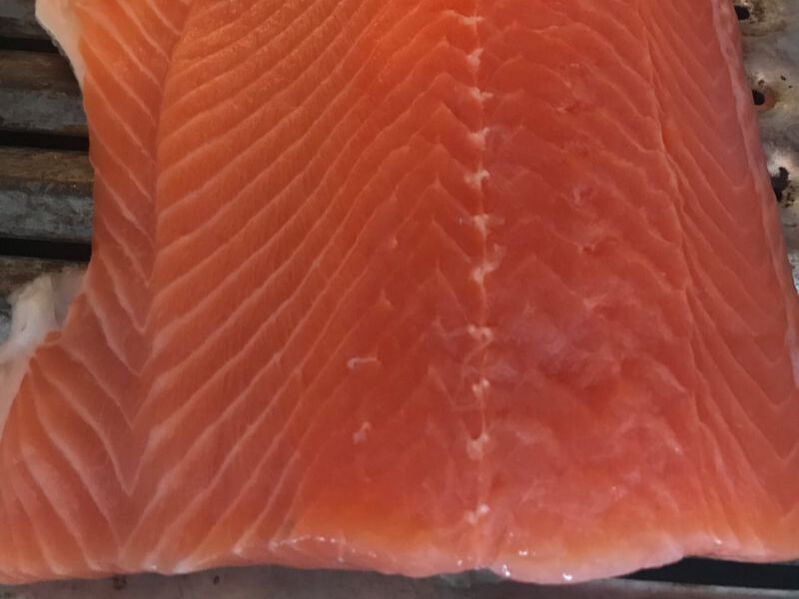
"I love fresh salmon." Whether grilled, baked, smoked, or sautéed, I'm all in. The little market in Lone Oak, KY. catches fish from the Gulf Coast in Alabama each week and hauls it back to Kentucky in a refrigerated truck. Taking advantage of fresh fish for flavor, heart health, and the joy of cooking is such a gift to the community. I'm not negating the wonderful fresh fish available in our neck of the woods. The rivers, lakes, and ponds that surround western Kentucky are such a blessing for those who enjoy fishing, cooking, and eating their catch. A couple of weeks ago, we bought a pellet grill. Nothing fancy. Kevin ran across a deal he couldn't walk away from at the local Lowes Home Improvement Store. He got a close-out on a grill, regularly priced at $500 for $200. That's right. There were six available. He called a few of his buddies at CSI and the grill's flew off the shelves. (If there were more, I would've shared them with my readers). It was time to test out the new smoker/grill on fresh salmon. Now, Kevin isn't a big fish fan....so, in his attempt to eat more fish, he gave it a whirl and I'm oh so glad he did. If you want the recipe...let's get to it.
Two pounds of salmon (or whatever you need for the meal)
The Brine Quart of cool water (make sure your fish is covered) 1/3 cup Kosher salt 1/3 cup brown sugar Mix together the brine and place the fish in a plastic or glass container. Cover and place in the refrigerator overnight. This process helps to eliminate excess moisture in the fish as well as infuse the fish with salt. The next morning, take the fish out of the brine and pat dry. Let it rest in the fridge, skin side down, for a couple of hours (minimum of two hours). Smoking on the pellet grill Rub the skin with a bit of oil so it won't stick to the rack. For the wood pellets, Kevin used apple wood. You'll start with a small fire and gradually work your way up to a higher heat. Smoke/grill at 140-150 degrees for about an hour gradually moving to 175 degrees for three hours. Once the internal temperature of the fish reaches 140 degrees, it should sustain that temperature for 30 minutes while on the grill. Basting After the first hour, baste the fish with pure maple syrup every hour. After the salmon has held its internal temperature of 140 degrees for 30 minutes, take it off the grill and let it rest on a rack before serving or placing it in the fridge. Once wrapped in plastic and refrigerated, smoked salmon will last for 10 days.
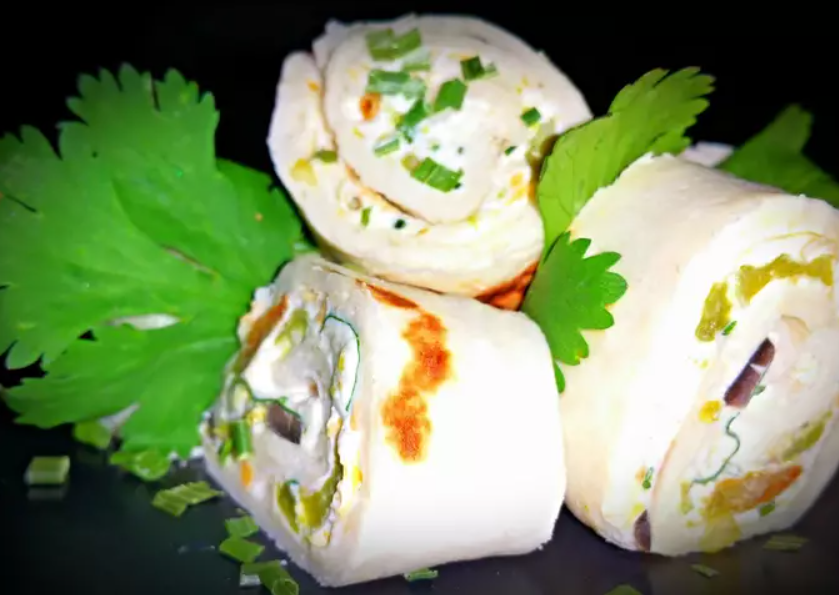
Have you ever thought about making your own pinwheels? I can honestly say I haven't...until now. Pinwheel cream cheese treats are an excellent choice for a snack that's light and filling.
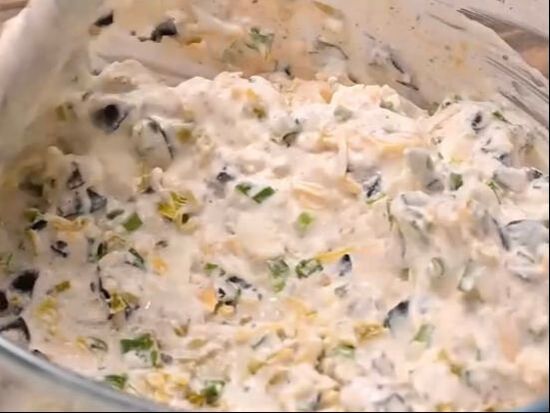
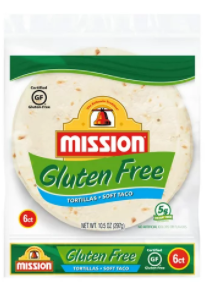
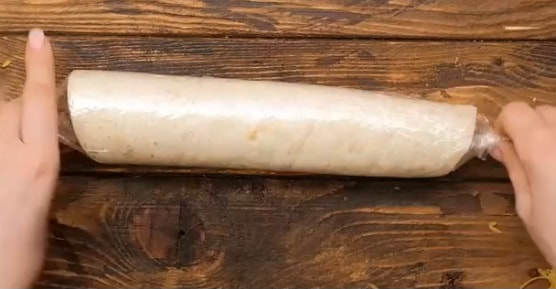
Friend Jody Davis shared this recipe with my Aunt Marge, Mom, and Uncle Danny. Jody and Danny are married and live in Florida. Another reason why my mind is on 'Florida, Florida, Florida.' The crew got together for some family time and Jody brought the pinwheels. Everyone fell in love with the flavor, the ease of making the dish, and the idea of taking almost anything you love and adding it to a cream cheese base. For this particular recipe you'll need the following: 8 ounces of cream cheese, softened 1 cup shredded sharp cheddar cheese Four green onions, chopped Bunch of cilantro, chopped 1/2 chopped red pepper 1/2 chopped yellow pepper Small can of chopped black olives, drained 2 ounces of green chilis (optional) 6 large burrito-size (gluten-free) tortillas...of course, regular flour tortillas will do Mix all ingredients, and spread equal portions of the cream cheese mixture on all of the burritos. Roll up. Wrap in saran wrap. Chill for an hour. Cut into bite-size pieces...in the shape of a pinwheel. Serve. If you want to use any dipping sauce, try your favorite salsa. Add some fresh cilantro and green onions for extra flavor. 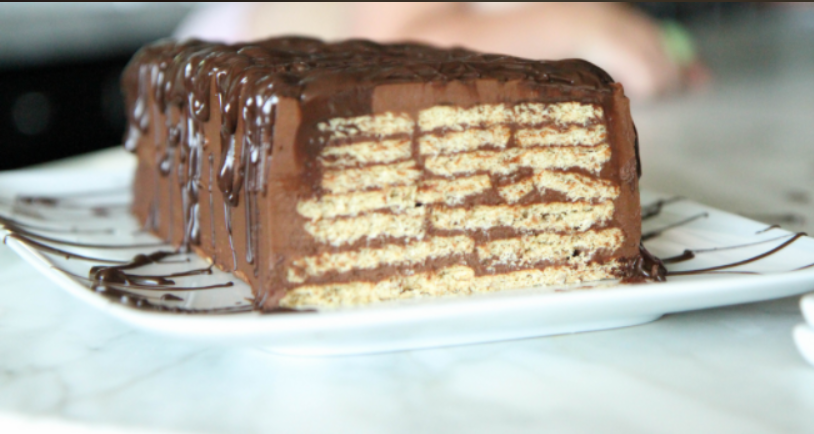 Indulgence made simple with this no-bake chocolate graham cracker cake
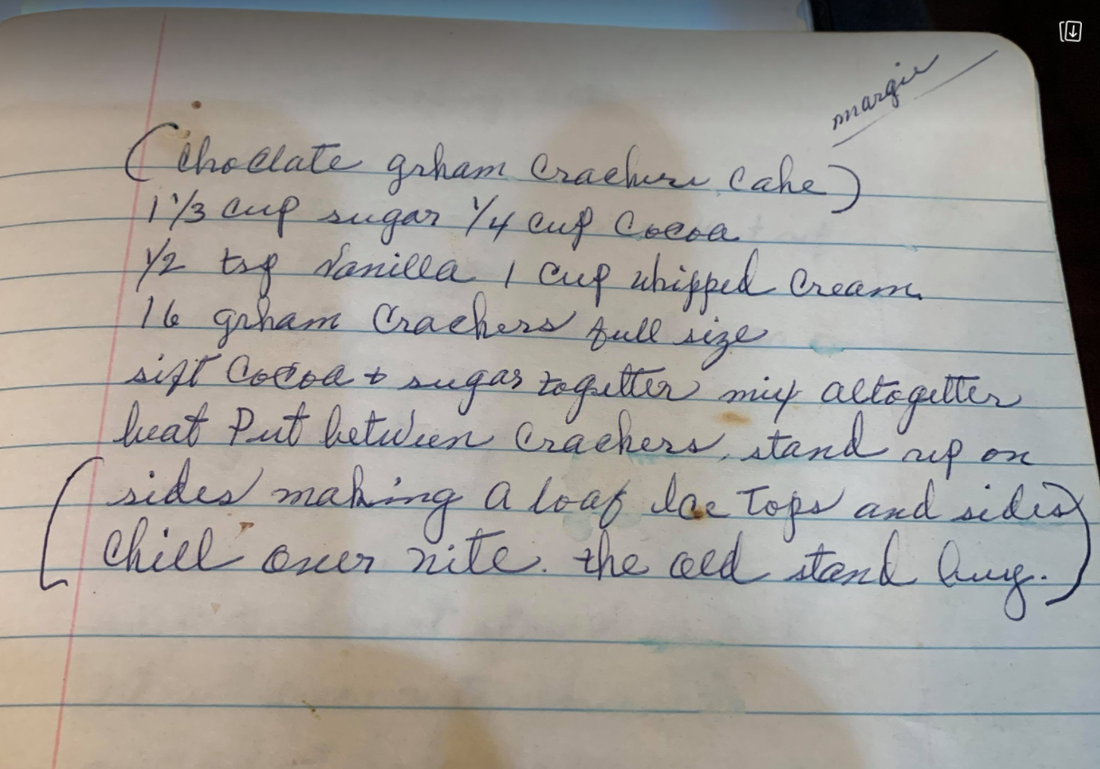
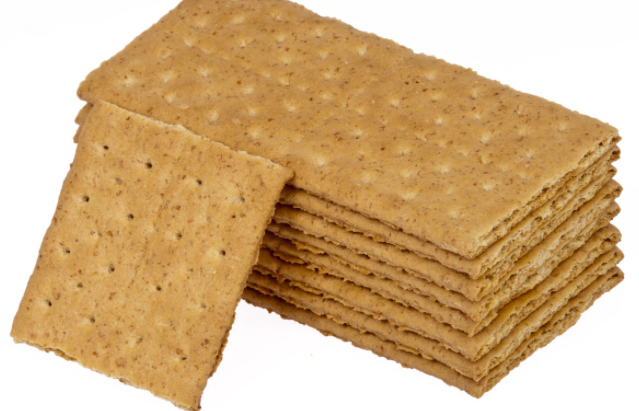
Chocolate Graham Cracker Cake is a favorite of two sisters, my mom, and Aunt Marge, made by my grandma when they were kids. It's one of those childhood dessert memories that's never forgotten and designed to put a smile on your face and deliciousness in your belly.
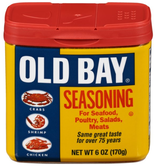
To this day, the family tradition continues. In fact, when Marge comes to visit Mom on her birthday, this is the cake she makes. The no-bake chocolate icebox graham cracker cake recipe 1 1/3 cup sugar 1/2 cup cocoa 1/2 tsp. vanilla 1 cup of whipping cream 16 graham crackers (Note from Marge, "I use a pint of whip cream because I like lots. So, I add about 1/4 more sugar and an additional 1/4 cup cocoa, and a little more vanilla). Sift sugar and cocoa and add slowly to the whipping cream. Beat until it peaks. Stack the 16 crackers in two rows of eight, side by side, horizontally. Spatula the cream mixture over the crackers, one cracker at a time. It will look like a loaf when completed. Be generous with the mixture between crackers. Hold the stack firm. Spatula icing over the sides and the top as well. Chill overnight. To serve, add dark chocolate shavings or Hershey's chocolate syrup for another layer of deliciousness. Or do what Marge and Mom do, cut a slice right out of the fridge and eat it.  King Crab Legs after boiling in hot water with salt, lemon, and Old Bay Seasoning
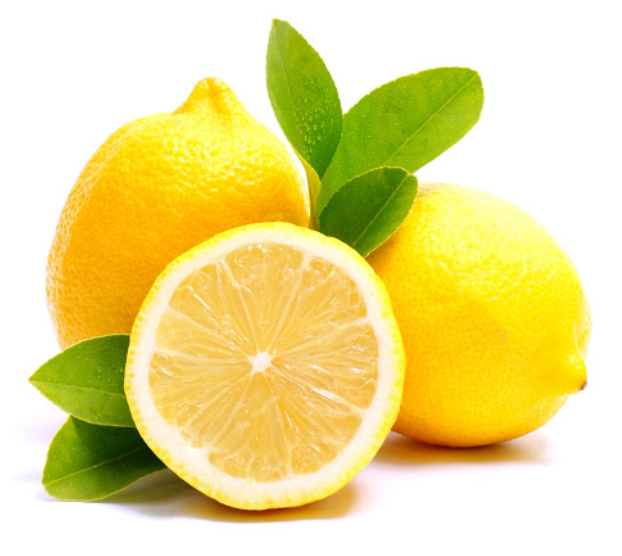
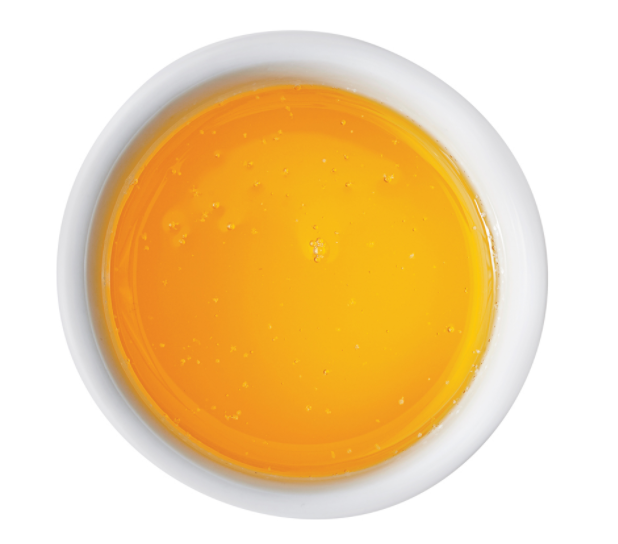
Happy Anniversary to us!  "David and I treated ourselves to King Crab legs compliments of Sam’s frozen food section. It was pricey...around $50.00 a package and I bought two! I was a bit hesitant since they were pricey...sure didn’t want to mess them up but they were wonderful!" Margie Davis fields If you're wondering the best way to cook King Crab legs, here's the low-down on this delightful indulgence. Directions: Thaw the shellfish on a cookie sheet in the refrigerator overnight. Prepare a big pot, half full, of water, with a couple of Tsp. of kosher salt, old bay seasoning, and sliced lemon. Bring to a rolling boil. Place the crab legs in the boiling water, put the lid on, lower the heat to medium, and boil for 5-6 minutes (I did six). Remove the legs and rinse slightly. Pat with a paper towel. Serve with melted butter. David prefers clarified butter, I use unsalted butter! I served it with a salad and roasted asparagus! Yummy!
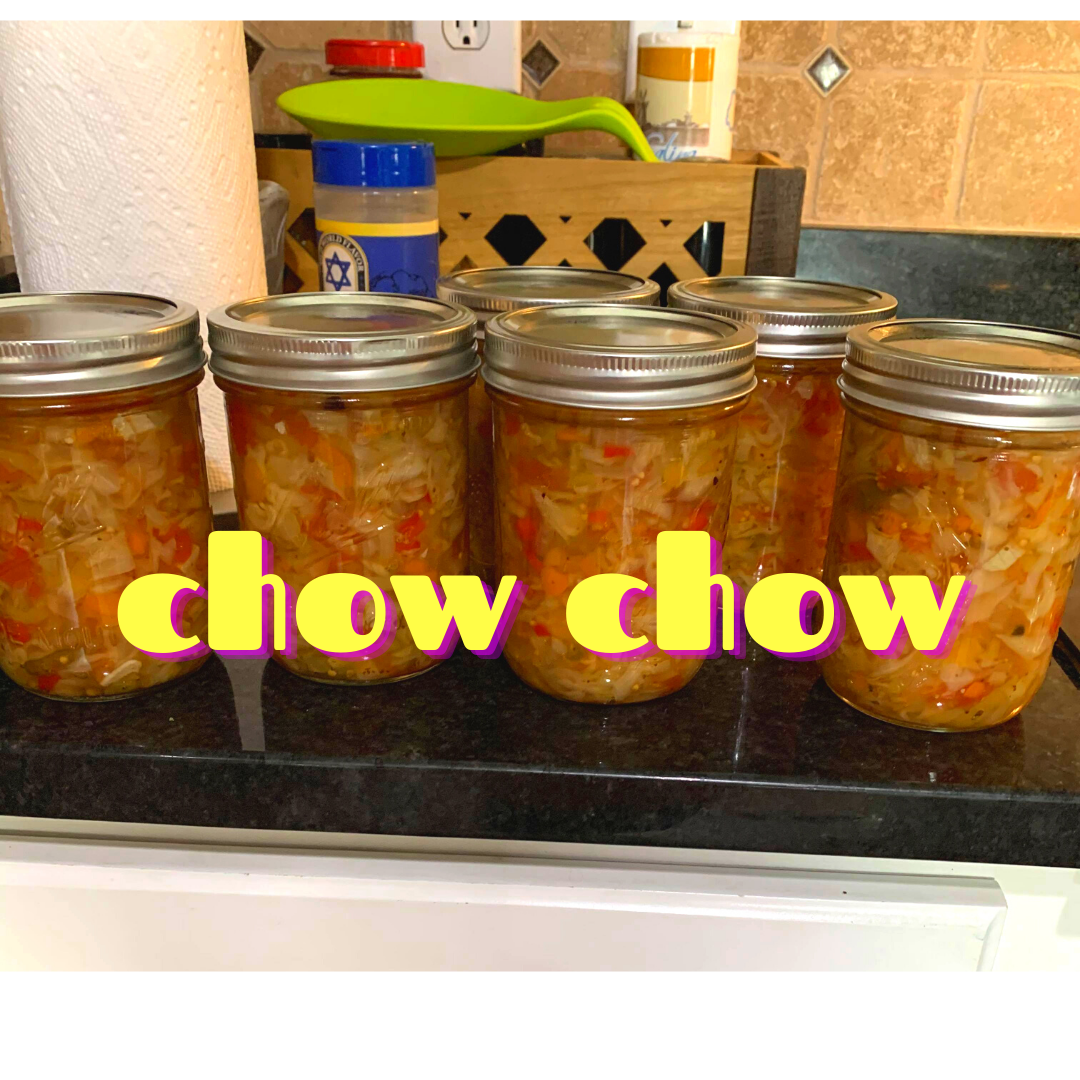
"I made chow chow today. Why, you ask? Because we can't find any. At our house, we love it with all kinds of things, and my mother, Liz's grandma, always had it around. I watched her make it lots of times from her garden veggies. So, I had a cabbage and a few things on hand and made it!" Margie Davis Fields
Chow Chow
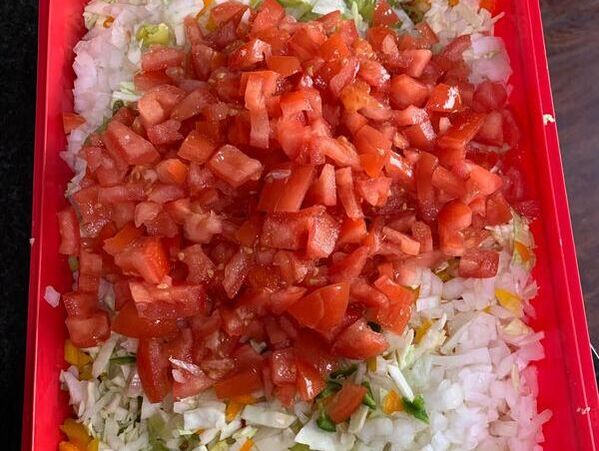
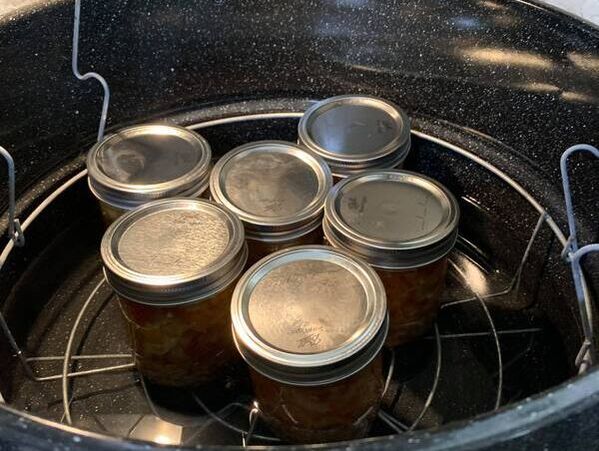
By Margie Davis Fields Such a Southern thing to eat with beans, meats, or whenever you want a little relish on your plate. My Momma made green tomato chow chow, pepper chow chow, ripe tomato chow chow...all kinds. I throw in whatever I like and do a basic process of canning. The recipe for this particular chow chow consists of the following: 1 small cabbage 6 semi-red store-bought tomatoes (I prefer green tomatoes) 5 different color bell peppers 2 hot peppers 3 large sweet onions Finely chop all vegetables. Place in a large pan. Add three cups of sugar, five cups of white vinegar, 1/4 cup pickling salt, one Tbs. yellow mustard seed, two-to-four cloves, minced garlic, 1 tsp. celery seed, 1 Tbs. pickling spices, and a dash of pepper flakes. You can be creative with the veggies added to the chow chow. Sometimes, I use zucchini or cauliflower. Bring everything to a boil. Reduce heat for 20 minutes. Place in six to eight-pint jars and seal. Of course, the jars need to be washed and ready to use. Next, boil the jars in a canner. The water needs to be at least an inch on the jar. Process for 10 minutes. Canning isn't hard. There are more convenient and simpler ways to can than my Momma's technique. Whatever method you use, it will turn out great too! |
Written byLiz Latta Archives
April 2024
Categories
All
|


 RSS Feed