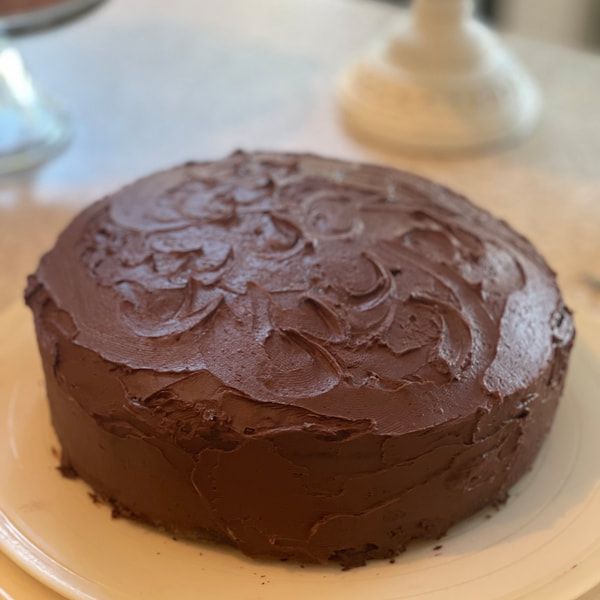
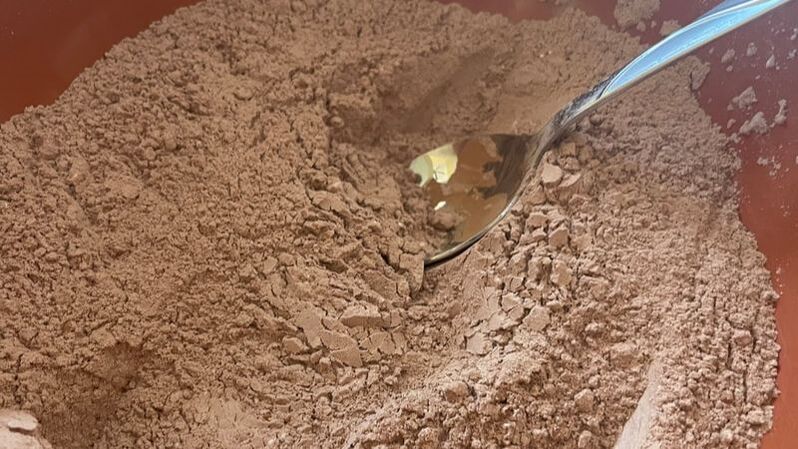
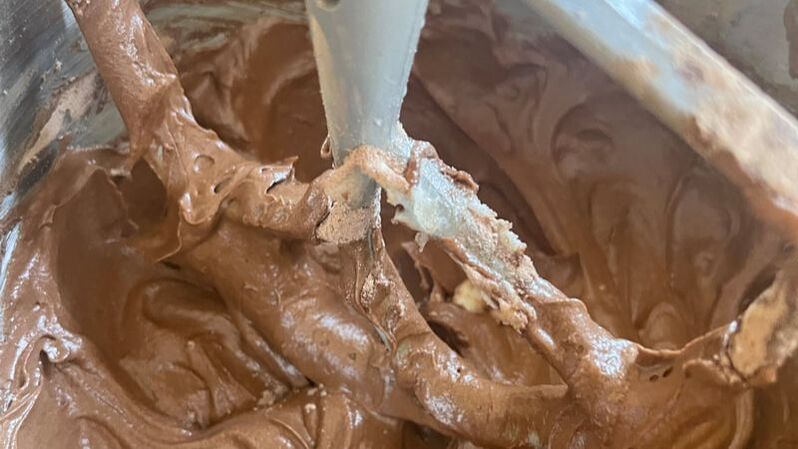
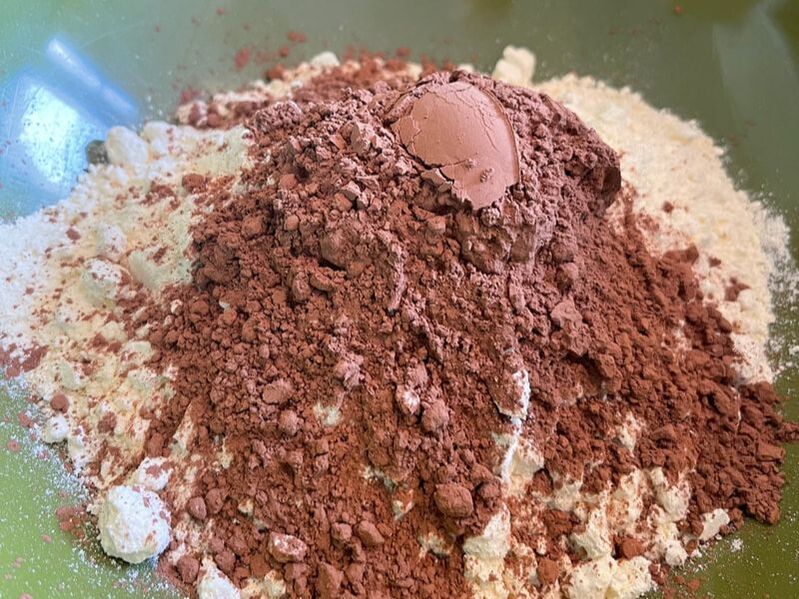
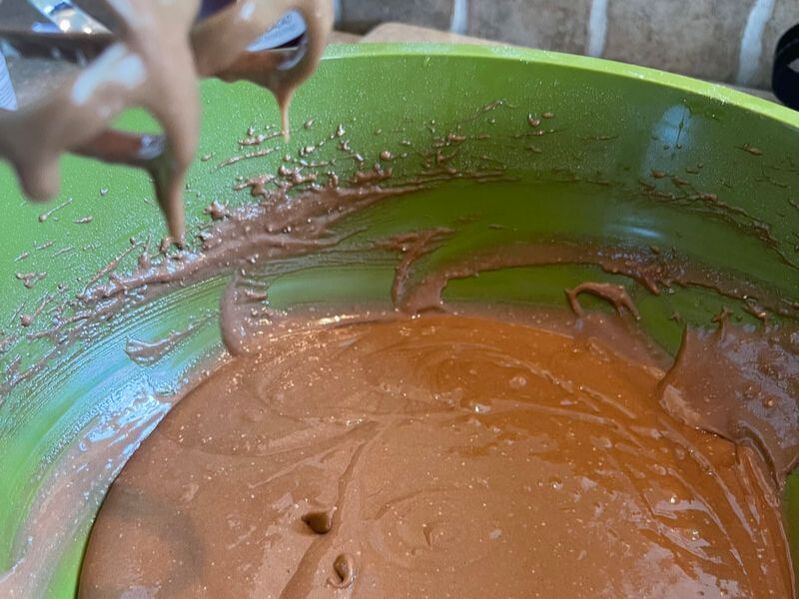
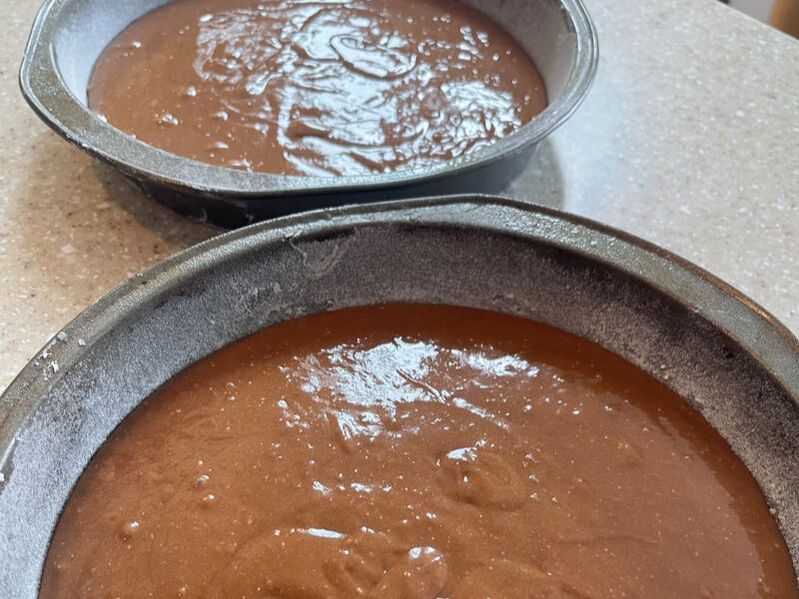
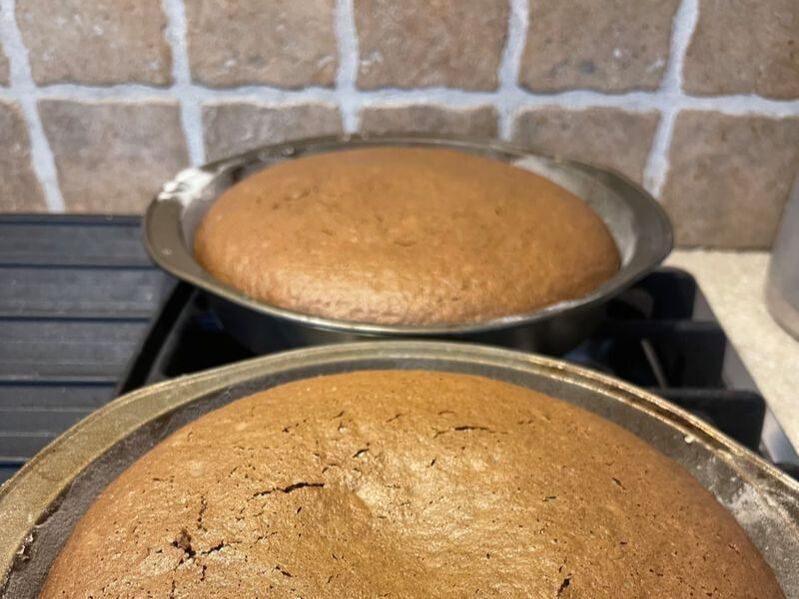
 Grandma's desserts are recipes created during simpler times. The desserts were meant for family reunions, church socials, and everyday living. All from a small kitchen in a small town with big love. Last summer, I started baking Grandma's recipes. She had cookbooks by the dozens with formulations of some of the most delicious sweets you'll ever try. Some of the ideas were hers and others were friends, family, or small improvements to published cookbooks. Are you interested in nostalgia baking? If so, Grandma's Recipes is the place for you. Take a trip down memory lane with her use of butter, sugar, and all things sweet. Some of my fondest memories of my Grandma involved her homestyle cooking. The food was always the perfect combination of sweet and savory. I don't recall a lot of heat, but the sweet and savory, definitely. All the baking that I remember took place in her kitchen on Church St. in West Tennessee. As a child, our families would gather on holidays or a typical Sunday meal after church. The women helped in the kitchen. The men sat in the den watching sports. The children played outside or were in one of two bedrooms playing with a jar full of buttons. It was heaven. Today, I'll share a little slice of heaven with this chocolate cocoa cake. Chocolate Cocoa Cake Ingredients: ¾ cup of butter 1 ¾ cup of sugar 2 eggs 1 tsp. vanilla extract 2 cups unsifted all-purpose flour ¾ cup cocoa 1 ½ tsp. baking soda ½ tsp salt 1 1/3 cup water Directions: Cream the butter and sugar until creamy and fluffy. 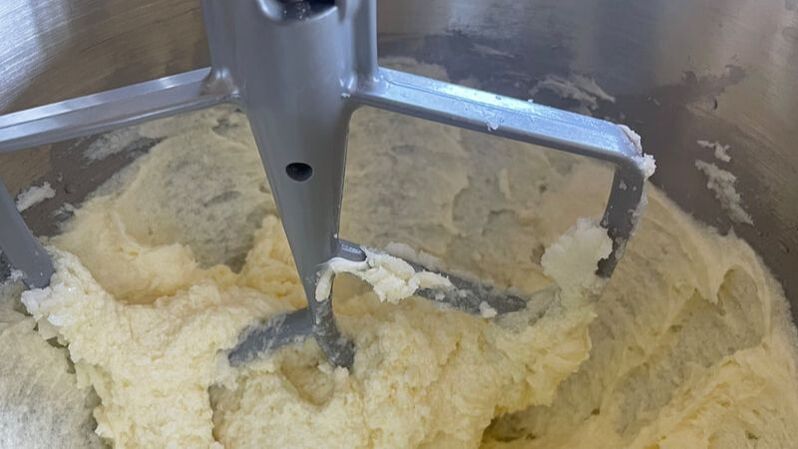 Add the eggs and vanilla and beat for one minute. Add the flour, cocoa, and salt alternatively with water to the creamed mixture.
Pour the batter into two oiled and floured pans. Bake at 350 degrees for 25 to 30 minutes or until a toothpick comes out clean. Let it cool for 10 minutes. When the cakes are cool, take out of the pans for icing. See the chocolate icing ingredients and directions below. 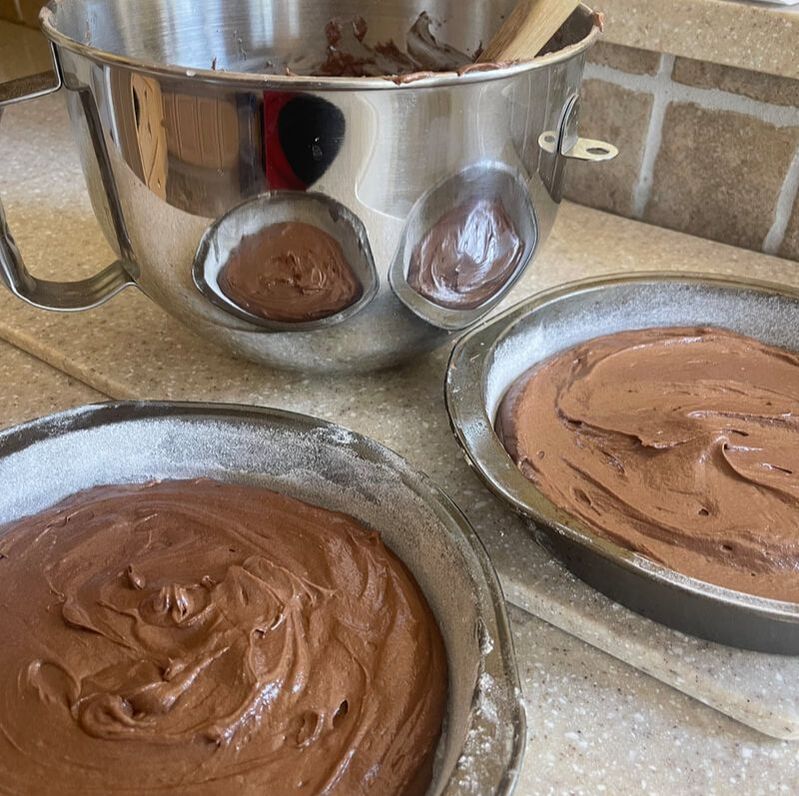 Ingredients for chocolate icing:
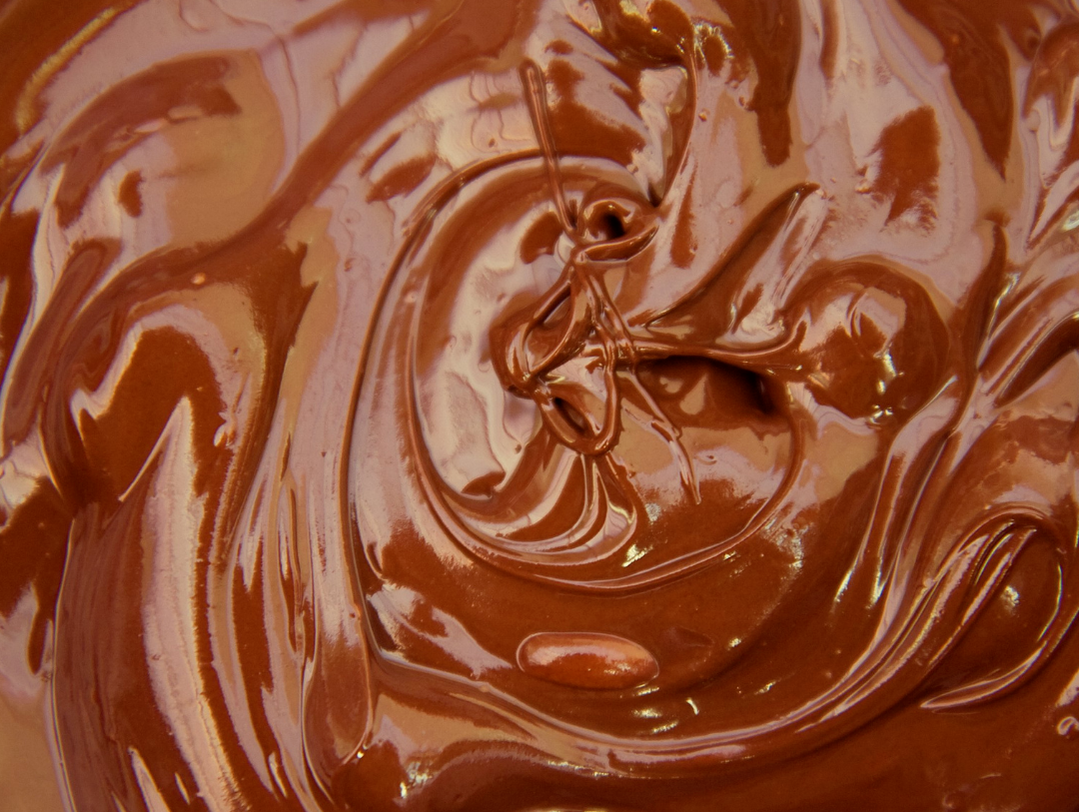
¾ cup cocoa 2-2/3 cup powdered sugar 6 T. of butter (unsalted) 5 or 6 T. of milk 1 tsp. vanilla Mix all the ingredients and spread on each layer of the cake.
0 Comments

The Chocolate Cheesecake Raspberry Chocolate Drizzle dessert is date night worthy with or without the date.
Here we are again. Back to writing, creating, and talking about desserts. I have a sweet tooth just like everyone else. When I'm really craving a sweet treat, I want chocolate. Not just any chocolate...a deep, dark, chocolate something.
As I started googling recipes, I ran across many chocolate cheesecake desserts. Choices like: To bake or not to bake. Adding fruit to the filling. The type of crust. Lots of ideas to ponder. For me, I have to watch the sugar, lactose, gluten, and all the stuff that accumulates in your gut and disrupts the ecosystem. Or something like that. Therefore, I created the Chocolate Cheesecake Raspberry Chocolate Drizzle a 'la Liz. Chocolate Cheesecake Raspberry Chocolate Dribble Ingredients: Cup of graham crackers (crushed) 2 ½ T. of melted butter One envelope of unflavored gelatin Cup of cold water One four-ounce pkg. of Baker’s semisweet chocolate (coarsely chopped) Four eight-ounce pkgs. of 1/3 less fat cream cheese (softened) Cup and a 1/3rd of coconut sugar ¼ cup of cocoa 1 ½ T. of vanilla extract Small container of fresh raspberries Hershey’s Chocolate Syrup Directions: Preheat oven to 375 degrees. Mix the melted butter and crushed graham crackers and press into a round pie pan that’s been greased. Bake until light brown, approximately 10 minutes depending on your oven. Next, prepare the gelatin. Pour the cold water into a saucepan and add the gelatin. Let it sit a minute then turn the heat to low. Stir. Wait until the gelatin completely dissolves. Add the chocolate to the gelatin until melted. Stir again. In your mixer, add the softened cream cheese and sugar and mix until the sugar is incorporated. Add the chocolate mixture and cocoa. Add vanilla. Pour into the graham cracker pie crust. Refrigerate for approximately two hours. Cut into 12 pieces. Add the raspberries, chocolate drizzle, and whipped cream to individual pieces. This dessert is easy and has Star Power. Make it tonight! 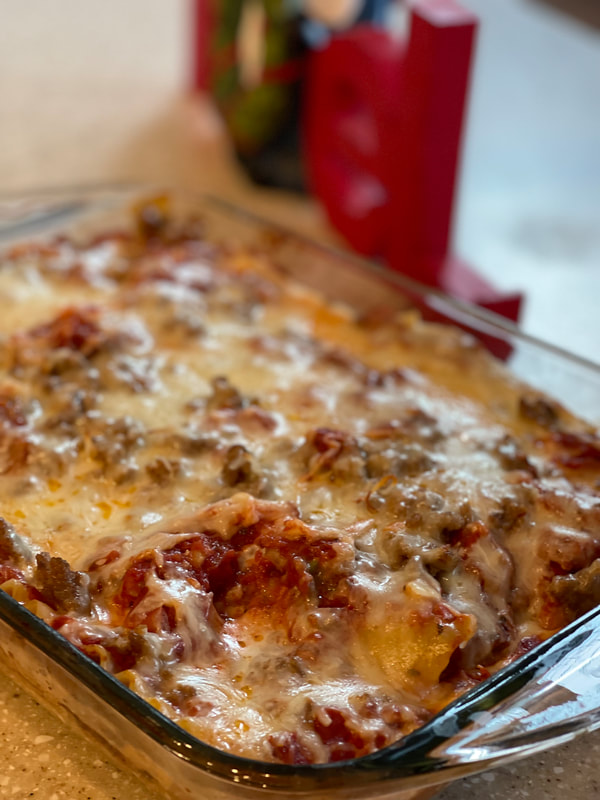 Everything is made from scratch except for the lasagna noodles. The Italian red sauce explodes with flavors like garlic, onion, oregano, and more. The Bechamel sauce replaces all other cheeses for richness and nuttiness. Every bit is perfection! Anytime is the right time for lasagna. Sometimes, homemade lasagna seems like a daunting task. My family loves lasagna and I've experimented with several recipes. This one is the winner!
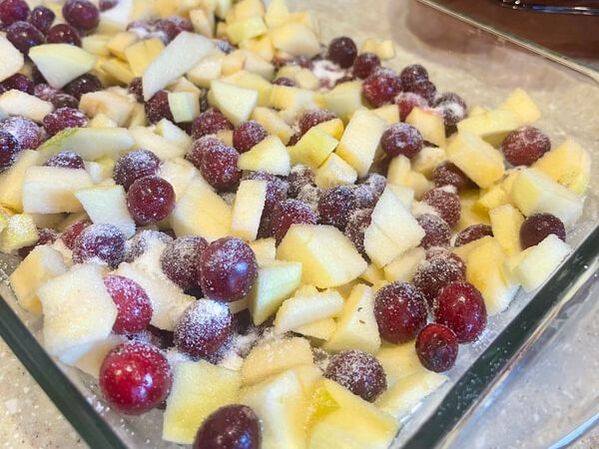
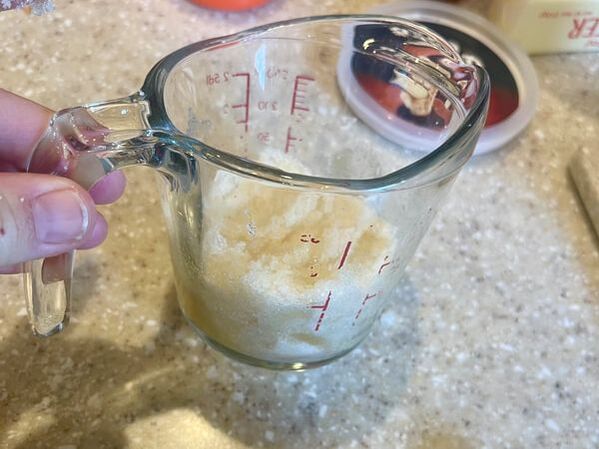
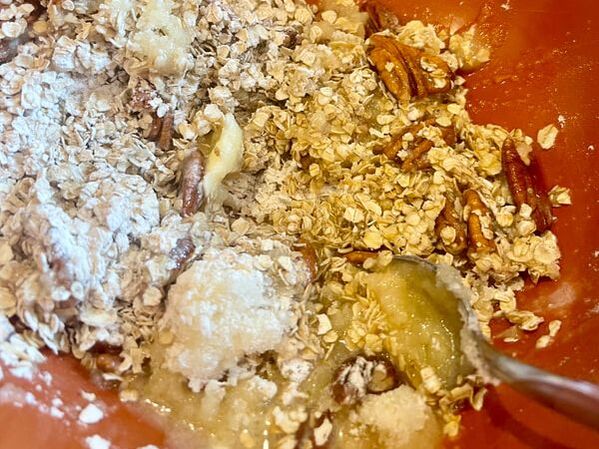
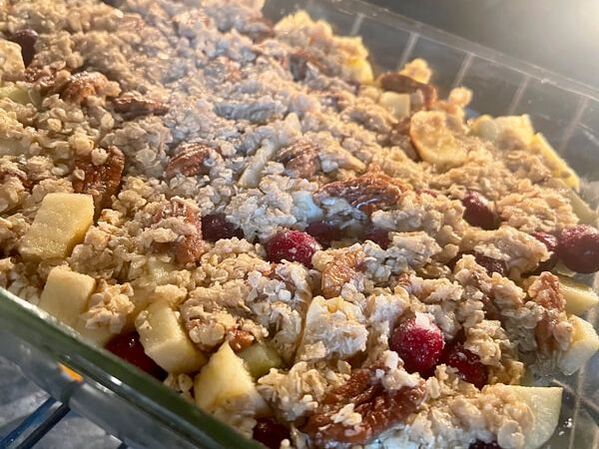
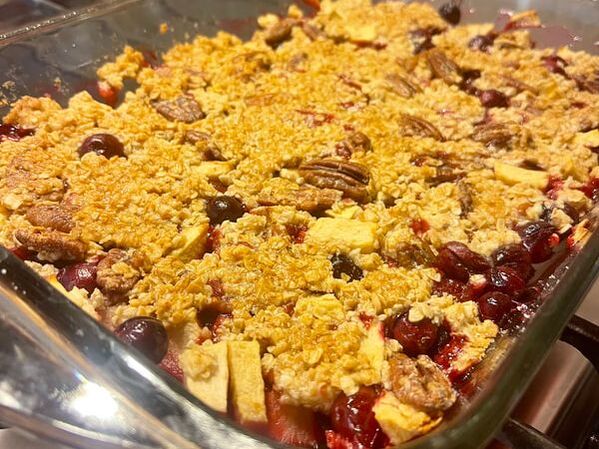
Family traditions are what make the holidays special. Food like your momma's dressing, grandma's cakes, and the best vegetable sides imaginable. All of these are great on 'the big day'. What about all the other days? What will you do for the company that's around three or more days? One of my family members makes chili on Christmas Eve. Another does a 'day after the holiday's leftover buffet. Taking the leftover turkey and creating a new dish. That kind of thing. Here's an idea. Make lasagna part of the family tradition. There aren't many who don't like it. A good recipe can be hard to find. Look no more. You've found it! Ingredients: 12 - 16 ounce pkg. of lasagna noodle T. of EVOO (extra virgin olive oil) 1/2 can tomato paste Large onion (diced) Four large cloves of garlic (minced) Tsp. oregano (to start) Dash of salt and pepper Begin to boil the lasagna noodles. Boil two minutes shy of cooking time. Not quite al dente. Remove from the water, and set aside with a bit of the salted water to keep it fresh and pliable. In a large frying pan, sauté the onion and garlic in a T. of EVOO until the onions are translucent. Add the tomato paste, oregano, and S & P. Mix together over medium heat until heated through. More ingredients: Large can crushed tomatoes Large can of diced tomatoes 2 T. oregano T. basil T. onion powder T. garlic powder 1/2 tsp. red pepper flakes 1/2 tsp. paprika S & P to taste Add these ingredients to the tomato paste mixture. Cook until a slight boil then turn down the heat to simmer. Simmer for approximately 20 minutes. Ingredient: 1 1/2 pounds of Italian sausage. Cook the sausage. Set aside White Sauce (Bechamel) 4 T. unsalted butter 1/2 cup of all-purpose flour 3 1/2 cups of milk Cup of freshly, grated parmesan Melt the butter, add the flour. Stir until silky smooth. Begin to add the milk a cup at a time. Once incorporated, add the cheese. When the cheese melts, set aside. Ingredients: 16-ounce bag of mozzarella cheese A handful of fresh parsley Begin to assemble in a large, rectangular dish. First the layer of lasagna noodles, the sauce, the sausage, the Bechamel. Repeat for at least three layers. Top off with remaining Bechamel, red sauce, meat, and mozzarella cheese. Cover. Bake at 350 degrees for 30 minutes. Top with parsley. Serve.  A friend's recipe for a holiday cranberry dish that's tart and slightly sweet. The roasted pecans are a flavor enhancer. So delicious! It's the holiday season. And Santa Claus is coming around the Christmas snow is white on the ground when ole' Santa gets into town he'll be coming 'round the chimney now. This holiday tune was first performed by Kay Thompson at the Hollywood Bowl, on December 22, 1945. Andy Williams' made it famous by placing it on his 1963 Christmas album. Cranberries! So many recipes. So many don't care for cranberries. They're bright and beautiful but tart and sour. For those who want to 'flip off' the berry, this recipe will inspire you to give it another go. Away with cranberry Jell-O and hello to apple cranberry crumble. Recently, I visited my dear friend, MK, in Atlanta. She shared a recipe that's a holiday tradition at her home. She said, "It's my favorite thing next to stuffing." I borrowed the recipe and wanted to try cutting down on the sugar (MK has a sweet tooth). I do this because I try to limit my sugar intake. Luckily, I minimized the sugar and stayed true to the recipe. Ingredients: Three large apples peeled and diced (I used two green apples and a Gala) 12-ounce bag of fresh cranberries 1/2 cup of sugar (If you want a sweeter treat, use a whole cup of sugar) 1 1/2 cups of quick-cooking oats 1/2 cup of flour Cup of pecan halves 1/2 cup and two T. of sugar 2 T. of honey 1/2 stick of melted butter
Directions: Use a large casserole dish. Preheat the oven to 325 degrees. Add the apples and cranberries to the dish. Sprinkle 1/2 cup (whole cup if you want it sweeter) of sugar over the fruit. Combine the other 1/2 cup plus 2 T. of sugar with 2 T. of honey. Pack it. Add the sugar combo to the rest of the ingredients. Top the fruit with the oat mixture. Cover with aluminum foil for half of the baking time. Bake for approximately an hour (Remove the foil after 30 minutes). After an hour, the apple cranberry crumble will bubble. The topping will turn golden brown. Serve immediately as a holiday side dish or make it a dessert served with vanilla ice cream. Yummy!
Enjoy this holiday dish. It's truly incredible. Thanks, MK!
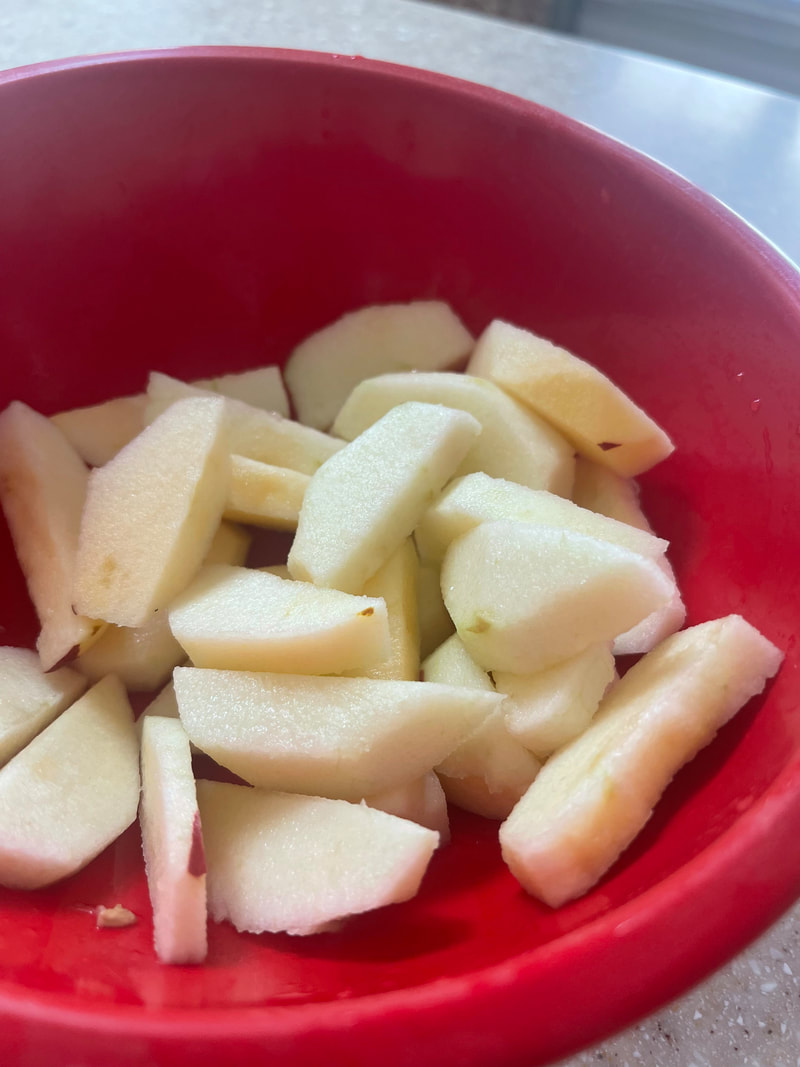
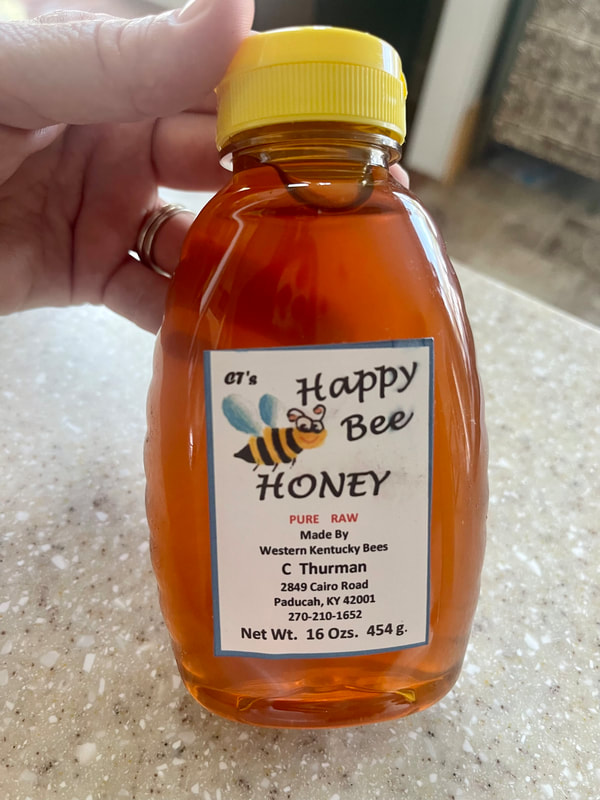
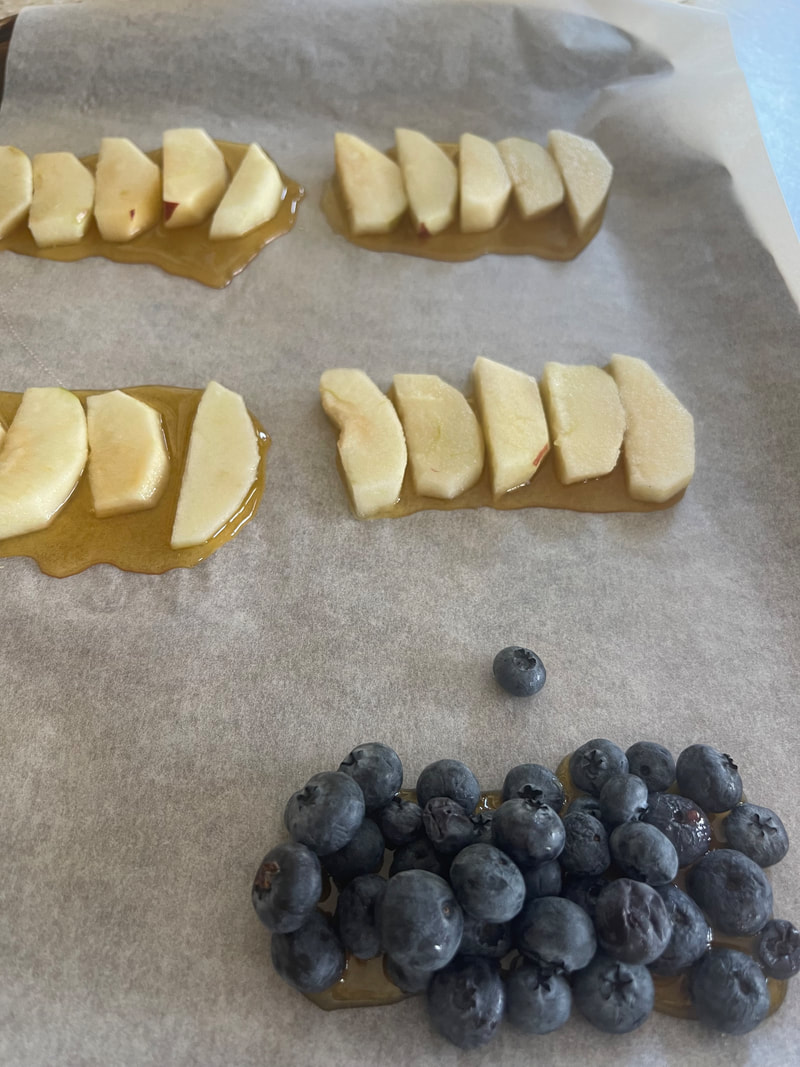
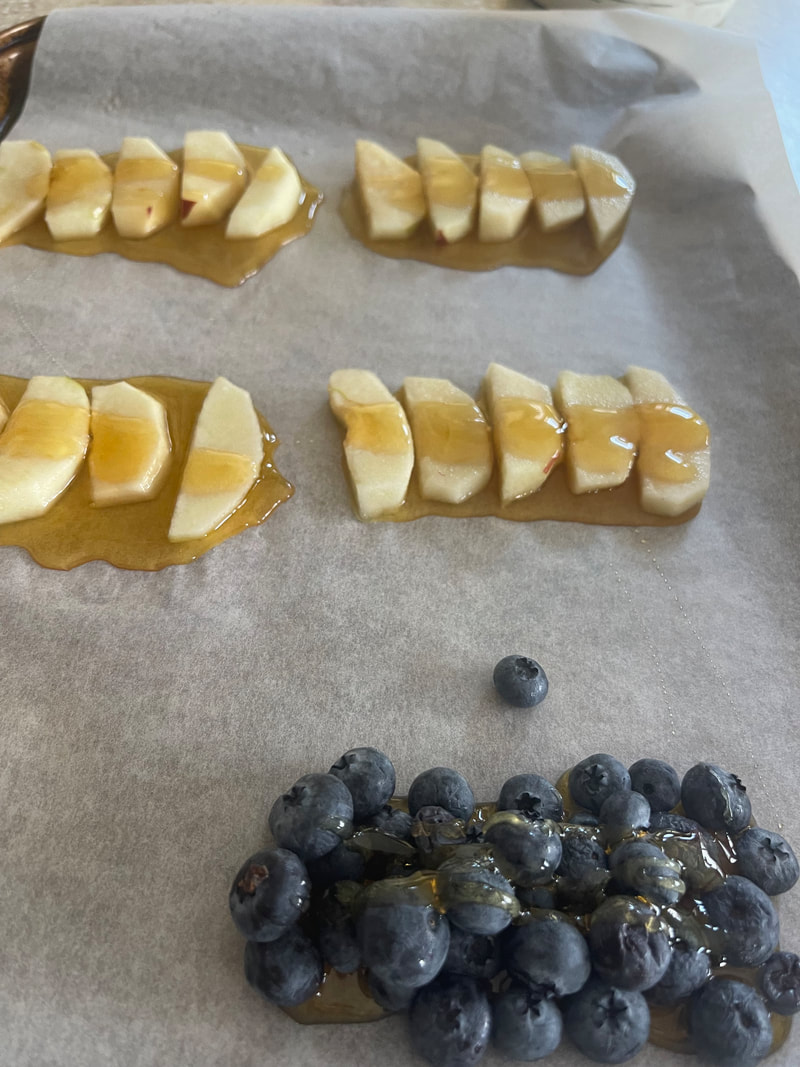
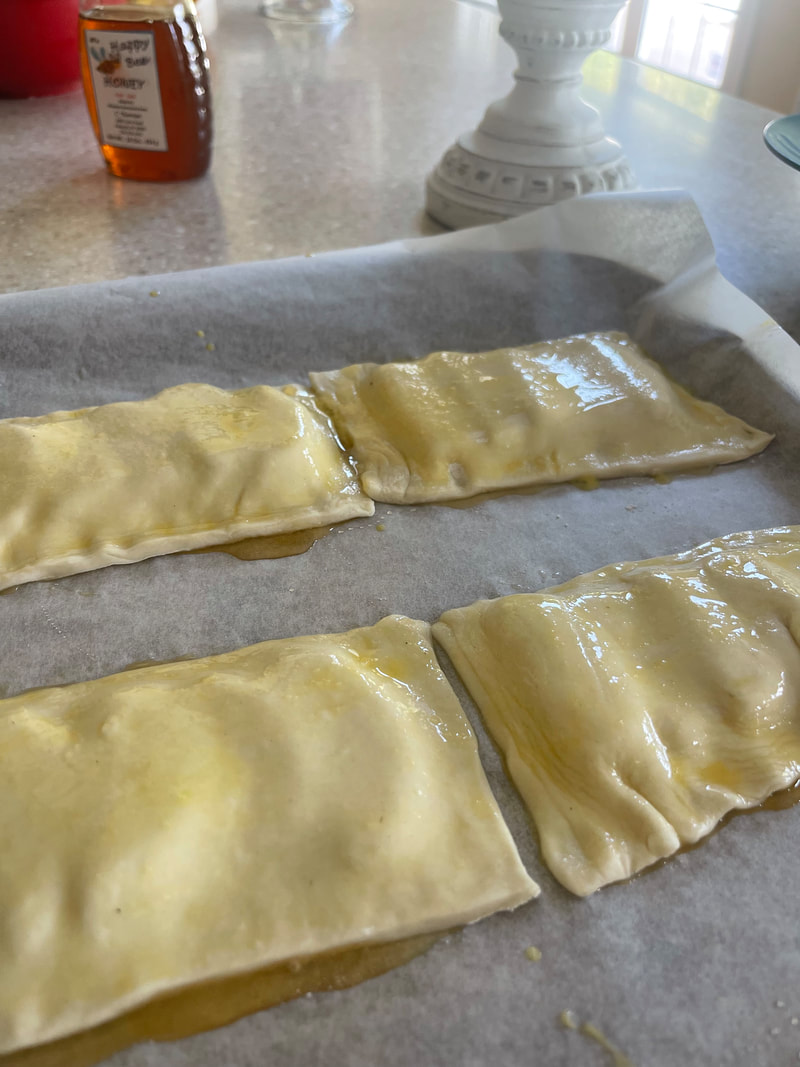
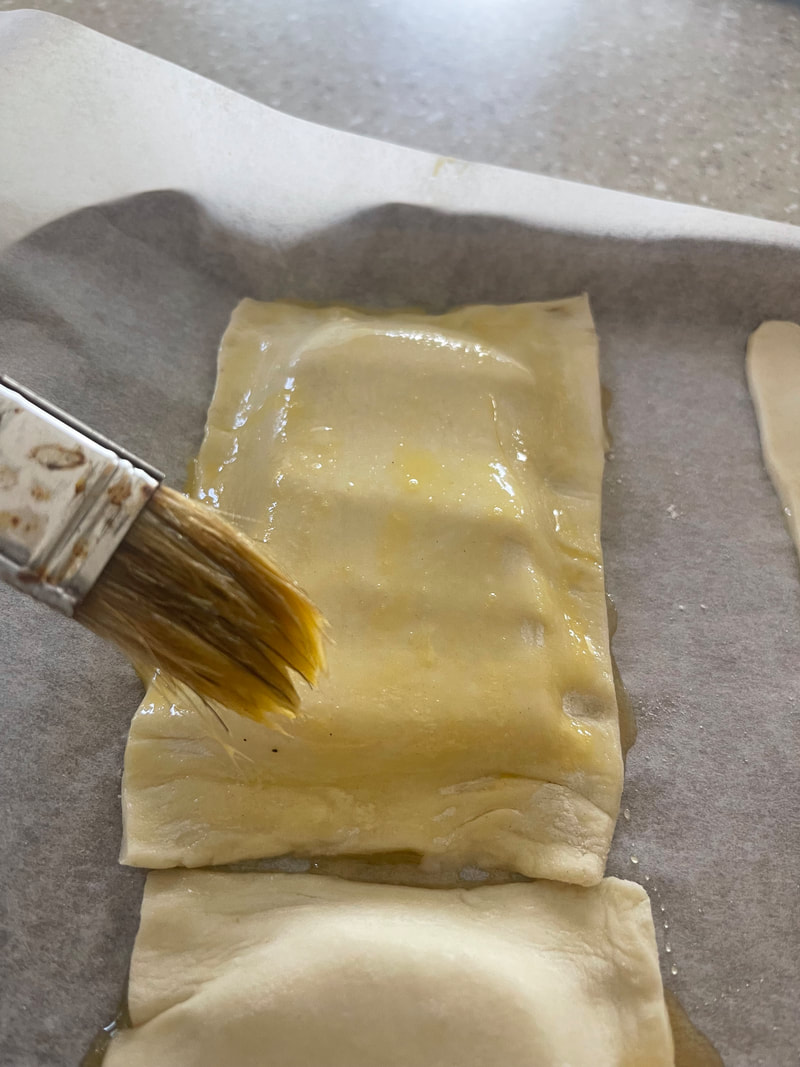
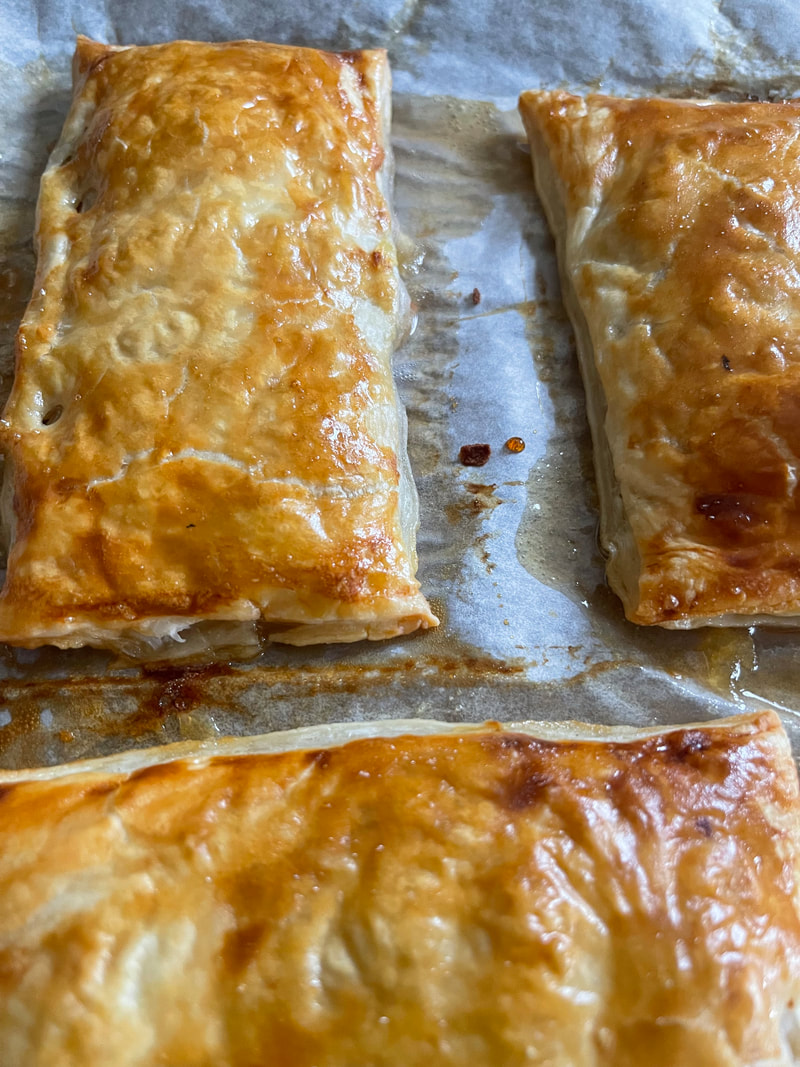
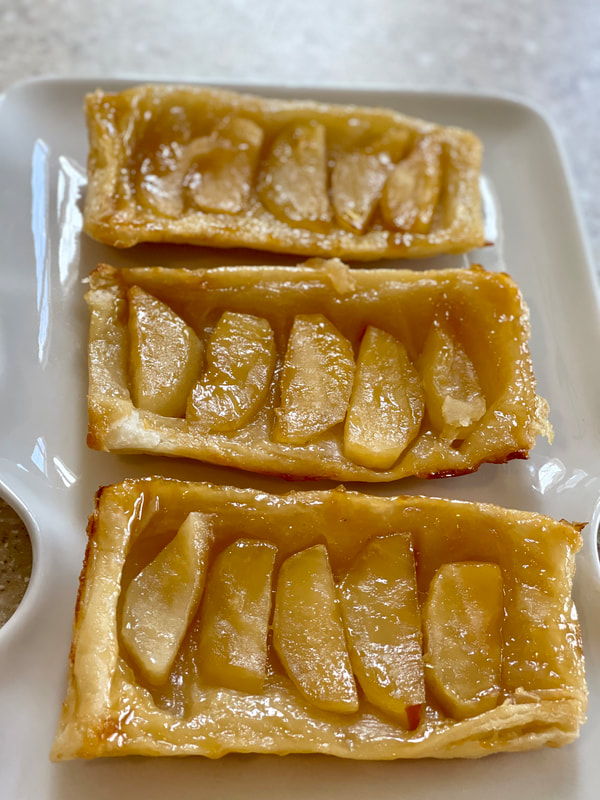
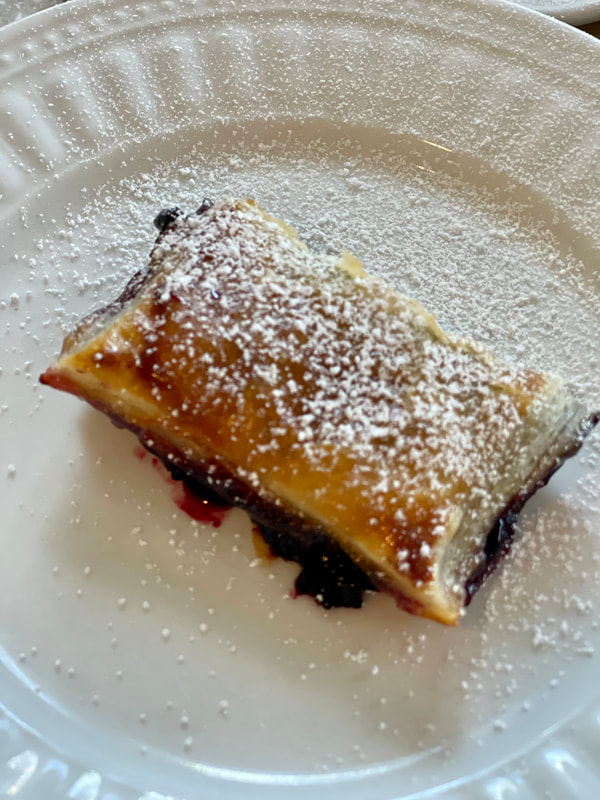
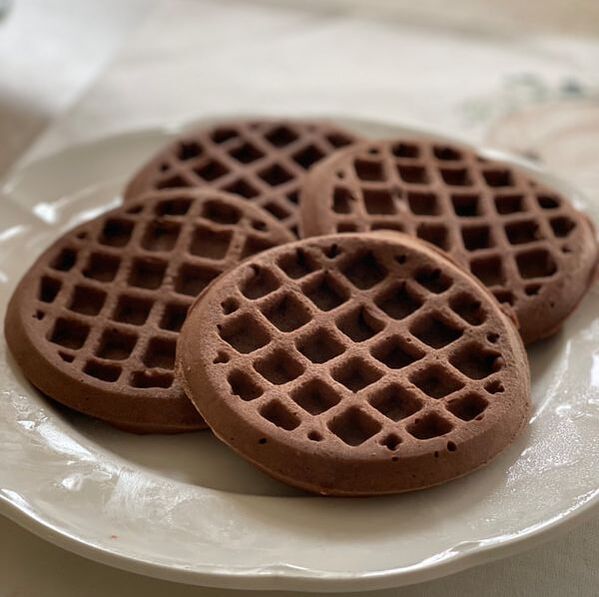 Chocolate waffles are perfect for breakfast or as dessert. Waffles are fudgy, yet, fluffy like a cake. Simply delicious. Sometimes your family wants something different for breakfast. Not cereal. Not eggs. Not pancakes. Maybe, not even waffles. Unless...you make chocolate waffles. The recipe you're about to read is exceptional. If you've got a decent waffle maker, and by decent I mean one that works, you're set. I bought my waffle iron at Walmart for $10. It's easy to work. Just plug it in. It's hot and ready in seconds. Plus, there's no need to use vegetable spray to keep the waffles from sticking. It seems like my grandchildren always ask me for something different to eat. Something that's different from what mom has in her kitchen. I don't mind so much, as long as I've gotten a good night's sleep. On this morning, I rested well. After going through the list of possibilities, chocolate waffles were chosen. When it comes to kids, I always like to make it fun. In my cupboard, I keep at least four kinds of sprinkles, mini dark chocolate chips, white chocolate chips, and the occasional gummy bear. Since I was making chocolate waffles, I got out the white chocolate and two kinds of sprinkles. Gummy bears would be yummy too. Wet Ingredients: One stick and six tablespoons of unsalted butter (melted and cooled) Four eggs (beaten) 1/2 cup of water (if the batter's too thick, add another 1/4 cup) Tsp. of vanilla Dry Ingredients: Two cups of flour 1/2 cup of cocoa 1 1/4 cup of sugar Tsp. sea salt Directions: Mix the wet ingredients. Mix the dry ingredients. Mix together. The batter will be slightly lumpy. As mentioned, if it's too thick add more water. 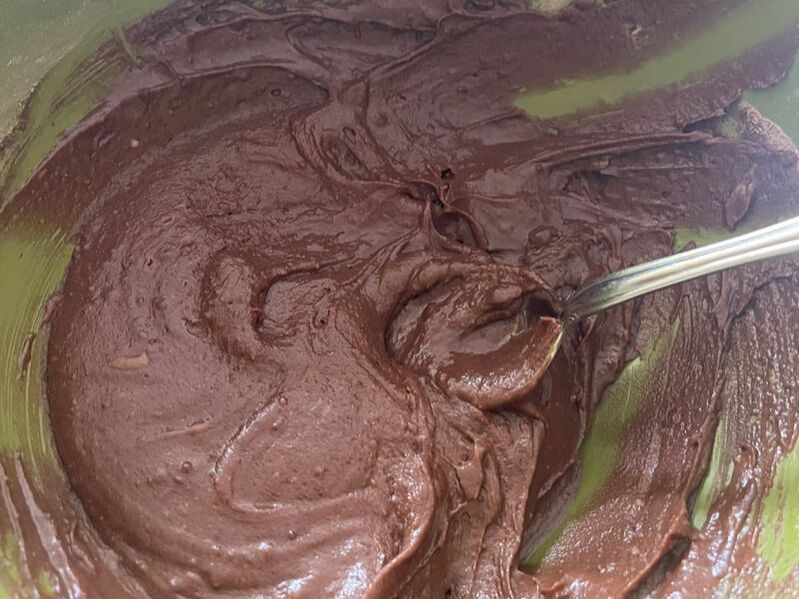 The perfect consistency for the chocolate waffle batter. Once the batter is ready, add enough to fill the waffle iron. Be careful not to add too much or it will spill over the sides. If you want to add some special ingredients like chocolate chips and sprinkles, do so before you close the lid. Your waffle maker will let you know when the waffles are ready. If you're using a small iron with this recipe, it should yield eight waffles. If a large waffle iron is used, count on four.   Fall Apple Fruit POP Tarts are sprinkled with powdered sugar and share space with a delicious buttery puff pastry. Saturdays are for gathering farm-fresh produce from local farmers. Huyck Farms in Paducah, KY is picking and selling crisp, flavorful apples at their farm store most days of the week. I scored big with a bag of Jonathan apples. These American beauties have a bicolor peel and are tart with a bit of sweetness. Perfect for making Fruity POP Tarts.  The puff pastry is cut the same size as a Kellogg's Pop Tart. It's what I would call an 'open-faced' tart. Made with honey, lemon, apples, powdered sugar, and puff pastry...the process is simple and elegant. I had some blueberries on hand and wanted to try a different fruit using the same process. Blueberries overheat during baking. The end result is a blueberry jam. So, I folded the Blueberry POP Tart in half and made a handheld Brunch Tart. For the larger tart, use a more solid fruit like apples, nectarines, or pears. If you want to fold the puff pastry in half for a Brunch Tart, strawberries, and raspberries would be fabulous! It's amazing how simple this recipe is to prepare and bake. Let's get to it!
Ingredients for four Apple POP Tarts and one Blueberry Brunch Tart Five pieces of puff pastry (there will be three left. Prepare more tarts if you want) Three medium-size apples (If you're doing eight tarts, use another apple) Honey One egg for wash Powdered sugar (enough to sprinkle on top)
Directions:
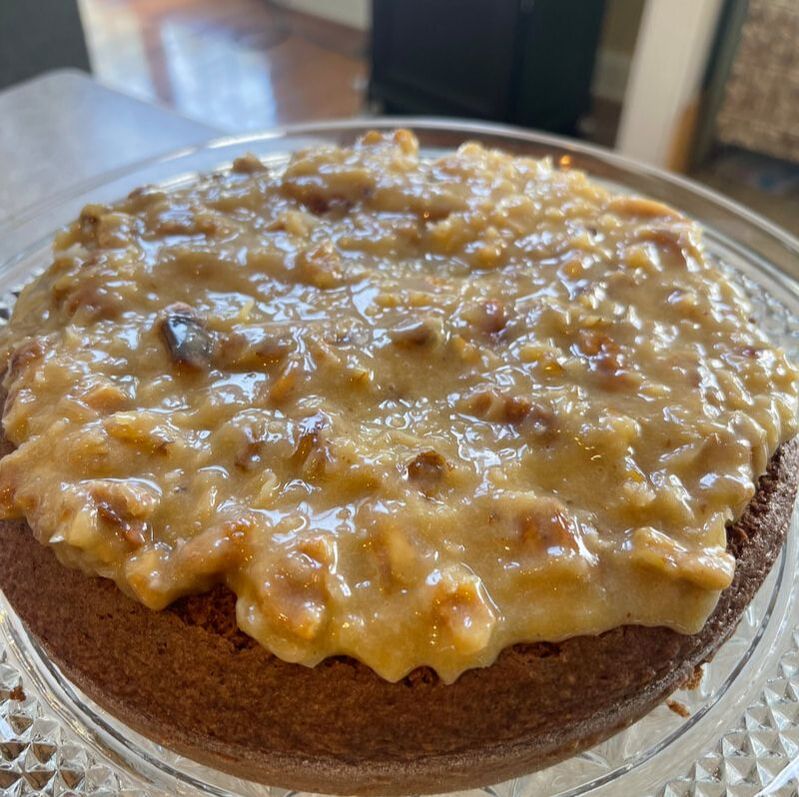
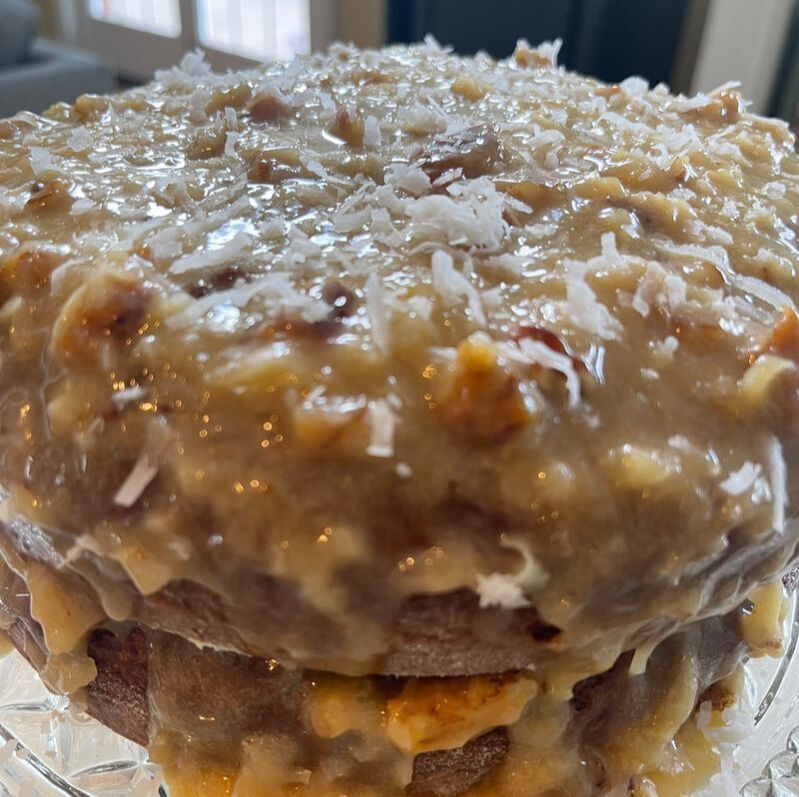
Slice and peel apples. Squeeze fresh lemon juice over the top of the apples. Set aside. Thaw the puff pastry. Read the package. Roll, if necessary, with a rolling pin. You want five to eight sliced puff pastries. Set parchment paper down on a cookie sheet. Preheat over to 350 degrees. Add enough honey to the parchment paper to make five to eight separate Fruit POP Tarts. If you're making five, there should be five separate drizzles of honey. Line the apples up and set on each honey drizzle. If you're trying the blueberry, add blueberries to one honey drizzle. After the fruit is placed on the honey, drizzle the honey on top of the fruit. Add the puff pastry to each pile of fruit. Press down on the edges of the puff pastry. Use one egg to make an egg wash. Apply it with a brush to each Fruit Pop Tart. Bake in the oven for 15 - 20 minutes. Take the tarts out of the oven. Let cool for about five minutes. Flip over with a spatula. Sprinkle with powdered sugar. If you've made a blueberry, peach, or strawberry tart, fold in half for a Brunch Tart. 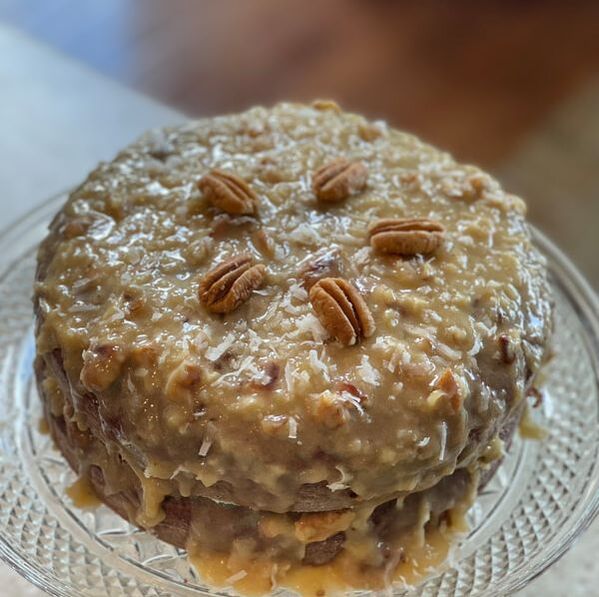 Grandma's Der Deutsch Schokolade kuchen ist ein Betruger means The German Chocolate Cake is an Imposter. It is a very delicious substitute for the traditional recipe. This recipe from my Grandma is fabulous. It's easy to make. The hardest part for me was whisking the filling. As mentioned, the directions in her recipes are sometimes sparse. While I'm in the middle of baking, I may have to Google another recipe quickly to make sure I'm doing the technique correctly. Grandma labeled this cake as a good substitute for German Chocolate Cake. After tasting it, I had no idea why she called it a 'good substitute'. It tastes like every other German Chocolate Cake I've ever eaten. After some inquiries, I uncovered the reason. Traditional German Chocolate Cake relies on melted chocolate. Grandma used cocoa. Here's some trivia: Sam German is who the cake is named for. He's responsible for creating a sweet baking chocolate used by the Bakers Chocolate Company in Boston. Regardless, I don't always have Baker's sweet chocolate in my cupboard but I do always have cocoa. It's one of those staples that you can't do without. Let me know your thoughts on the recipe. I think, WOW!
Ingredients for the cake batter: One box of yellow cake mix Four Tablespoons of cocoa 1/2 cup of sugar Three eggs The required amount of oil and water on the yellow cake mix box. Prepare cake pans with oil and flour. Pour into the cake pans. Bake at 325 degrees. The two cakes I prepared took 20 - 25 minutes. One finished sooner than the other so check each cake if you're making two or even three layers.
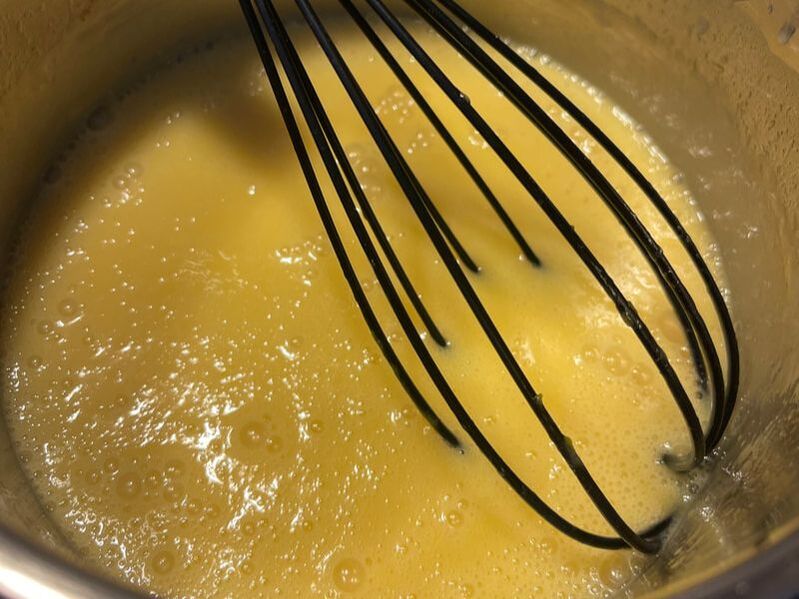
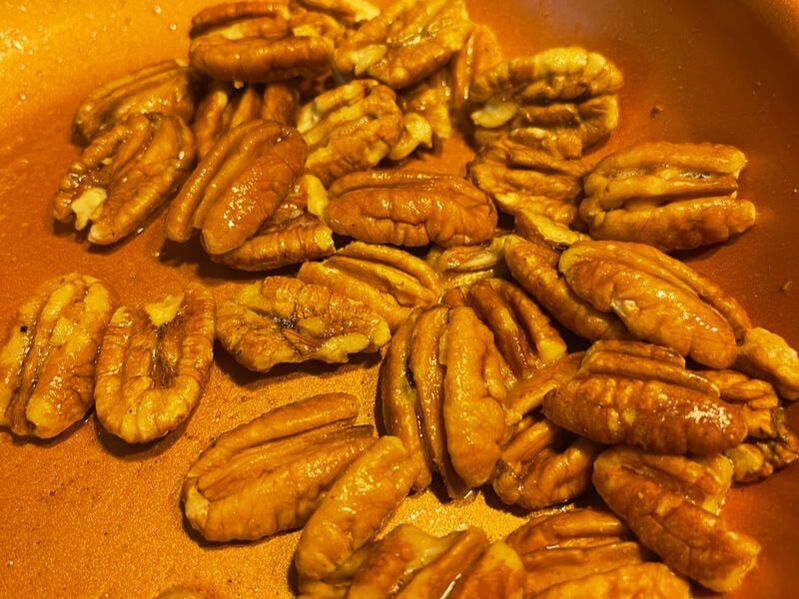
Ingredients for the German Chocolate Filling: One cup of sugar Three egg yolks One stick of butter One cup of Pet Milk One tsp. of vanilla One cup of shredded coconut One cup of toasted (or not) pecans Cook over low heat or in a double-boiler. I used low heat while everything came together and then I turned the heat to medium. Once it started a slow boil, I whisked it continuously for five minutes. While the filling is cooking on low, whisk occasionally so the egg doesn't scramble. Once the batter is thick, remove from the heat and add the vanilla, toasted pecans (chopped), and the shredded coconut. Make sure it's completely cooled before icing the cake. You can decorate the cake with pecans and more coconut.
 Slice of 'The Imposter' German Chocolate Cake for everyone!
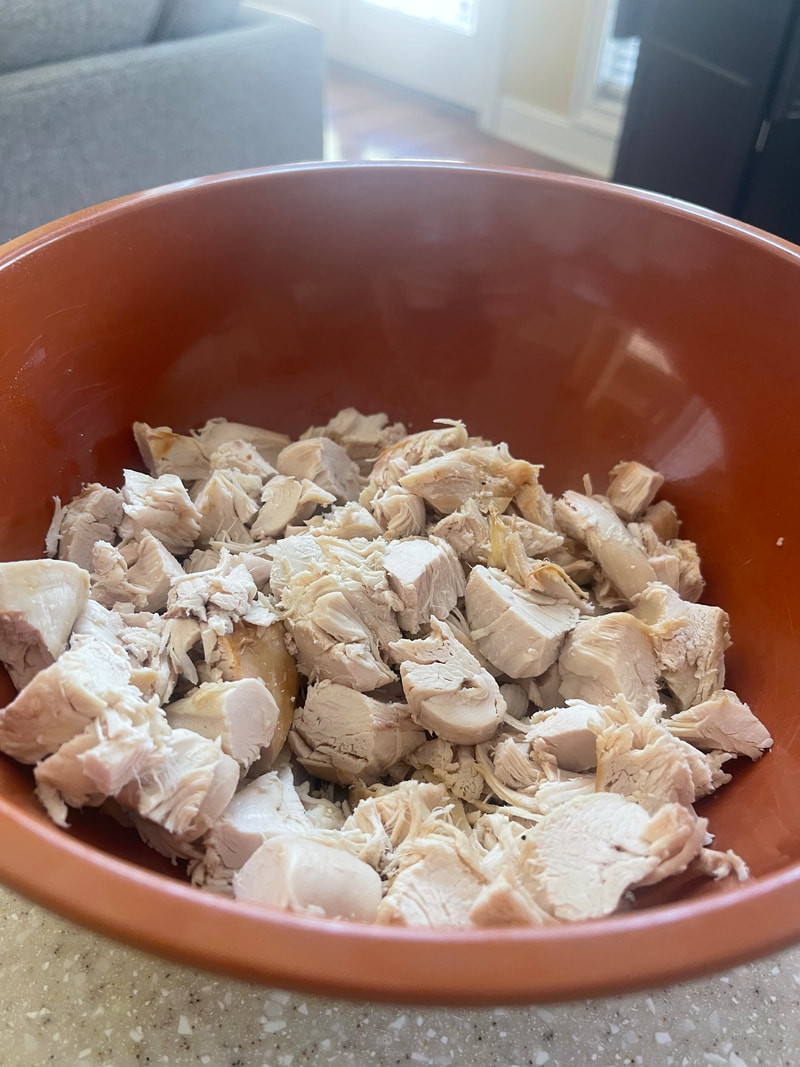
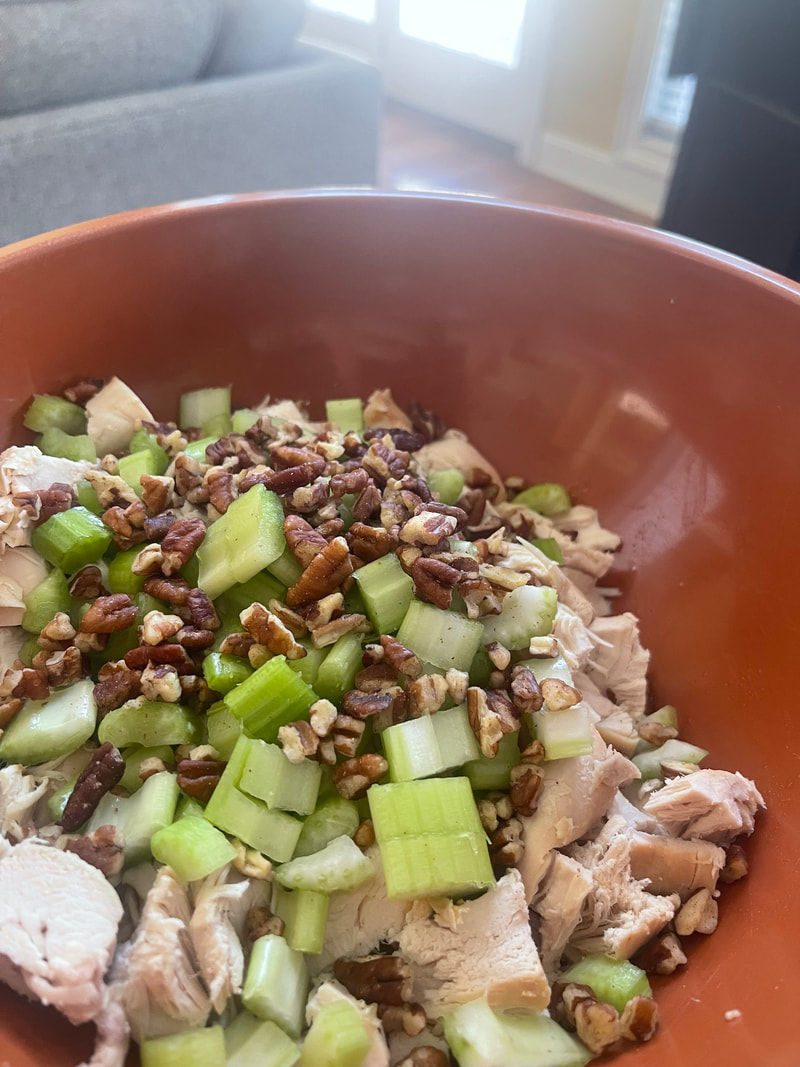
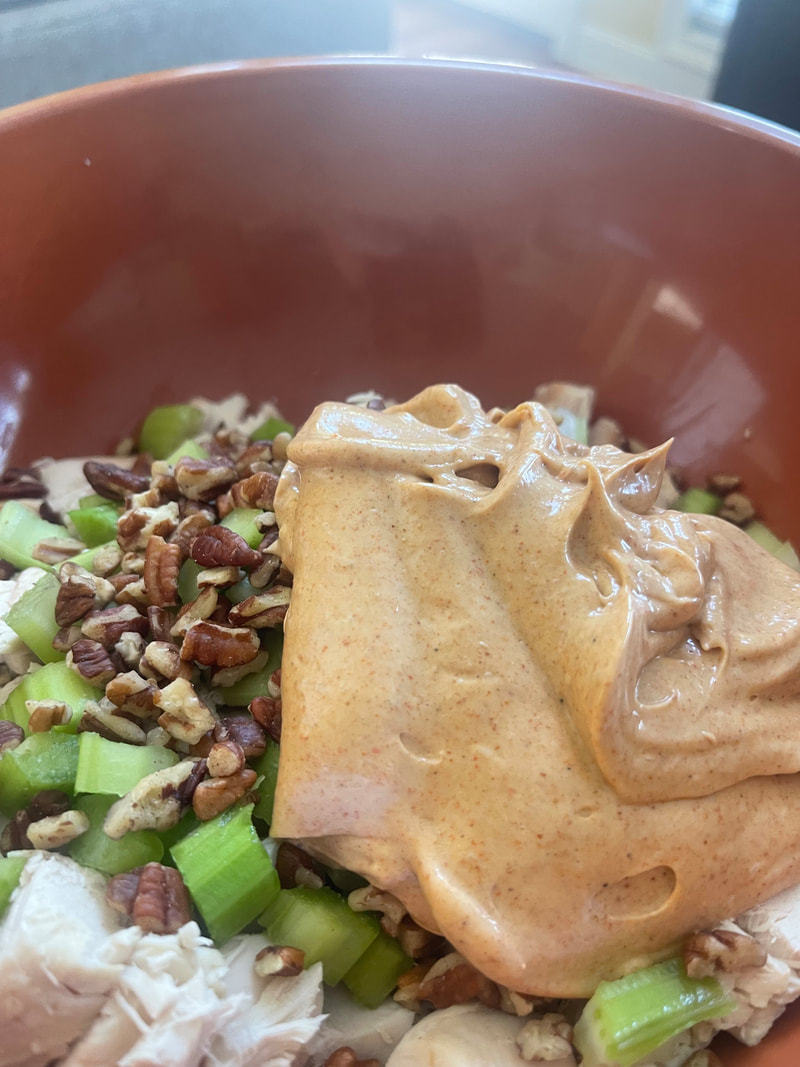
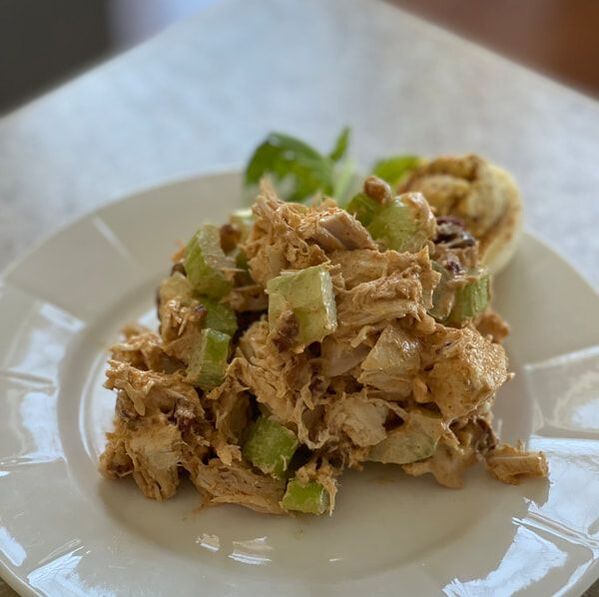 Smoky chicken salad is seasoned with cumin, paprika, and black pepper. Smoky chicken salad is a new flavor for me. I love the smell of a campfire. I love smoky spices. It's as if this dish and I were meant for each other. How it came to be. Here's the story. I'm sticking to it. I wandered into a deli. The smoky chicken salad was on the menu. Of all the chicken salads I've tried before, I've never tried a smoky chicken salad. If I'm going to mention a few... I couldn't. If you've ever been to the restaurant Chicken Salad Chicks, you may know they have quite a variety of chicken salads. I've tried all but two. My favorite on the menu is the lemon basil. Back to the smoke. I stopped by Kitchens Cafe on Harrison St. in Paducah. It's part of the WKCTC campus. More often than not, they'll feature gluten-free items. On this day, they didn't. I started ordering random things. This cold salad was one of the things. No ingredients were listed on the packaging. So, I started analyzing my lunch. I began with the easy ingredients like cubed chicken, celery, and pecans. Next, I would taste the sauce, and taste the sauce, and taste the sauce. Based on my tastebuds, love of smoky flavors, and the seasonings readily available in my cabinet. Viola, the recipe. Ingredients: Three chicken breasts (either roasted or poached) Three celery stalks 1/2 cup of chopped pecans Sauce: One cup of mayonnaise 2 tsp. paprika 2 tsp. cumin 1/2 tsp black pepper When the chicken is cooked, cut into cubes. Next, use celery hearts. Slice in half. Chop. Add to the chicken. Add the pecans. Mix the sauce ingredients together. Fold into the chicken. Time for lunch.
If you love smoky flavors, a chipotle might be nice in the chicken salad. I detected no heat in Kitchens Cafe Smoky Chicken Salad. I wanted to try my best to replicate it. I believe I came very close. 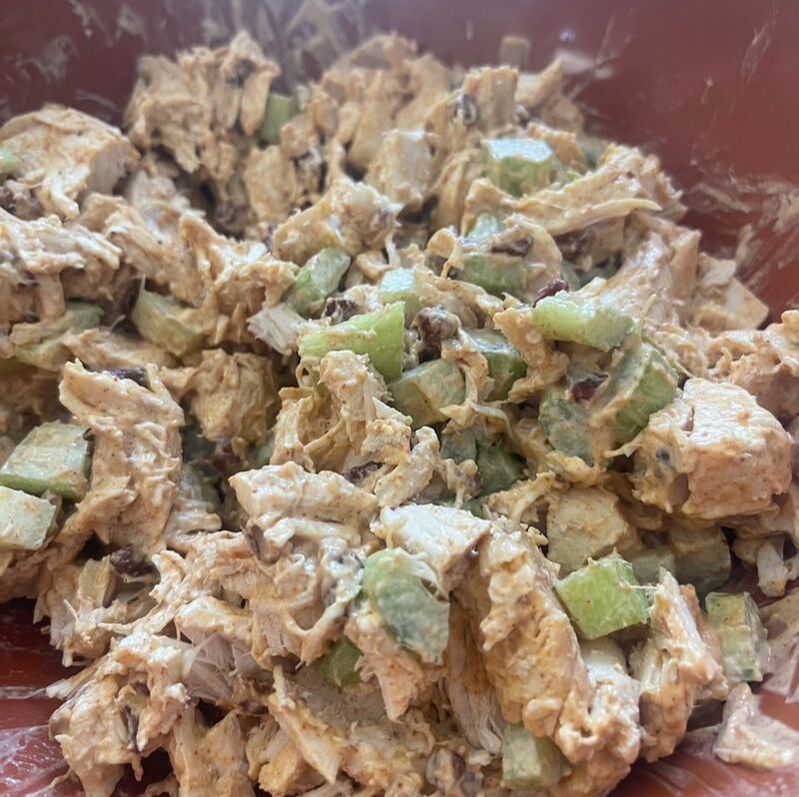 Smoky chicken salad serves 3 -4 people
 It's good to have protein-packed granola for any occasion. Hurricane Idalia is powering through the Gulf and about to strike Florida. At 2pm CST, the wind pressure was 974 mb and moving at 15 mph. At 5 pm CST, winds were 100 mph and Idalia was a Category 2 storm. Over the next few hours, the storm's intensity is expected to reach Category three status. As with all hurricanes, folks are hoping for the best and preparing for the worst.
My friend and Chef Laura hunkered down with her family a few years back as a hurricane approached the Louisiana/Alabama area. She made banana beignets and a few other hurricane-ready foods. The snacks helped during power outages that lasted several days. My Aunt Marge shared this recipe with me many years ago. When my kids were younger, I would make it frequently. It's the perfect granola that can be customized. Marge's favorites are in this granola combination. On a side note: Prayers are with all those touched by Hurricane Idalia. Ingredients: Four cups of old-fashioned rolled oats Two cups of shredded coconut Two cups of sliced almonds 3/4 cup vegetable oil 1/2 cup of good honey 1 1/2 cups of small, dried apricots 1 cup of small, dried figs 1 cup of dried cherries 1 cup of dried cranberries 1 cup of roasted, unsalted cashews Preheat oven to 350 degrees. Toss the oats, coconut, and almonds. Whisk the oil and honey and pour over the oats. Spread out onto a baking sheet. Bake for 45 minutes. After cooling, add the dried fruit and nuts. Questions Answered... What's the best way to store granola? Store in an airtight container at room temperature. Is it more expensive to make your own granola or buy store-bought? Pre-made anything right now is very expensive. To have the variety available in this recipe, it would cost twice as much to buy at the store as opposed to making your own. Can I use quick oats? All my research about this question points to 'NO'. When you add liquid to the oats, it tends to make them mushy. Old-fashioned rolled oats are the best. 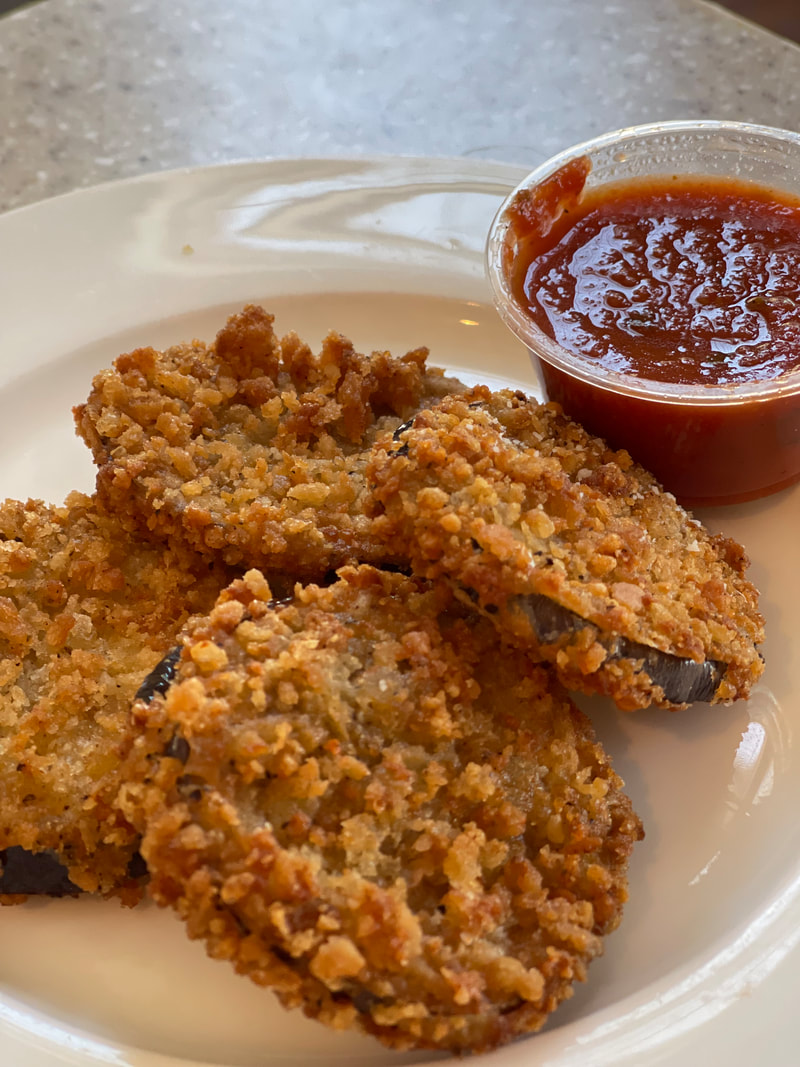 The breading batter is key to a delicious and crispy eggplant parmesan Eggplant Parmesan is a favorite among those who enjoy Italian cuisine.
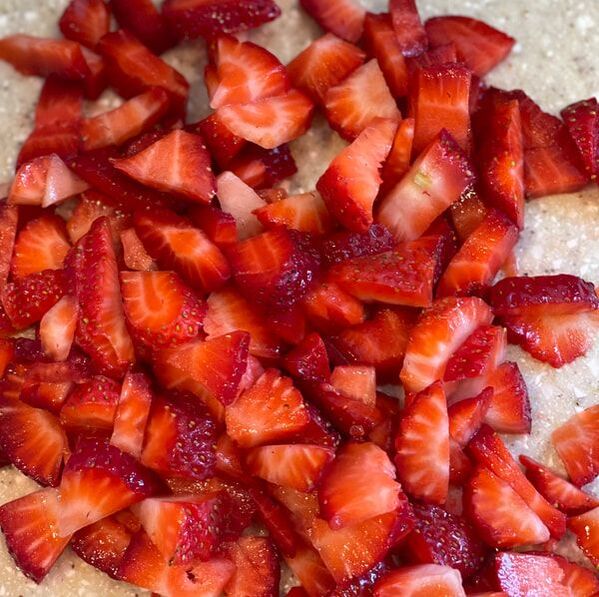
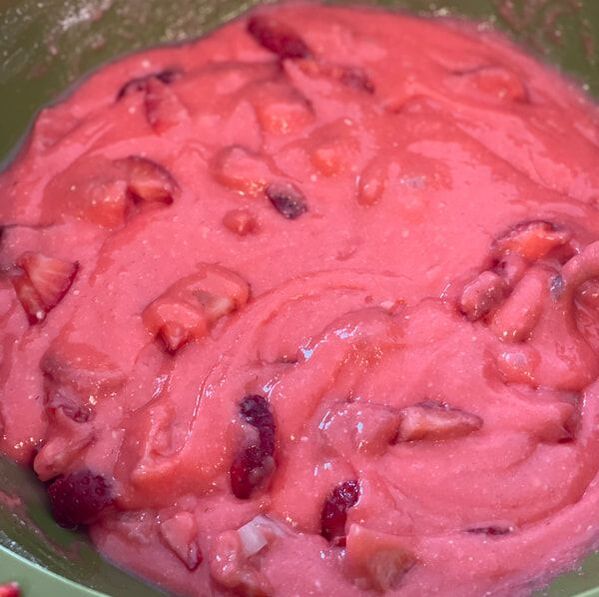
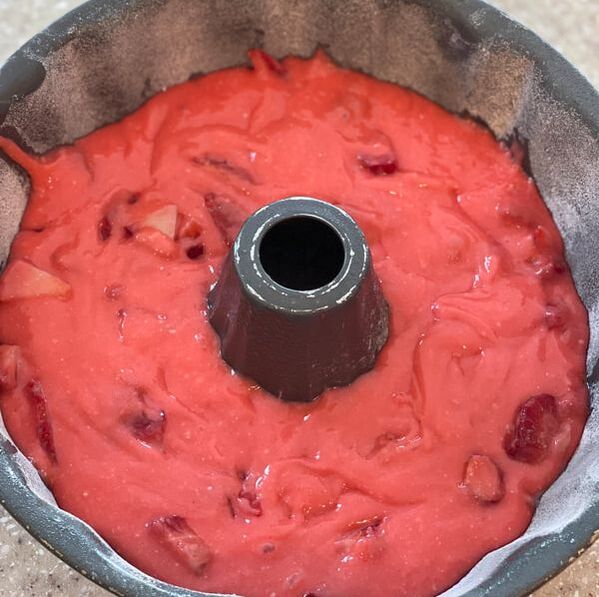
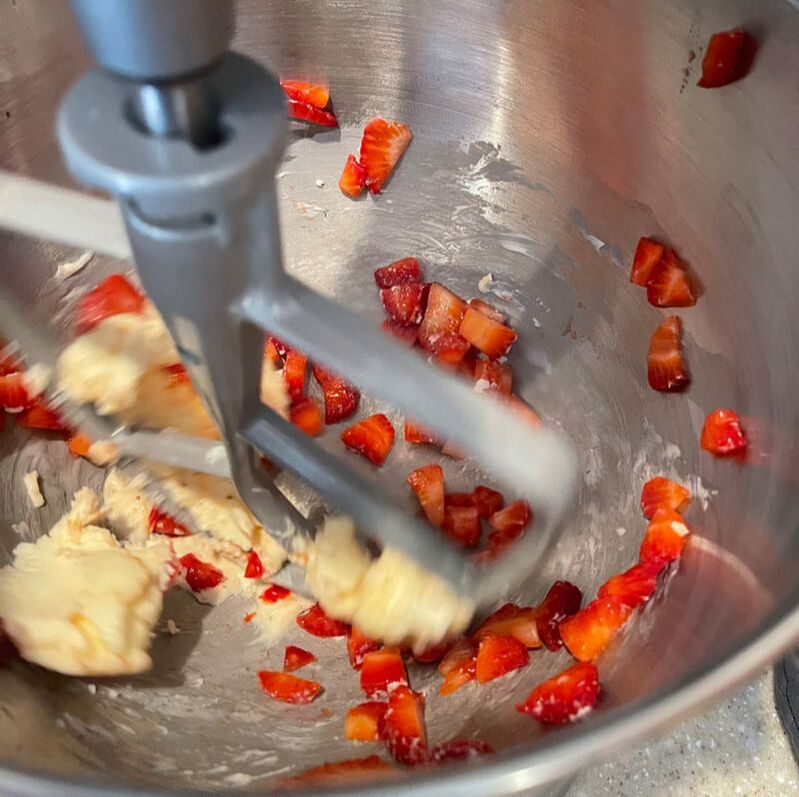
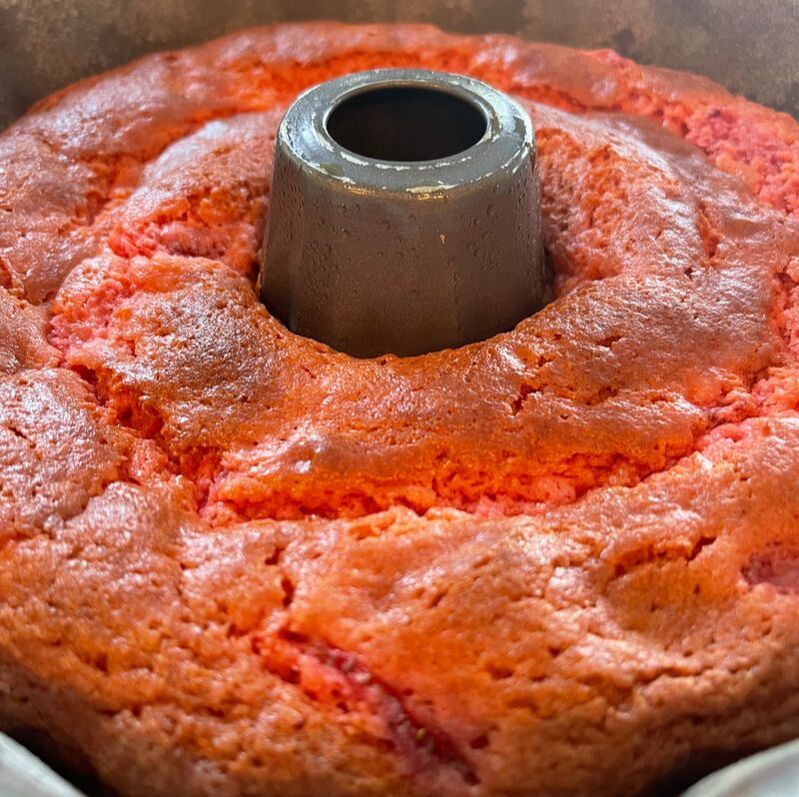
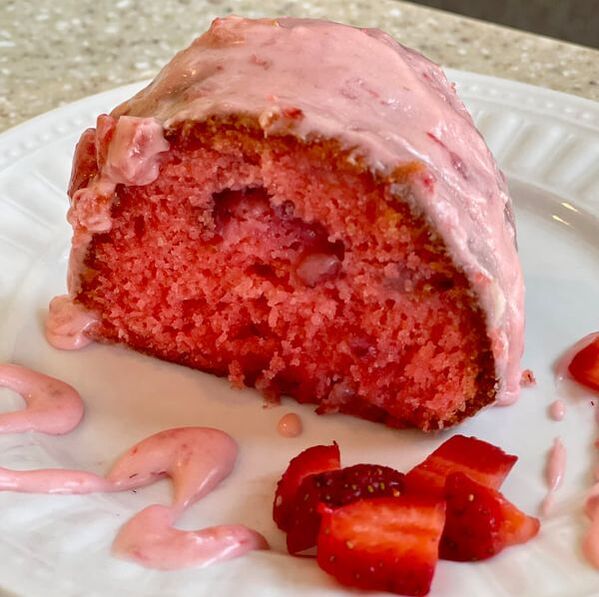
The process is simple. The key is the batter. The first time I tried eggplant parmesan was at an Italian restaurant in Lexington, KY. We had finished a project, successfully, and were celebrating our victory. I believe it was Rick Pitino's restaurant. Yes. It was! As I'm writing this recipe, everything's coming back. Our significant other was invited to tag along too. It was a 'no holds barred' affair. We dressed for success. Enjoyed endless bottles of wine. A champagne toast. And an entire room to ourselves. Quite the experience. I'm sure many of the readers of WKY Community Living have tried eggplant parmesan. On that note, I'm sure many have made eggplant parmesan. If you've experienced sogginess, this is your answer to the soggy bottom. The process of eggplant parmesan Prepare the eggplant as follows: slice the eggplant into 1/4 to 1/2-inch slices. Set on a baking sheet. Sprinkle with salt. Let the eggplant slices sit for 10 minutes. Dab away any additional moisture from the eggplant with a paper towel. Dredging the eggplant is like all other flour, egg, and breadcrumb processes. First, dip eggplant slices into the flour mixture. Next, the egg. Finally, the bread crumbs. Eggplant Breading Mixture: If you're using one large eggplant One cup of flour Two Tbs. Mrs. Dash Seasoning One Tbs. of baking powder Mix together. This is the first step in dredging. Next, use one egg. This should be ample for this recipe. Coat both sides of the slices in egg. Next, sprinkle your preferred breadcrumb on either side of the eggplant. I like panko. You can either bake or fry the eggplant. If you bake it, do so in a 350-degree oven for 25 - 30 minutes. If you fry it, I like to use coconut oil. Fill a sauté pan with 1/4 inch of oil. Check the temperature by flicking a bit of cold water in the oil. If it sizzles, it's ready. Fry on both sides until golden brown. For the marinara, use your favorite prepared brand or make your own. It depends on my schedule as to how much time I have available. I love my sauce but I don't always have time. I'll save the marinara for another recipe. Enjoy! 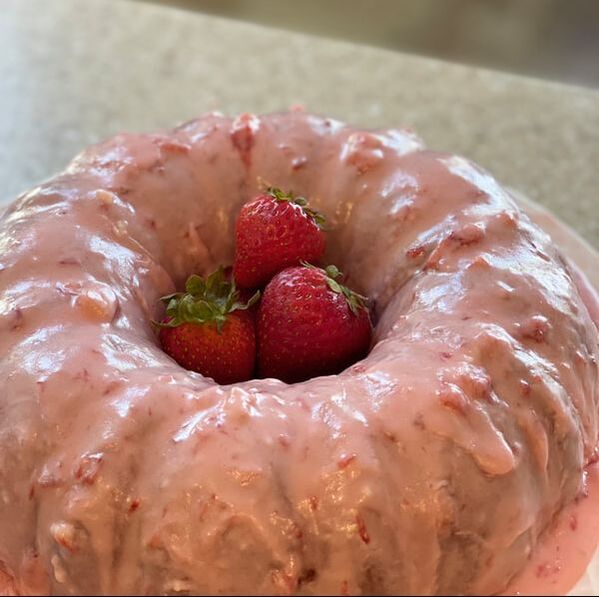 Grandma's recipe for Strawberry Cake with a thick, Strawberry Glaze is BERRY delicious. As I bake my way through many of my Grandma's goodies, I realize that most of the recipes for cakes, pies, cookies, canned foods, slaws, Jell-O salads, and more...are unchartered territory for me. Baking techniques, times, and directions can be confusing. Grandma made these recipes so many times she didn't need as much information. Oh well, it's an adventure. If I remember correctly, a strawberry cake is one of my middle brother's favorites. Mom made him one when he was a toddler. Now that he's grown...he still makes the occasional request. The cake is delicious. It's quick and easy. No mess. A lovely cake.
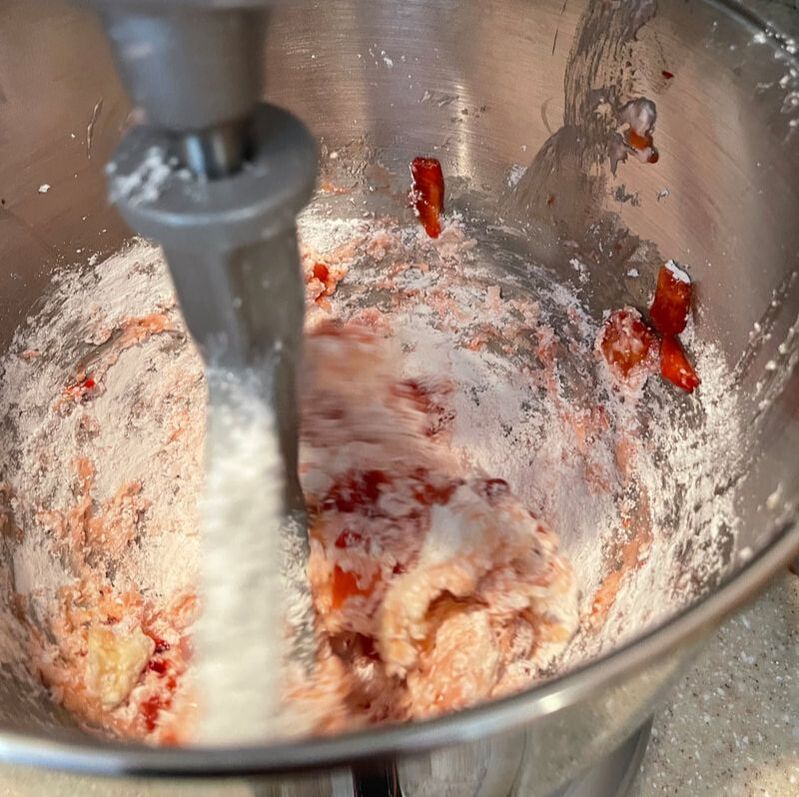
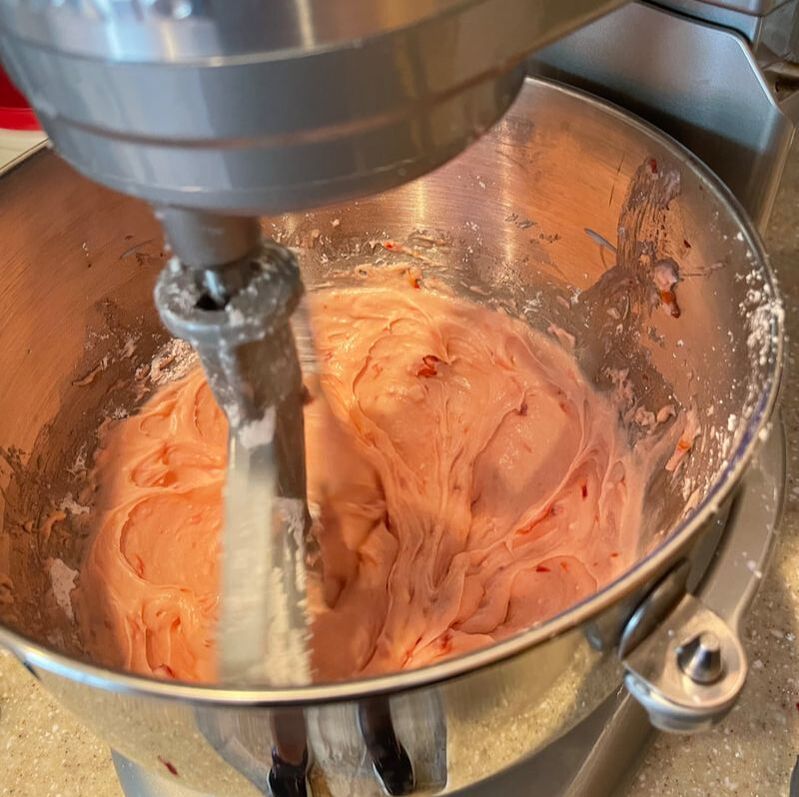
Ingredients for the Strawberry Cake: One box of white cake mix Four eggs One cup of Wesson oil Three T. flour One cup of diced strawberries One box of strawberry Jell-O Directions: Preheat the oven to 350 degrees. Lightly grease and flour your cake baking pan. You may use a Bundt pan, two round pans, or a 9 x 13. It's your choice. Dice the strawberries and set aside. Add all ingredients to a mixing bowl. Don't over-mix. Fold the strawberries into the batter. Pour into the baking pan. For the Bundt pan, bake for 35 minutes. Check the cake while in the oven with a toothpick. If it comes out clean, it's ready. Let the cake completely cook before spreading the frosting.
Ingredients for the Frosting/Thick Glaze One box of powdered sugar Five T. of softened butter (unsalted) 1/2 cup of diced strawberries Pinch of kosher salt T. of milk Directions: Cream the butter and strawberries. Slowly add the powdered sugar. Add T. of milk. Pinch of salt. Mix until there's a good consistency. As mentioned, it's more of a heavy glaze than a buttercream frosting. More butter is needed for a buttercream frosting. Glaze the cake after the cake has cooled.
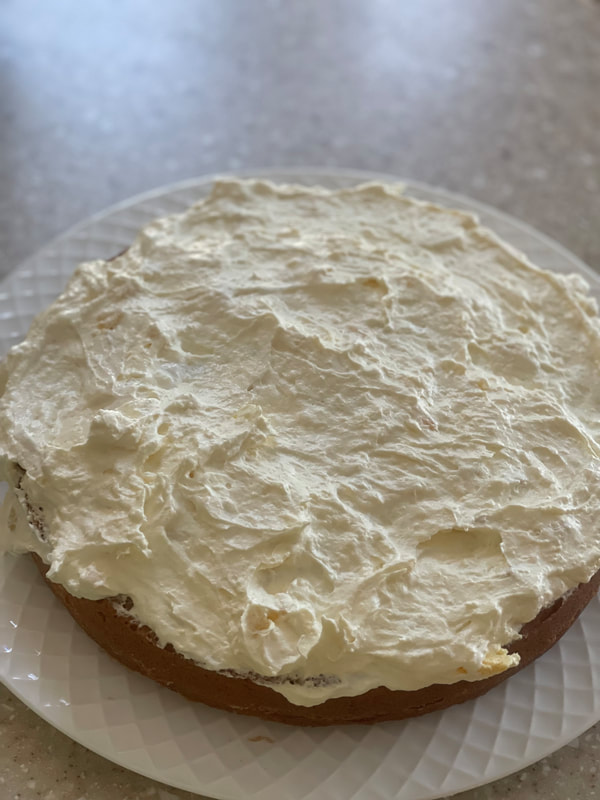
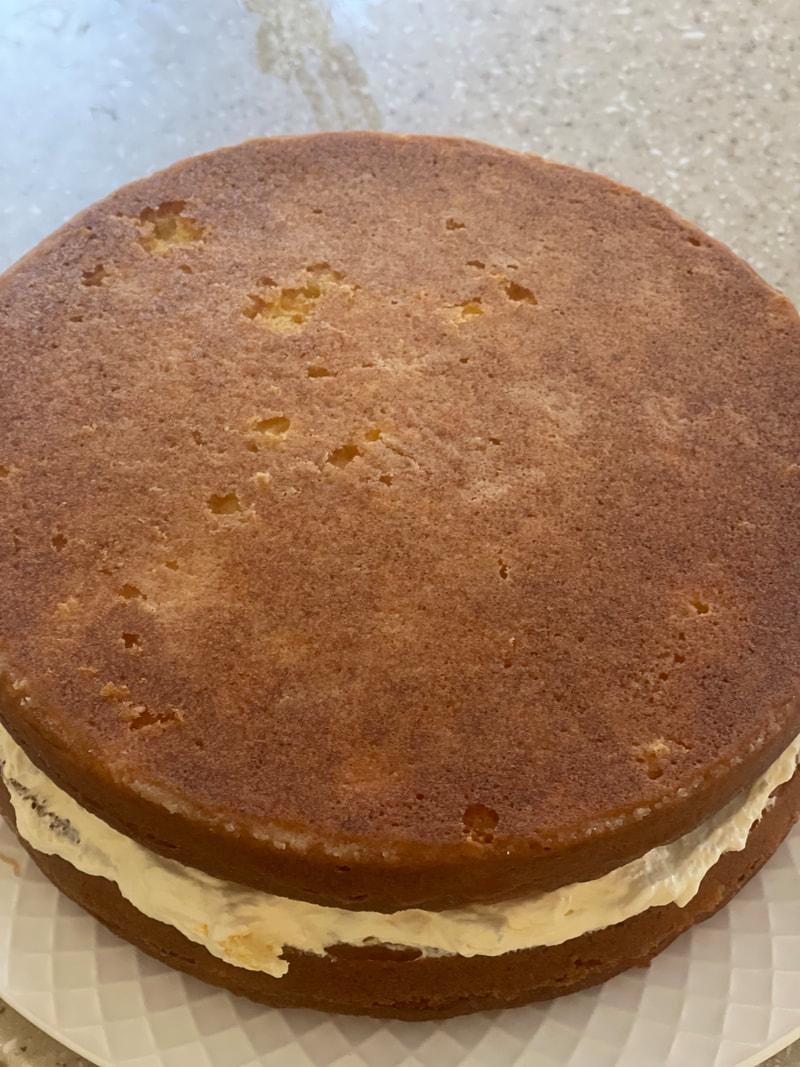
 Pea Pickin' Cake works well as an after-dinner dessert. It's light. Not too sweet. The perfect ending to a long day at the office or in the fields...pickin' peas. Making my way to baking all of Grandma's recipes is one of the sweetest ways to honor her memory. My Aunt Marge said Grandma would be so happy that I enjoyed her cooking. It really was fabulous. The memories of her kitchen are all happy ones. I asked my mom why Grandma called this a Pea Pickin' Cake. She didn't have the answer. Mom said Grandma made so many cakes she couldn't keep up. I did some internet searching and found that this cake is very southern. No doubt. It has two names: Pea Pickin' and Pig Pickin'. The Pea Pickin' Cake is more appropriate in this scenario. Quick Southern recap of the cake. The name Pig Pickin' originated from pig roasting at barbecues from years gone by. It was called a Pea Pickin' cake in honor of all those ladies who sat at their kitchen tables or on the back porch shelling peas in the summertime. The Ah-ha moment hit me. Grandma had a large vegetable garden in her backyard. The white house was small. The backyard garden was huge. That's how it appeared to me as a child. The whole bunch of kids and grandkids loved purple-hulled peas. When visiting Grandma's house in the summertime, we pitched in to help Grandma shell the peas to get to the eating process quicker. Good days. Good times. Great memories.
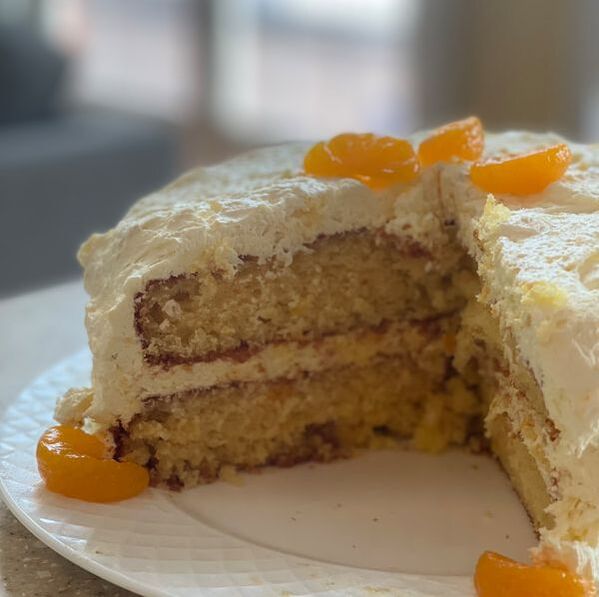
Ingredients for the cake: One box of yellow or white cake mix 15-ounce can of mandarin oranges sliced and drained 1 1/2 cups of vegetable oil Four eggs Directions: Oil and flour two round cake pans. Mix the ingredients together. Add even portions of batter to each pan. Bake at 350 degrees for 25 minutes. Let it cool down before adding the frosting. See the tip below. Ingredients for the frosting: One large tub of Cool Whip One 20-ounce can of crushed pineapple One large box of instant vanilla pudding Directions: Mix and beat together and spread over the cake. Bottom layer first. Then, the top and sides of the cake. Wrap the cake and let it sit in the refrigerator overnight. Tip: Grandma shared in her recipe that you could make up a box of jello and pour it over the cake while it's still hot, adding more moisture. The cake is already moist. I didn't do it. It's an idea, especially if you don't have time for the cake to sit in the refrigerator for 24-plus hours. The longer it's in the fridge, the more delicious. 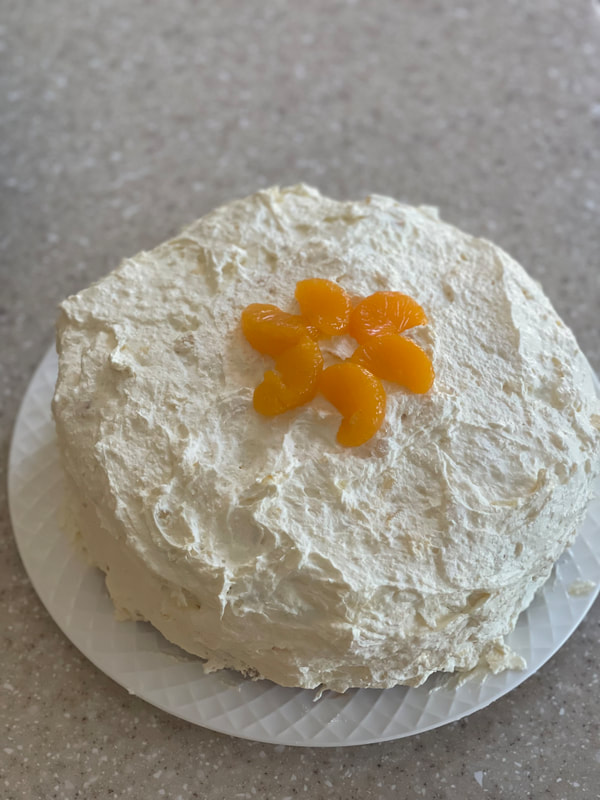 Gorgeous summertime Pea Pickin' Cake
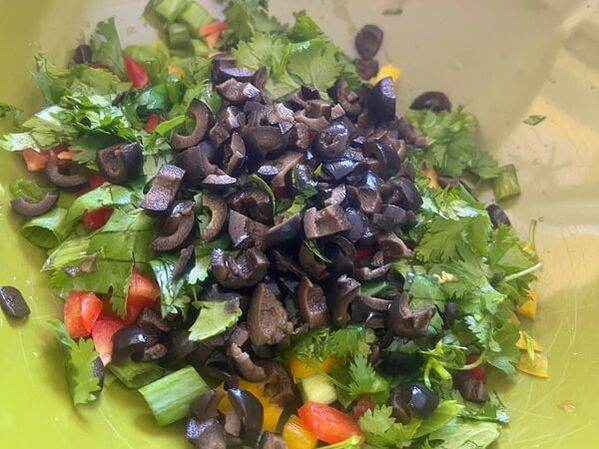
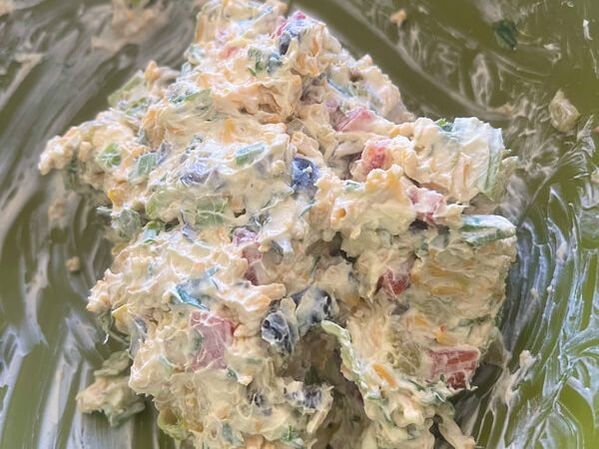
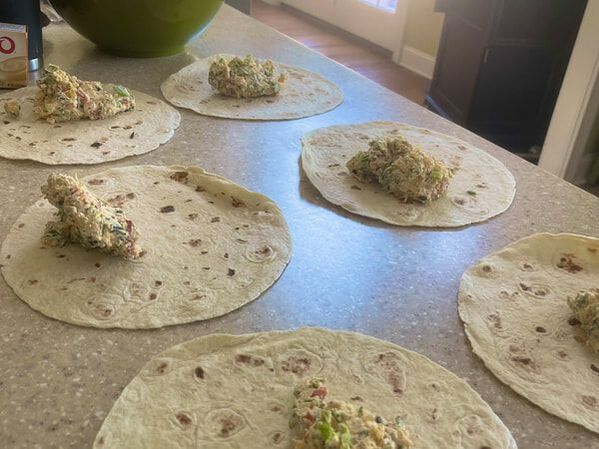
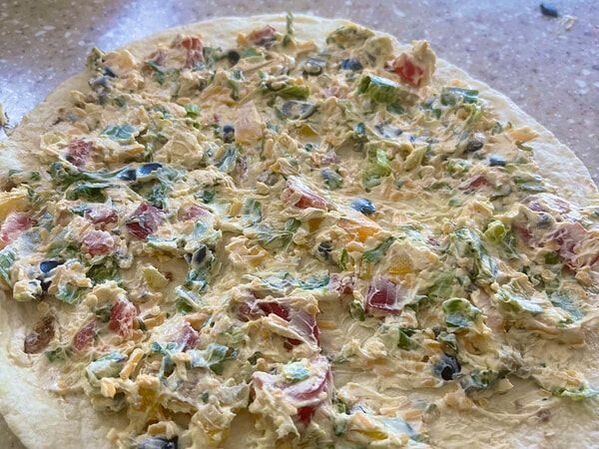
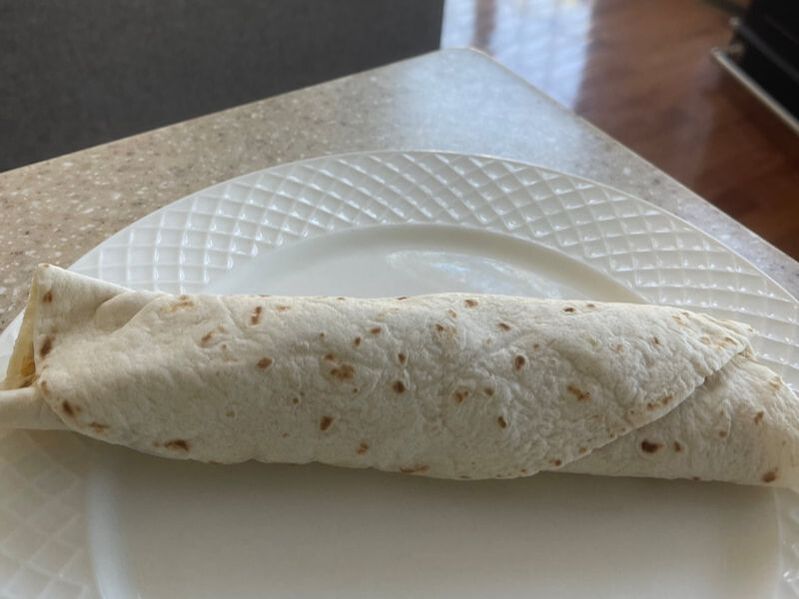
 The freshness will delight you...cream cheese, cilantro, red & yellow bell peppers, green onion, black olives, and green chilis...packing flavor in every bite. A good friend and wife to my Uncle Danny shared this recipe for cream cheese pinwheels. Actually, I added it to the WKY Community Living website a year or so ago but hadn't made it myself. After tasting the flavors and witnessing the ease of the recipe, it's on my list of favorite pool party snacks. Jody and my uncle live in Florida. Oh, how horrible it must be for them. All that sunshine, warm temps, and the ocean. Let's breathe in the air again before saying the word 'ocean'. There aren't many who want to spend all day in the kitchen if your patio view is a white, sandy beach or the deep canals of the Florida waterways. Either way...it's a little slice of paradise. The cream cheese pinwheel works for several occasions. One is a quick snack. The most time-consuming part of the recipe is waiting for the cream cheese to soften. This little problem is solved by buying soft cream cheese. For this recipe, I did buy the Philadelphia eight-ounce stick of cheese. I let it sit outside of the refrigerator for an hour before using it in the recipe. The veggies were quick and easy to chop. Rolling up the cream cheese in the tortilla was the most fun. I felt like I was making sushi. As mentioned, making this recipe for snacks is great. However, a meal could be made. Simply add bacon, ham, or any preferred deli meat to the mix and you've got a dinner. Jody suggested having your favorite salsa on hand as a dipping sauce. My husband and I really like the medium-hot Arriba Roasted Red Salsa. It's available at Midtown Market in Paducah. I'm sure it's more widely available than I realize. Check it out online. Here we go!
Ingredients:
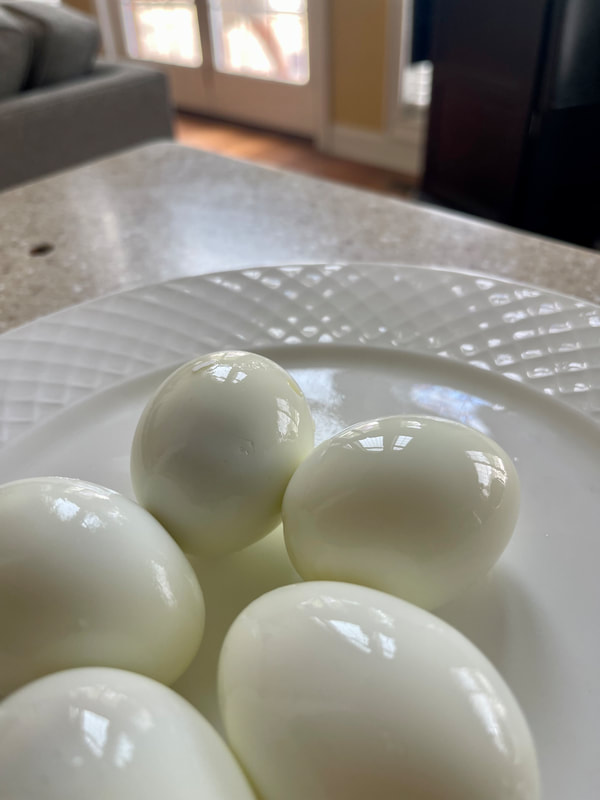
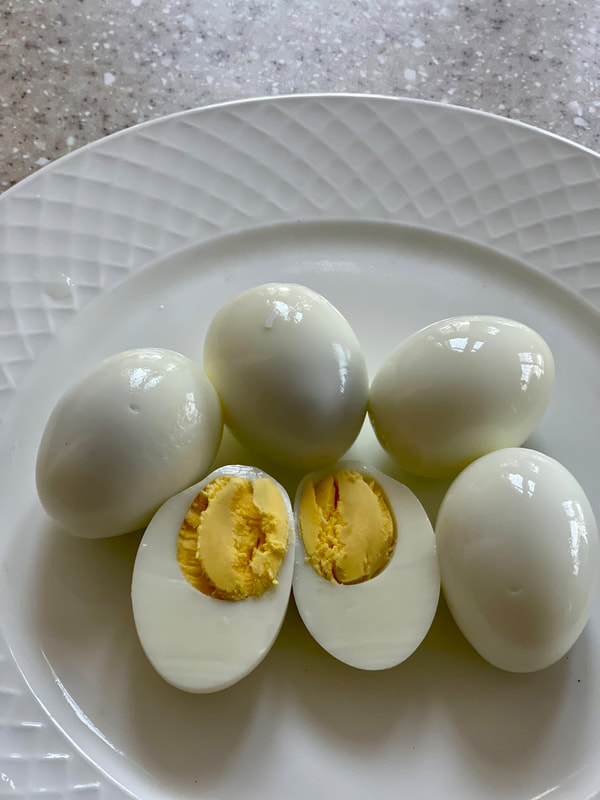
Four large tortilla-filled pinwheels. For eight tortillas, double the ingredients. Eight ounces of softened cream cheese One cup of shredded, sharp cheddar cheese Four green onions, chopped Bunch of cilantro, chopped 1/2 red pepper, chopped 1/2 yellow pepper, chopped Small can of black olives, chopped and drained Two-ounce can of green chilis Large burrito-size tortillas Directions: After chopping and waiting for the cream cheese to soften, mix all ingredients together. Spread equal portions of the mixture on each burrito-size tortilla. Roll up. Wrap in plastic wrap and chill for an hour in the refrigerator. Cut 1/2" to 3/4" slices. A pinwheel design will emerge. Eat by themselves or serve with your favorite salsa.  Grandma's Deviled Eggs are perfect for Sunday dinners, holidays, and picnics. As some of you know, I'm taking a trip down memory lane with many of my Grandma Davis' recipes. My aunt is a fabulous cook, like her momma, and kept recipe books that my grandmother wrote. All of her recipes are written in cursive. It's so special because it's in Grandma's handwriting. It's where she put pen to pad. I don't know about you, but I don't receive many handwritten anything anymore. Everything's on the computer. This recipe holds memories of Sunday dinner at my Grandma's house on Church St. in Ridgely, TN. None of Grandma's six children stayed in Ridgely; all moved away. However, all returned home at least once a year, some more often. It's the Sunday dinners that are most embedded in my mind. On the Davis side of the family, there were six sets of aunts and uncles along with 14 first cousins. The little white house had three bedrooms, a living room, a dining room, one bathroom, and a kitchen. Needless to say, the house was quite full when the family came to dinner. On to the recipe for Grandma's Deviled Eggs. Ingredients: Eight eggs boiled Two Tablespoons of mayonnaise Two or three teaspoons of lemon juice One teaspoon of prepared mustard One teaspoon of Worcestershire Sauce 1/2 teaspoon of salt 1/8 teaspoon of pepper Directions: After the eggs are boiled, cut long ways. Mix the yolks and remaining ingredients together. Blend well. Add the yolk mixture to the egg whites, two teaspoons per egg half. Grandma says, "They're good!" Tip for boiling eggs: I use the Martha Stewart method for the perfect boiled eggs. Once the eggs come to a boil, turn the stovetop off and place the lid on the pan. Let the eggs sit in the boiled water for 14 minutes. Rinse with cold water and peel. The boiled eggs are much easier to peel and the eggs are perfectly boiled. For adding the prepared yolk mixture, I place it in a plastic baggie, cut off the end, and squeeze the contents into each egg white.
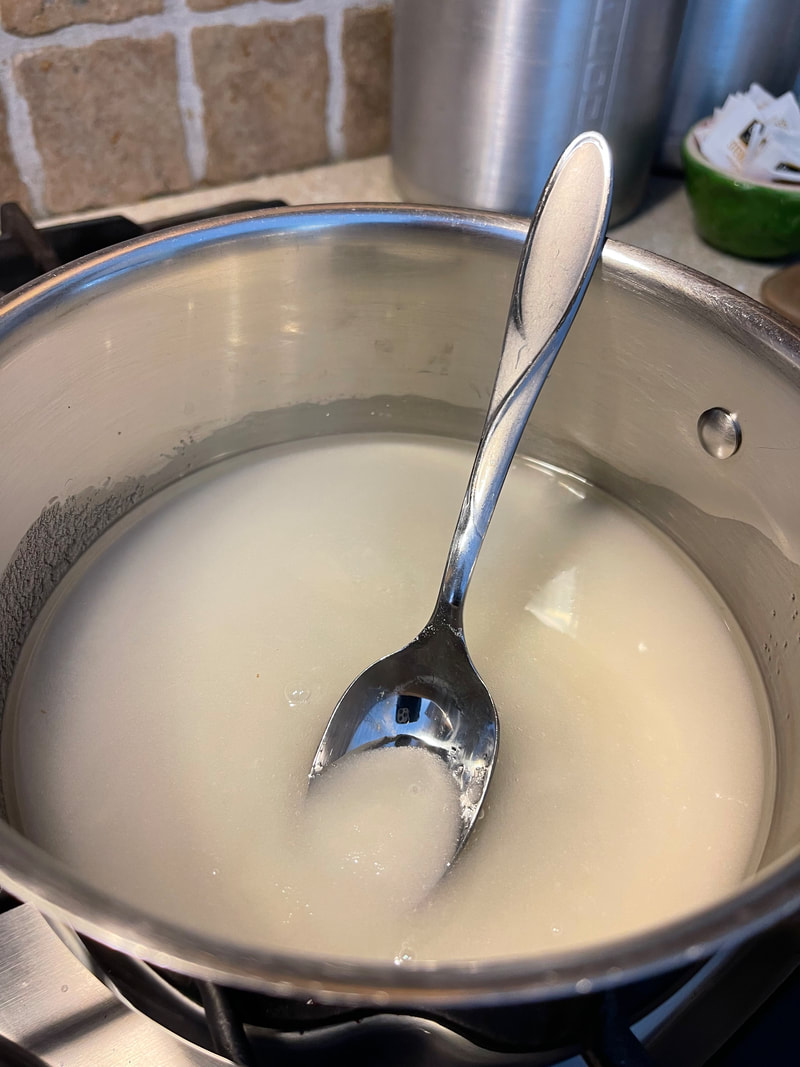
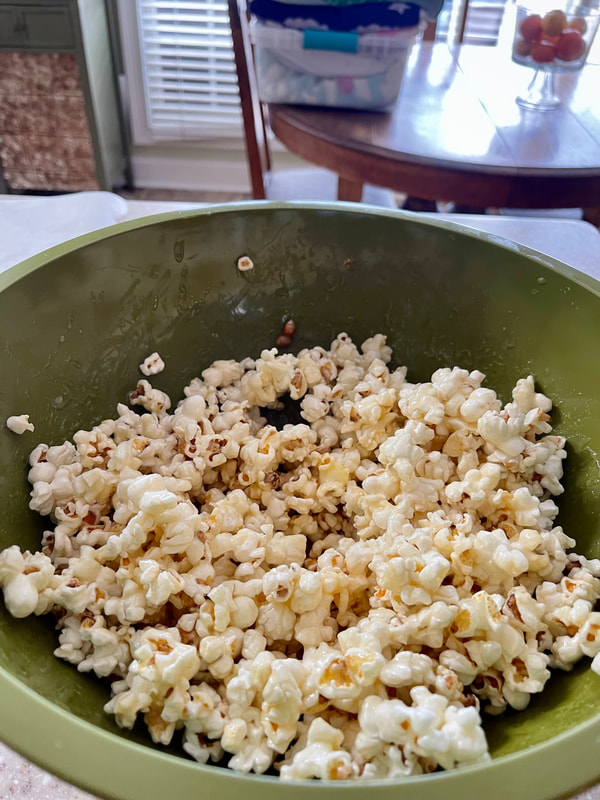
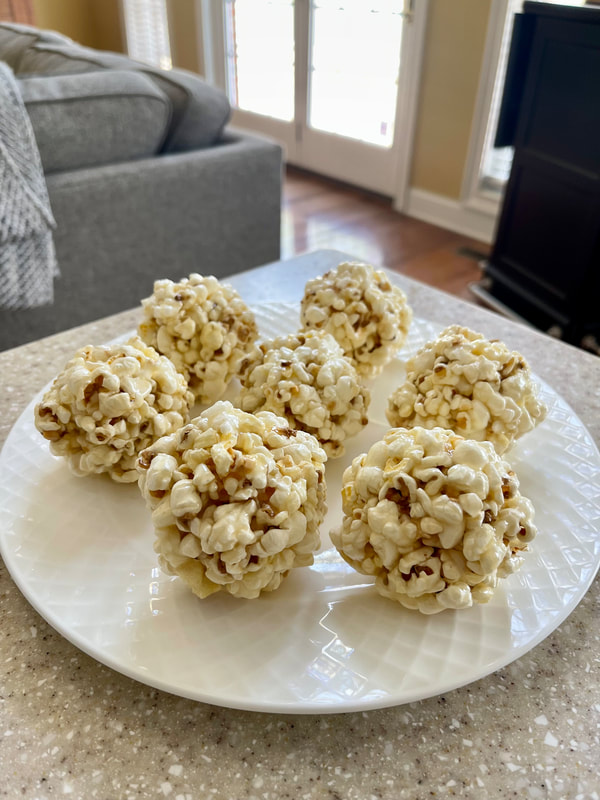
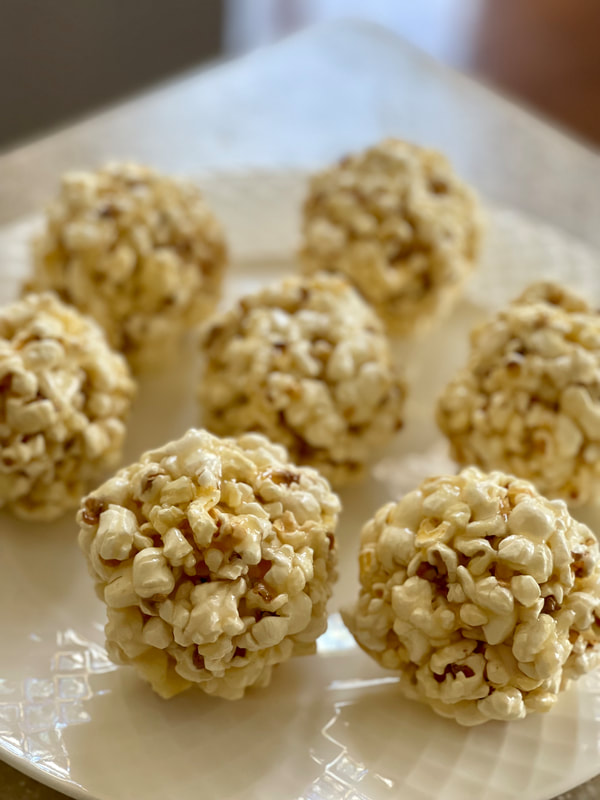 Grandma's Popcorn Balls remind me of visits to her home in Tennessee. The sweetness of the simple sugar and the saltiness of the corn is the perfect combination. Trick-or-Treating is a fun time for young and old. Orange pumpkins, children's costumes, and candied apples are all reminiscent of the season. However, nothing reminds me more of the bewitching holiday than popcorn balls. In today's world, homemade treats on All Hallows Eve are a thing of the past. People with bad intentions spoiled this component of the holiday spirit for everybody. Still, we can make these delicious delicacies for ourselves as well as for family and friends. When recreating the memory of my Grandma's kitchen, I can recall her popping the corn on the stovetop. Typically, the grandchildren entered the kitchen when the food was ready. It also applied to receiving popcorn balls. To me, the incredible thing was how they stayed fresh, chewy, and gooey. I made a recipe a few years back and didn't achieve the same effect. (You can see my post for pink popcorn balls from 2020). I love the idea of adding color. I wanted to try my Grandma's recipe just as she wrote it before tweaking it...as I'll do with all of her recipes.
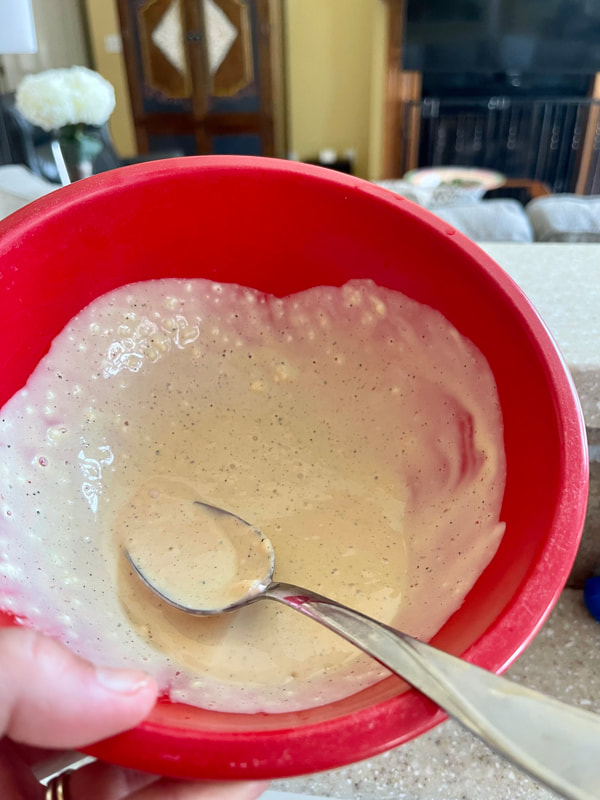
Ingredients Seven cups of popcorn (one big bag of microwaveable popcorn is equivalent) It makes about seven nice size popcorn balls One cup of granulated sugar 1/3 cup of water 1/3 cup of light corn syrup One teaspoon of sea salt One teaspoon of vanilla 1/2 stick of unsalted butter Directions Melt the water and granulated sugar together on medium heat on the stovetop. Add the remaining ingredients. Cook on medium heat. The simple sugar needs to reach the 'soft-ball' stage. (I had to look this up). The candy thermometer should read 235 degrees. If you don't have a candy thermometer, place a small amount of the syrup in cold water to see if a small ball forms. I didn't have a candy thermometer so I used a meat thermometer. Also, I tried the water test. It took me about three minutes to get to the 'soft-ball' stage... constantly stirring. Once the simple sugar is ready, drizzle over the popcorn. Stir it quickly. The simple sugar is hot. Let it cool to a lukewarm temperature. Make the popcorn balls with buttered hands. I had to wash and butter my hands a couple of times during the process. Cool on parchment paper. Store.
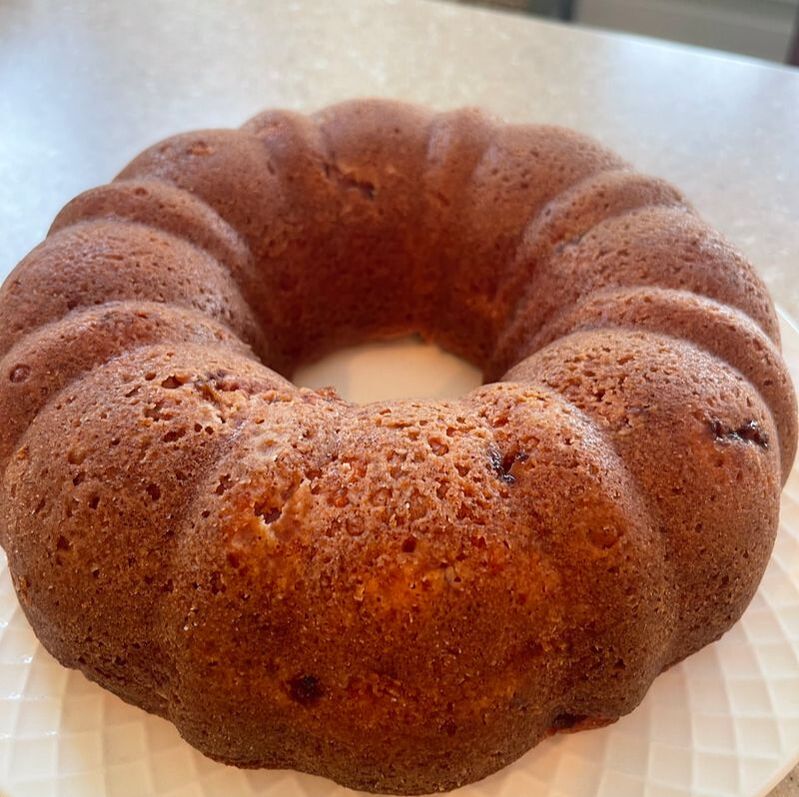
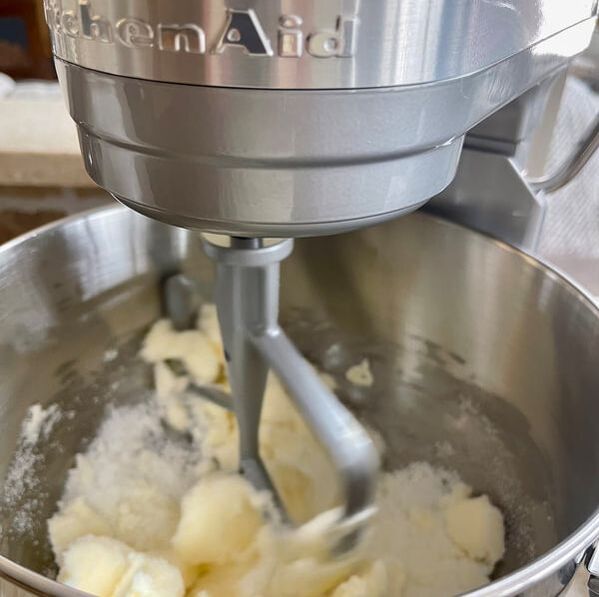
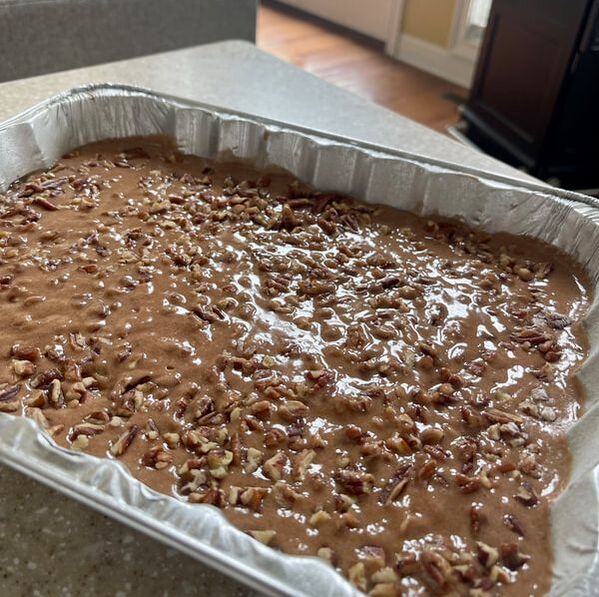
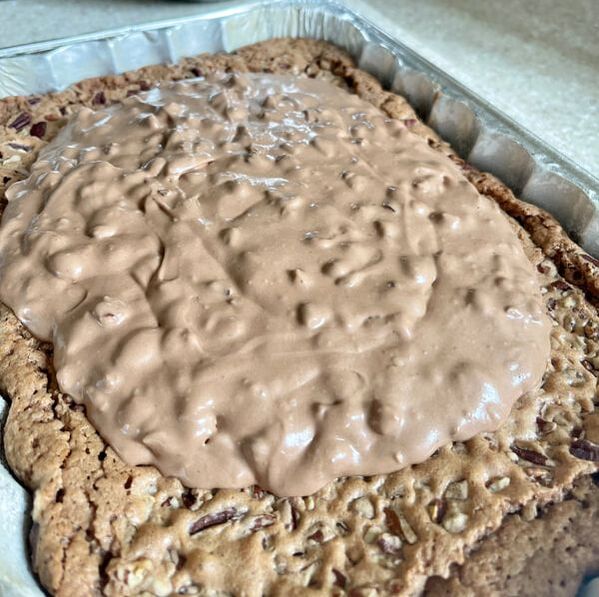
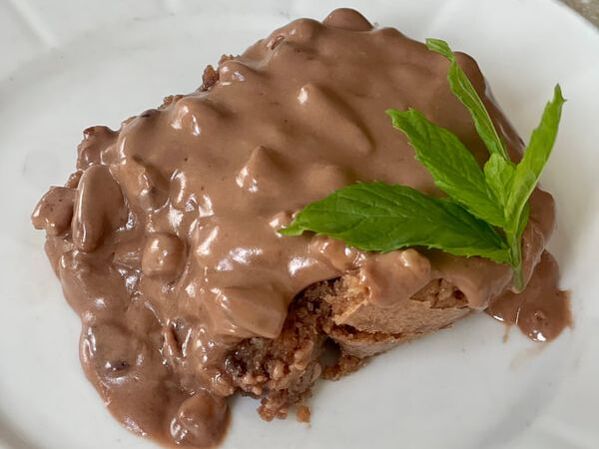 Mississippi Mud Cake is a Grandma's hug on a disappointing day. The richness of the chocolate and the hints of coconut and marshmallow cream are incredible. The pecans really keep the dessert in check. They're sweet, buttery, and fabulous. The Mississippi Mud Cake is the first of many recipes I'll publish from my Grandma's cookbook. My Aunt Marge trusted me with its contents while she was in Western Kentucky for a quick visit with my mom...her sister. I made copies of EVERY recipe in the book, even her baking tips. In this one little book, there are 70 pages of recipes. Many of the pages have two or three recipes per page. Attempting to bake all of her recipes will take years. For my first Grandma recipe, I used my new KitchenAid mixer. I'm almost 60 years old. Yep. And I've had the same egg beater mixer for nearly 40 years. Can you believe it still works? Sometimes it overheats. It hasn't burst into flames yet. It's all good. You'll need to check out Pinterest. The WKY Community Living's Pinterest page will feature a new board. It's called Grandma's Recipes. Readers can find recipes from decadent desserts to good old-fashioned tomato ketchup. All at the click of a button. Read on for the first very special treat from Grandma's Recipes, Mississippi Mud Cake.
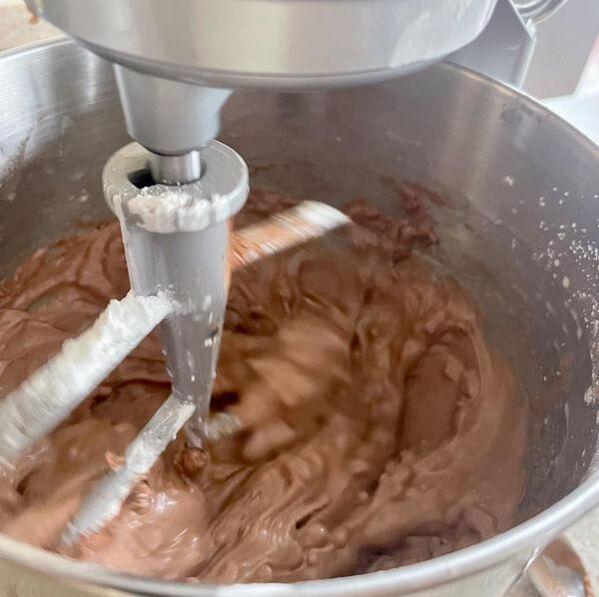
Ingredients---Directions for the cake: Two sticks of butter (room temperature) Two cups of sugar Four eggs 1 1/2 cups of flour One teaspoon of baking powder Two tablespoons of cocoa One teaspoon of vanilla 1 1/2 cups of coconut 1 1/2 cups of pecans Mix all ingredients together and bake in a 9 x 13 pan (lightly greased and floured) at 350 degrees for 35 minutes. While the cake is baking, start on the frosting/ganache. You'll want to pour it on the cake soon after it comes out of the oven---when it's nice and hot.
Ingredients---Directions for the frosting-ganache: One seven-ounce jar of marshmallow cream Four cups of powdered sugar Three tablespoons of cocoa 1 1/2 sticks of butter (room temperature) 1/2 cup of evaporated milk One cup of pecans Mix together. Pour over the cake while hot. Let the cake cool. Cut into squares and serve. 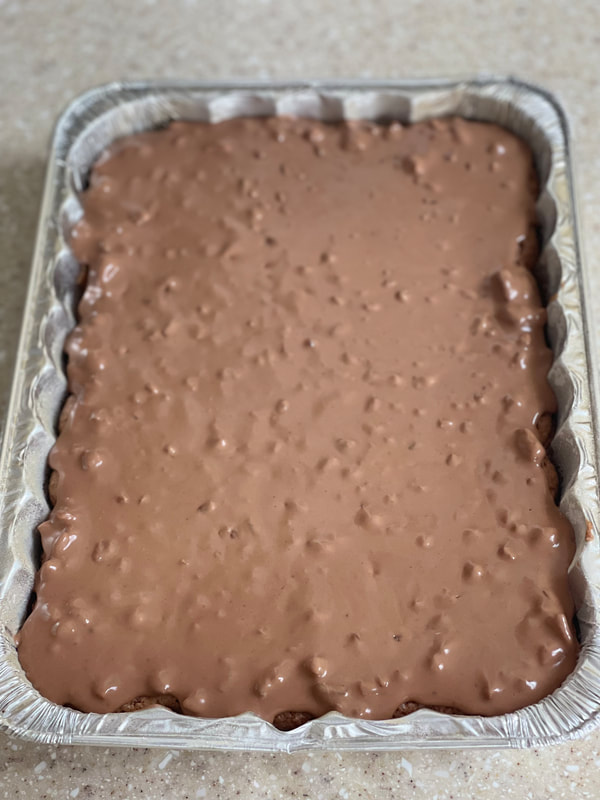 The Mississippi Mud Cake is a rich, chocolate cake with pecans, coconut, marshmallow cream, and other delicious flavors. It's to die for.
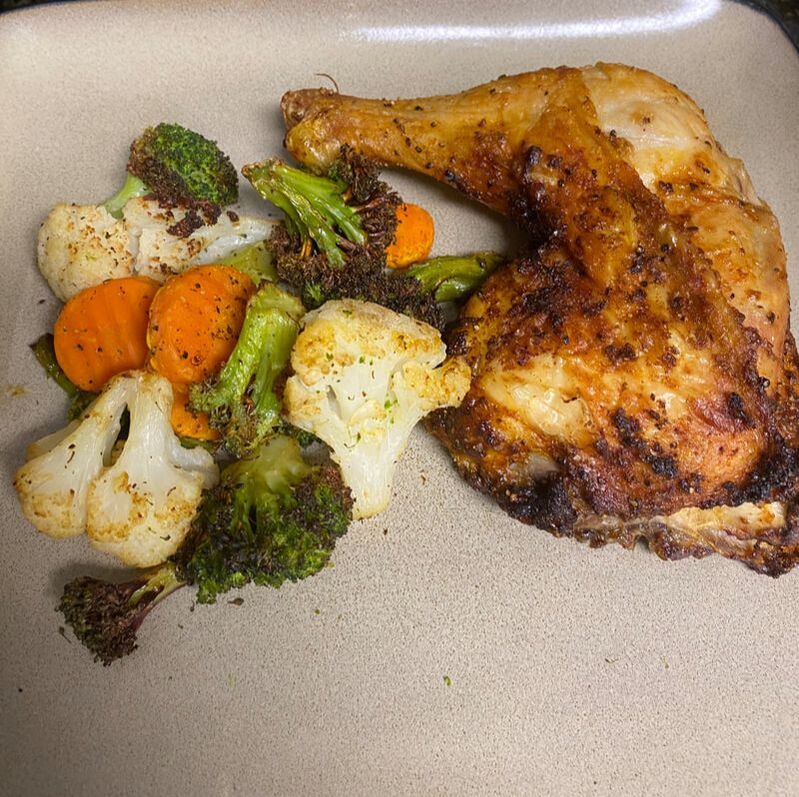 The secret is in the rub. Or maybe it's in the crispy skin achieved by using an air fryer. The air fryer group is at it again. Creating delicious recipes in the blink of an eye. It's that fast. Air fryer cooking has simplified weekday dinners. If you're a busy person or simply don't want to spend much time in the kitchen, you've got to get an air fryer. The air fryer group started during the pandemic. Everybody was looking for things to do. I don't have to tell you about it. We all lived it. The air frying sensation started around this time. I did some googling and found a great article in The New York Times about the air frying boom. A quick recap: The first prototype was introduced in 2010 at an electronics fair in Berlin. After this, all the major companies started producing air fryers. In 2017 is when the 'boom' happened. By 2020, air fryers were in 36% of American homes...during the pandemic. Back to the crispy, flavorful chicken quarters created by the air fryer. Simply delicious. Phenomenally good. Perfect, quick meal. Let's get to the recipe. Ingredients: A chicken quarter per diner...this recipe is for two chicken quarters. I would purchase medium to small quarters so you may fry two at a time. Cook time is about 25 minutes. Pat your chicken dry. Make sure excess skin and fat are off the chicken. Rub a little EVOO on the chicken. Mix together the seasoning before applying a rub. Seasoning: A teaspoon each of garlic powder, onion powder, oregano, and paprika 1/2 teaspoon of mustard powder and sage 1/4 teaspoon of salt and pepper Rub all the goodness on each chicken quarter Fry at 380 degrees for 25 minutes. Stick a thermometer in the chicken between the thigh and the leg. It should read 165 degrees. If not, fry again for another few minutes. After taking the chicken out of the fryer, let it rest. You can wrap it in aluminum foil to keep all the juiciness inside the chicken. Wash the fryer and cook the veggies for 7-10 minutes. Go ahead and melt some garlic butter to toss the veggies in (I like to melt Chef Shamy Garlic Butter). Allow them to just turn golden brown around the edges. No need for salt and pepper. If you want to roast the veggies in the oven at the same time as air frying chicken...roast at 400 degrees for 15-20 minutes. 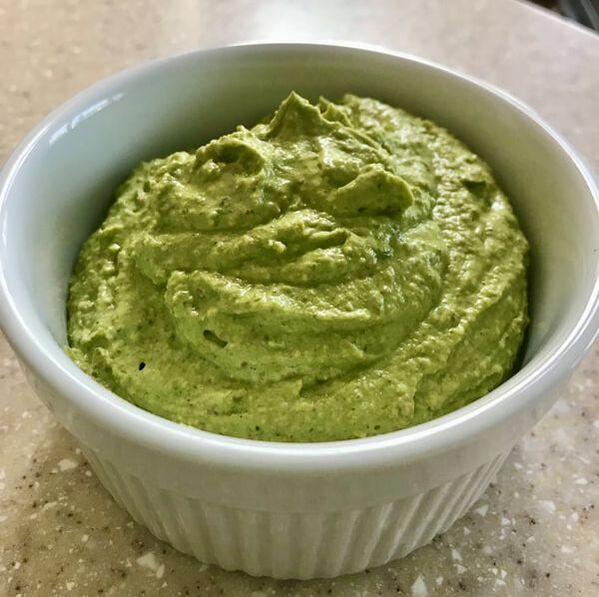 Swapping pine nuts for pistachios is the best substitution ever. This nutty flavor doesn't overpower and it's simply delicious.
The world is better with herbs. Gardening with flowers, vegetables, and fruits takes patience. With herbs, it's free and wild. It doesn't require a lot of finesse. Stick them in a pot. Water. Sunshine. And you have a beautiful, aromatic garden.
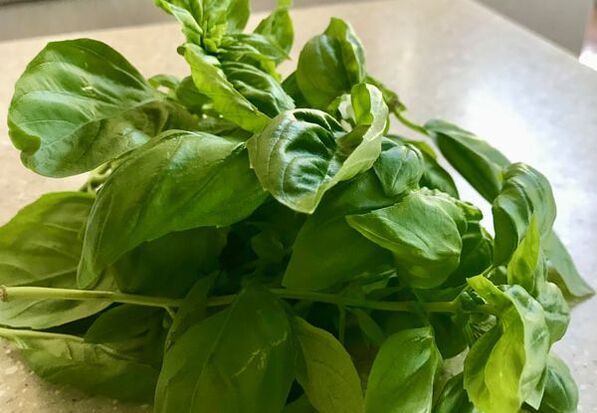
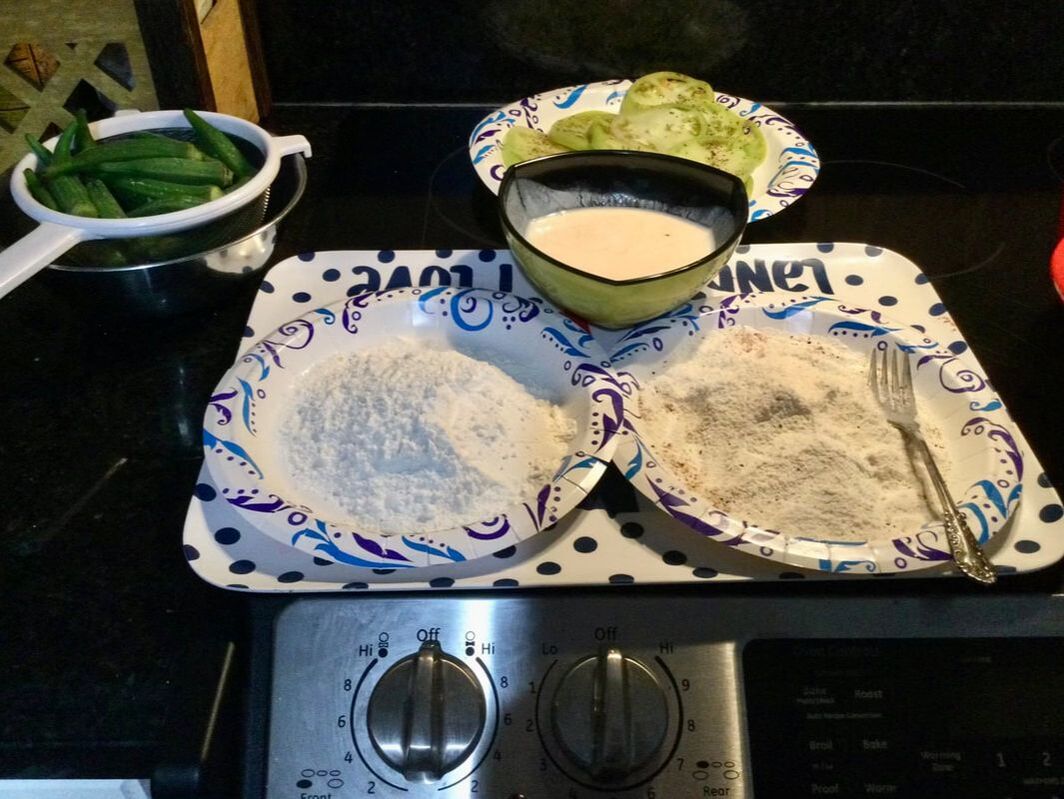
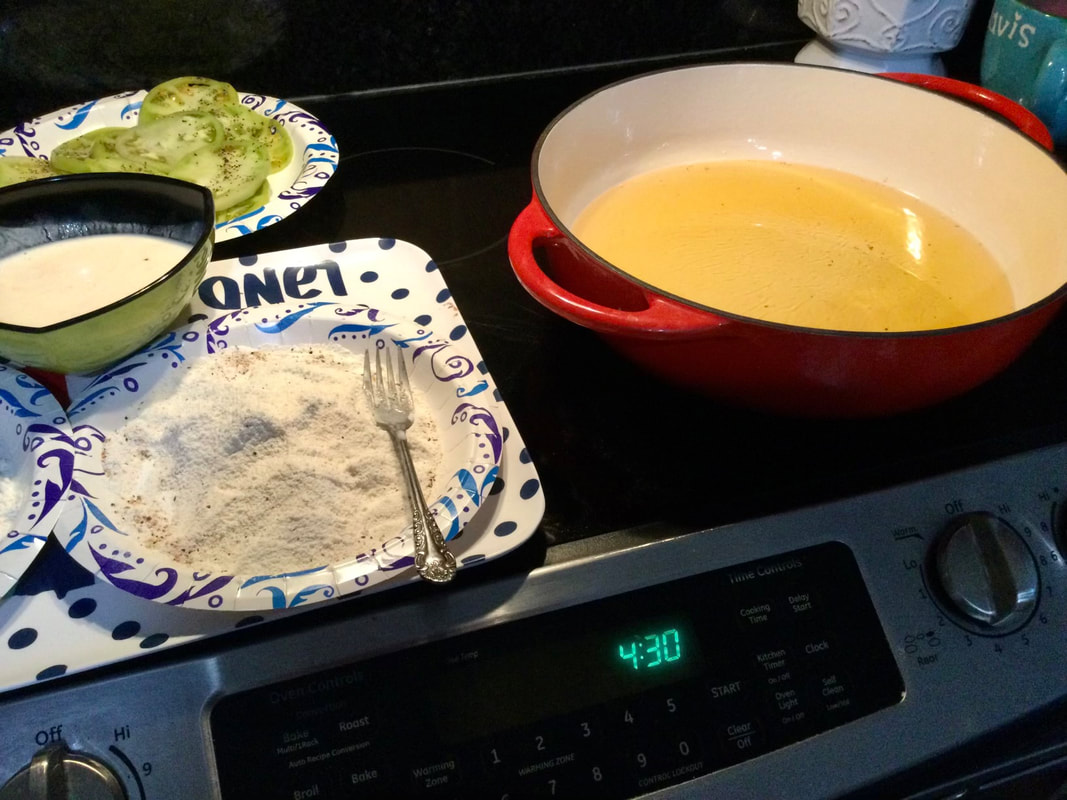
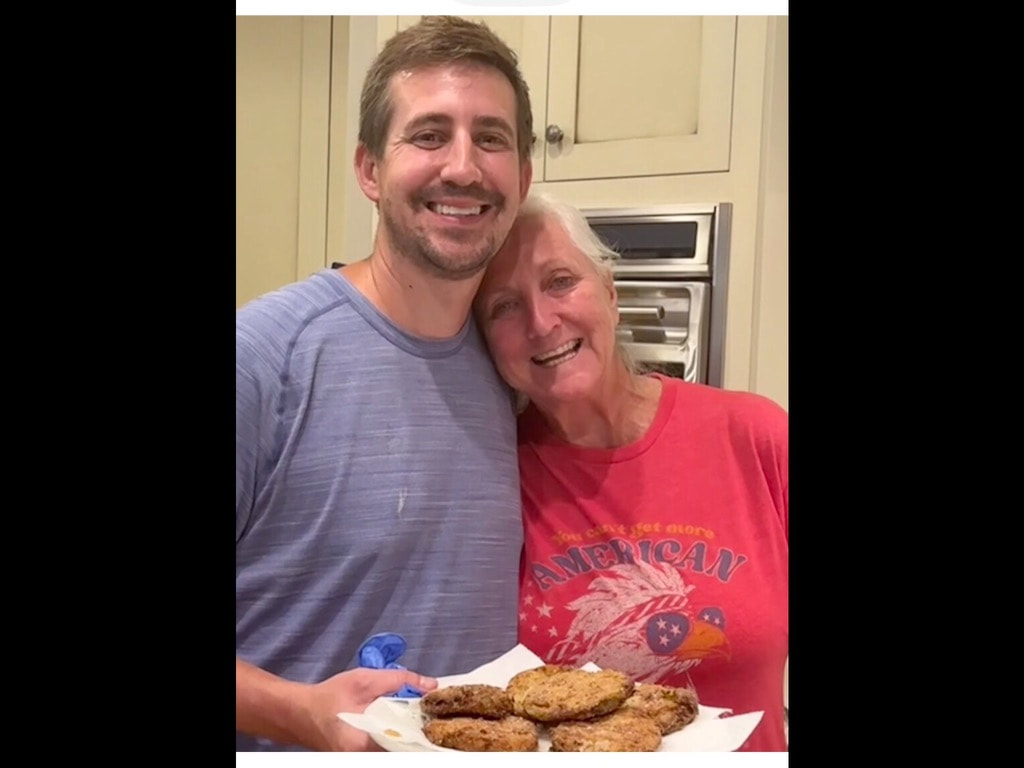
If you live in the suburbs or the city, there's not much space for gardening. It's not like living on a farm. Ingenuity and pre-planning go a long way. How many pots do I need? Does size matter? What's the best potting soil? Where's the best place to grow them? So many questions in order to create the perfect outcome. I will share my thoughts... Each herb needs its own pot. In order for plants to reach maximum capacity, buy them the space. Size does matter. Read on the plant label information pertaining to width and height. Plan accordingly. Buying cheap potting soil will only bring fungus and unwanted vegetation to your potted herbs. Buy the good stuff. Miracle Grow is always a great choice. If you can grow your herbs on the lawn, do so. Create a potted garden on your lawn or make a small herb garden. If you're growing herbs in pots and they grow deep roots, let the plants take root in the soil. They grow like crazy. Extra nutrients and water. The best thing about growing herbs, other than the aroma, is eating herbs. They are a fantastic complement to many summer dishes. Herbs are the star of the show when making pesto. Let's get to the recipe, shall we? Ingredients: Cup of Pistachios (lightly-salted) 1 1/2 cups of freshly-picked basil A whole head of garlic (clip the bottom of the head) 1 1/4 cup of EVOO Three lemons (juiced) 3/4 cup of Parmesan cheese Pinch of red pepper flakes (Grind if you can) Salt and Pepper to taste A Tsp. or two of water if needed Directions: Roast garlic in aluminum foil whole. Rub a T. of EVOO on the garlic, sprinkle with sea salt, and wrap in aluminum foil. Roast at 400 degrees for 10 minutes. Once out of the oven, let it cool. To your food processor or blender, add the remaining ingredients. Mix. If the mix is too thick, add the water. Remove garlic from the skin. Add to the mixer. Pulse or mix to incorporate. Taste. Add more of something for your taste buds. Serve. It will keep in the fridge for days or it freezes beautifully. 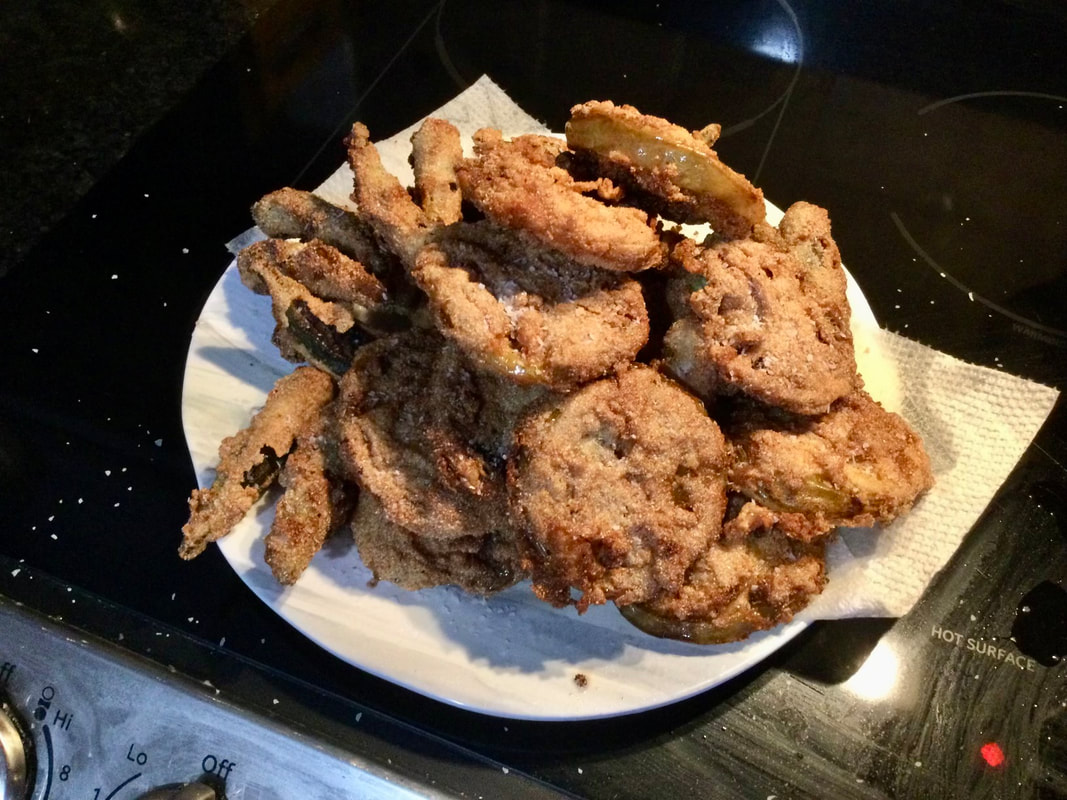 Hear the sizzle as fried green tomatoes cook until crispy and golden brown. All the Southern goodness of buttermilk, flour, cornmeal, and other seasonings. Marge's fried green tomatoes are so Southern and so good. Requests for all of her recipes are in much demand on Pinterest, WKY Community Living's website, and by our large family. Even her sweet son, Dr. Bo, wanted the recipe after Marge's recent visit to southeast Tennessee. Do you ever wonder when is the right time to pick green tomatoes? I've often asked myself this question. The answer is simple...whenever you want (or so they say). With that in mind, other Southerners have offered their expertise and opinions on the optimal time to pick green tomatoes for frying. Don't pick green tomatoes when they're extremely firm. If you pick them while they're super green, they may lack flavor. Green tomatoes are tangy but not puckered sour. Take a look at the bottom of the tomato. If you see streaks in two different shades of green jetting out from the location of the old bloom, it may be time to pick tomatoes for frying. If the tomato is starting to blush, this could indicate it's time to pick the tomato. If the tomato starts to turn soft, pick it. Honestly, your gut will tell you when it's the right time to pick the tomato. Too many options, don't you think? I'm sure the recipe is the next question readers want the answer to. Without further adieu, here it is. Ingredients: Four or five medium-sized green tomatoes Cup of flour Cup of buttermilk Cup of cornmeal tsp. garlic powder 1/2 tsp. Cajun seasoning Salt and Pepper to taste Peanut oil for frying Dash of hot sauce Directions: Cut tomatoes into 1/4-inch thick slices. Salt and pepper and leave on a plate to drain for 30 minutes. Have your separate bowls of buttermilk and flour ready for the tomatoes (add a dash of hot sauce to the buttermilk if you like some heat). The cornmeal is in a separate bowl as well. However, add the garlic powder, Cajun seasoning, and more salt and pepper to the cornmeal bowl. Toss it around to mix. Heat the peanut oil in a Dutch oven or deep skillet until hot. It should sizzle. Dip each slice of tomato in the flour, shake it, then buttermilk, and finally, the cornmeal bowl with the seasoning. Coat both sides of the tomato. Place each slice in the hot oil. It should fry for two to three minutes on each side. It needs to turn golden brown. After frying on both sides, have a paper towel handy and let the fried tomatoes drain. You can use the same process with whole okra pods. The only difference is you'll boil the pods first in water, drain them, and then fry them like the tomatoes.
As always, I appreciate my Aunt's recipes. She was taught by her mom, my grandmother. Let me tell you, my grandma was the best Southern cook ever. Marge is a close second.
 Soup season is around the corner. Sooner than later, pumpkins will be all the rage, and garden tomatoes will be something to look forward to next year. In the meantime, grab as many homegrown goodies as you can carry out the door. Farmer's markets are advertising scratch and dent sales and plans are underway for next year's harvest.
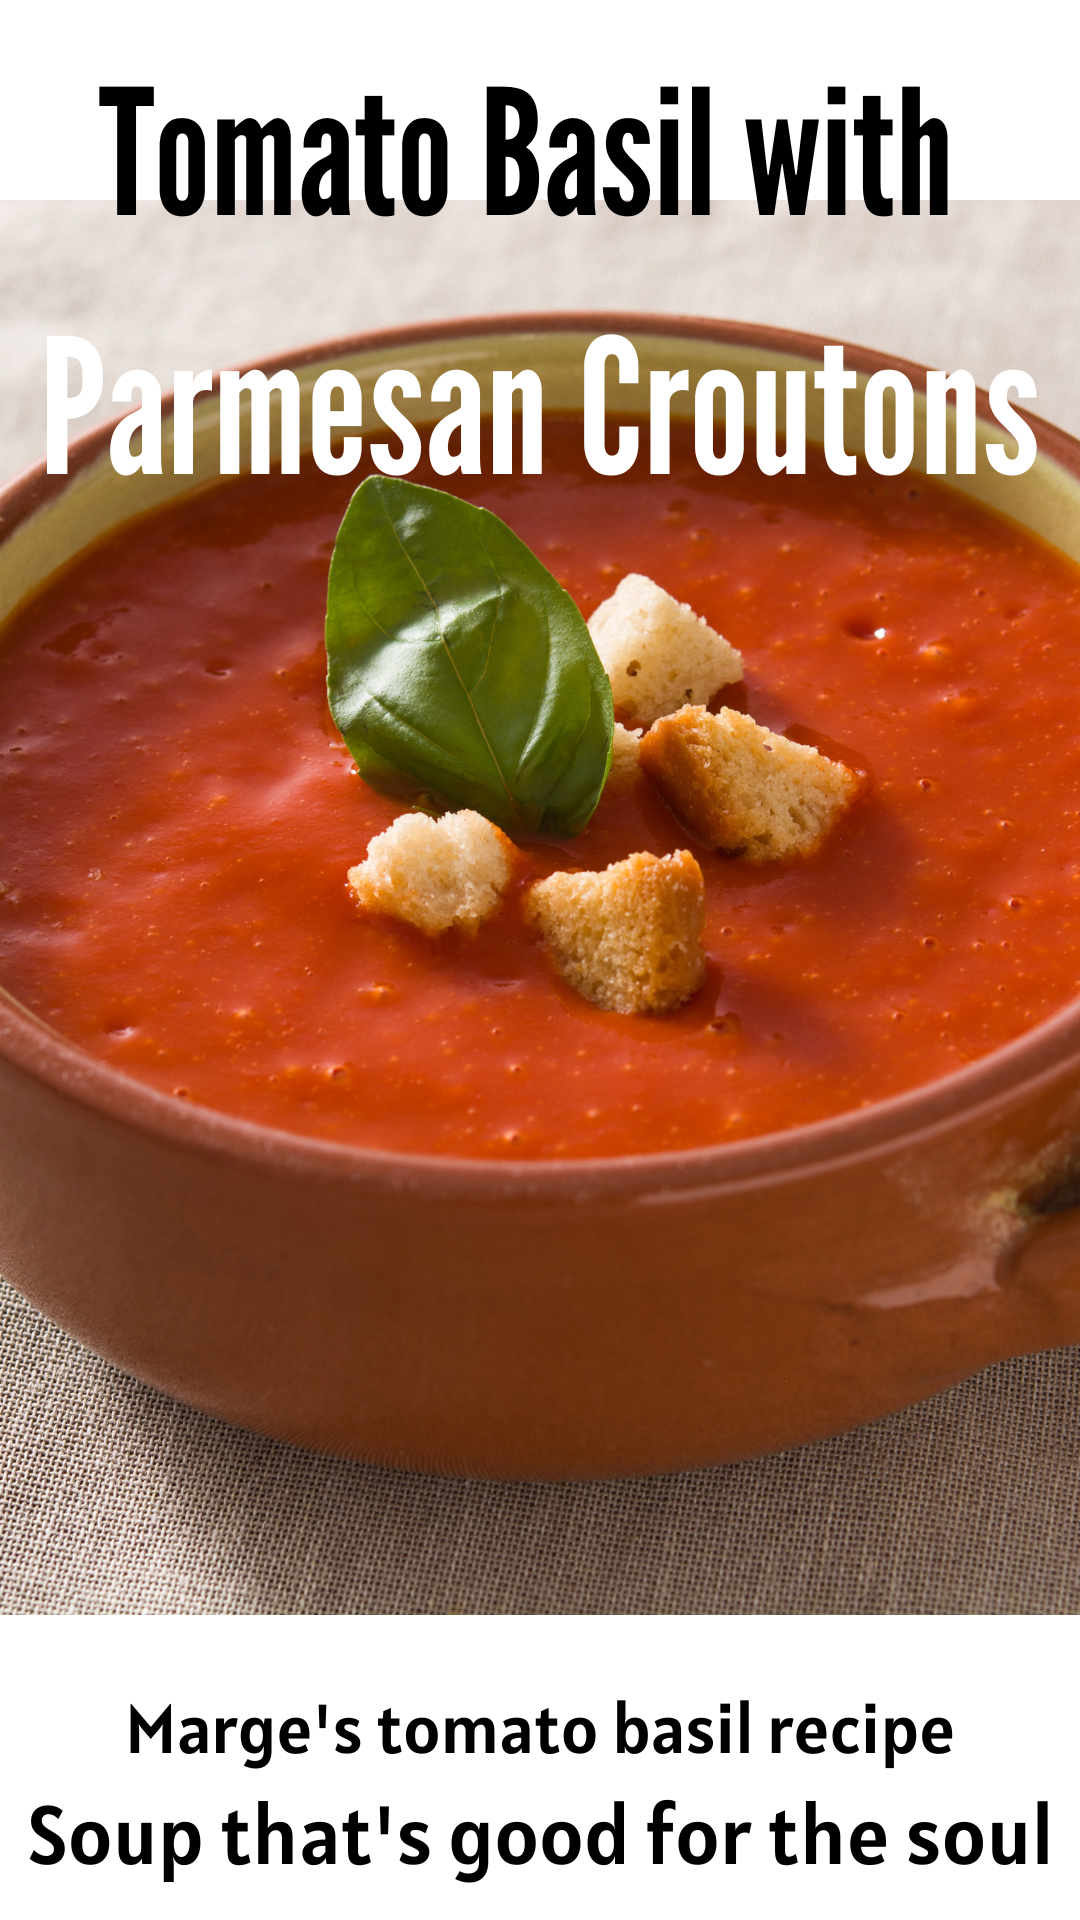
Though farmer's markets will shut down for the season, all is not lost. Big city markets like Whole Foods will carry fabulous fresh produce. If you live in a small town, hopefully, you'll be lucky enough to have a little market like Paducah's Midtown Market. Midtown supports local growers. They carry specialty items like gluten-free products. One of the best things about the market is the deli. Guess what, the deli has homemade tomato basil soup every day! If you're interested in the little market's back story...Midtown Market was formerly Myrick's grocery store. Myrick's was one of the last true 'mom-and-pop' stores in the city. The store was managed by Lester and Charles Myrick. Lester was Charles' uncle and the two ran the store together, side-by-side, for 53 years. This reminds me, Myrick's is a featured business in a book I'm reading by local author Tracey Buchanan, Toward the Corner of Mercy and Piece. If you haven't ordered a copy of this funny, quirky book, I'd recommend it. The character, Minerva Place is a hoot. Tomato basil soup is a great recipe to include in your arsenal of good soup recipes. Thanks to my Aunt Marge for sharing. Ingredients: 2 T. olive oil One purple onion (diced) Three cloves of garlic (minced) 28-ounce can of crushed tomatoes Four cups of chicken stock Small can of tomato paste Salt and pepper T. of Cavendars Greek seasoning 3/4 cup of heavy cream Handful of chopped fresh basil (dried will work too) 1/4 cup of Parmesan Cheese Directions: Heat the oil in a Dutch oven. Add the onion and a dash of kosher salt. Saute until soft. Add the garlic. Simmer until you smell the aroma. Stir in the tomatoes, chicken broth, dash or two of pepper, and Greek seasoning. Bring to a boil. Simmer for 15 minutes. Add the tomato paste. Puree with an emulsion blender or mixer. Add the heavy cream and basil. Simmer on low for a few minutes. Serve with sprinkled Parmesan cheese on top. Recipe for Parmesan Croutons Ingredients: Serves Six Six pieces of bread (use what you have on hand) Cut into square chunks Toss in 3 T. EVOO, tsp. garlic powder, 1/2 tsp. dried basil, 1/4 cup Parmesan Cheese Either bake, sauté on the stovetop, or air fry. You're looking for a golden brown color for the right amount of crunch. Top your soup with these delicious crunchy morsels. |
Written byLiz Latta Archives
April 2024
Categories
All
|


 RSS Feed